How to Set Up a Butcher Station at Home: Complete Workspace Guide
How to Set Up a Butcher Station at Home: Complete Workspace Guide
You can own the sharpest knives and the best bone saw on the market, but if your workspace is a cluttered kitchen counter with bad lighting and no drainage plan, you are going to struggle. The butcher station — your dedicated meat-processing workspace — is the foundation everything else sits on.
After years of processing deer, hogs, and beef halves in garages, basements, and purpose-built rooms, I have learned that a thoughtful workspace layout cuts processing time in half and makes cleanup almost painless. This guide walks you through every decision, from choosing the right table to designing your workflow zones.
Choosing Your Space
The first decision is where your butcher station will live. Each option has tradeoffs:
Garage or Workshop
This is the most popular choice for home processors, and for good reason:
- Easy to clean with a hose or pressure washer
- Concrete floors handle blood and liquids without damage
- Proximity to chest freezers and refrigerators
- Ample space for large carcass work
- Temperature control during cooler months (ideal for processing)
Key concern: Garages often lack climate control in summer. Meat quality degrades quickly above 40°F, so plan your sessions for cool weather or add a window AC unit for warm-season processing.
Basement
Basements offer naturally cool temperatures and are protected from weather, but drainage can be an issue. If your basement has a floor drain, it is an excellent choice. Without one, plan for bucket-based waste management and extra towels.
Outdoor Setup
A covered patio or carport works well in temperate weather. Benefits include unlimited ventilation and easy hose-down cleanup. Drawbacks: insects, weather dependence, and limited electrical access.
Kitchen
For smaller jobs — breaking down primals into retail cuts, portioning steaks, or deboning a few chickens — a well-organized kitchen counter works fine. But for whole-animal processing, the kitchen is too cramped, too warm, and too hard to sanitize afterward.
The Butcher Table: Your Central Work Surface
The table is the heart of your butcher station. Get this right and everything else falls into place.
Table Material
Stainless steel is the gold standard. Commercial stainless prep tables are NSF-certified, non-porous, corrosion-resistant, and easy to sanitize. They are what every commercial butcher shop and USDA-inspected facility uses.
- Budget ($120-200): Restaurant supply stainless table, 24 x 48 inches. Brands like Gridmann or ROCKPOINT sell direct on Amazon.
- Mid-range ($200-400): 30 x 72 inch commercial table with undershelf. Regency, Advance Tabco.
- Premium ($400-800): Heavy-gauge stainless with backsplash, adjustable feet, and drawer storage. John Boos, Eagle Group.
Minimum size: 24 x 48 inches for primal breakdown. For whole-animal work, 30 x 72 inches gives you room to spread out without pieces falling off the edge.
Table Height
This detail is critical and often overlooked. A table at the wrong height causes back pain, shoulder fatigue, and poor knife control.
- Standard recommendation: 34 to 36 inches — roughly the height where your palms rest flat on the surface with a slight bend in your elbows
- For heavy pressing work (leaning into cuts, splitting): slightly lower, 32-34 inches
- For detailed knife work (deboning, trimming): slightly higher, 36-38 inches
If you are between heights, go lower. You can always place your cutting board on a riser, but you cannot easily lower a table.
Alternatives to Stainless Steel
If budget is tight:
- Folding banquet tables ($50-80): Cover with a fitted plastic tablecloth for sanitation. Disposable and cheap, but wobble under pressure.
- Plywood on sawhorses ($30-50): Wrap the plywood surface in heavy-duty plastic sheeting. Surprisingly stable and easy to customize to your height.
- Old kitchen table: Functional but hard to sanitize in crevices. Cover with a disposable plastic sheet for each session.
Workflow Zone Design
Professional butcher shops are designed around workflow zones that prevent cross-contamination and minimize wasted movement. Apply the same thinking to your home station:
Zone 1: Receiving and Staging
This is where raw carcasses, primals, or sub-primals arrive and wait to be processed. Keep this area:
- Separate from your active cutting area
- Cool (near a cooler, fridge, or in the shade)
- Clean and covered to prevent contamination
A second small table, a clean cooler with ice, or a dedicated shelf on your main table works well.
Zone 2: Primary Breakdown
This is your main cutting area — the largest section of your table. This is where you separate primals, debone, and do the heavy knife work.
- Place your large HDPE cutting board here
- Keep your breaking knife and bone saw within arm's reach
- Position a waste bin directly below the table edge for trim and scraps
Zone 3: Trimming and Portioning
After primary breakdown, cuts move to this area for final trimming, portioning into retail sizes, and quality inspection. Use a separate cutting board (or flip/wash your primary board) to prevent contamination from bone dust and raw surfaces.
Zone 4: Packaging
The final station where finished cuts get vacuum sealed, wrapped, or bagged for the freezer. Keep this area dry and clean:
- Vacuum sealer on a stable surface
- Pre-cut bags or bag rolls ready to go
- Labels and markers for dating and identifying cuts
- A kitchen scale for portioning by weight
Flow direction: Design your zones so meat moves in one direction — from raw to finished — without backtracking. This is the same principle used in commercial food processing and dramatically reduces cross-contamination risk.
Lighting
Good lighting is non-negotiable. You need to see the grain of the meat, identify silverskin, spot connective tissue planes, and avoid cutting yourself.
What You Need
- Overhead LED shop lights: 4-foot LED fixtures ($20-40 each) mounted directly above your work surface. Aim for 5000K color temperature (daylight) for accurate color rendering — you need to see the true color of the meat to assess freshness and quality.
- Brightness: At least 4,000 lumens directly over your cutting area. Two 4-foot LED shop lights provide roughly 8,000 lumens and eliminate shadows.
- Positioning: Mount lights 3-4 feet above your table surface. Avoid placing them directly behind you, which creates shadows over your cutting area.
Poor lighting is a safety hazard. If you are squinting to see where the bone ends and the meat begins, you are one slip away from a cut.
Floor and Drainage
Butchering is messy. Blood, fat, bone fragments, and wash water need somewhere to go.
Concrete Floors (Best)
Sealed concrete is ideal. It handles moisture, cleans with a hose, and resists staining if properly sealed. Apply a concrete sealer ($30-50 per gallon) before your first session — unsealed concrete absorbs blood and develops odors.
Floor Drain
If your space has a floor drain, use it. Direct wash water toward the drain with a squeegee after each session. If you do not have a drain, use a wet-dry vacuum ($50-80) to collect wash water.
Anti-Fatigue Mats
You will be standing for hours. Anti-fatigue mats ($20-40) with drainage holes placed in front of your work table reduce foot, knee, and back pain significantly. Choose mats designed for wet environments — restaurant-grade rubber mats with perforations allow liquids to drain through.
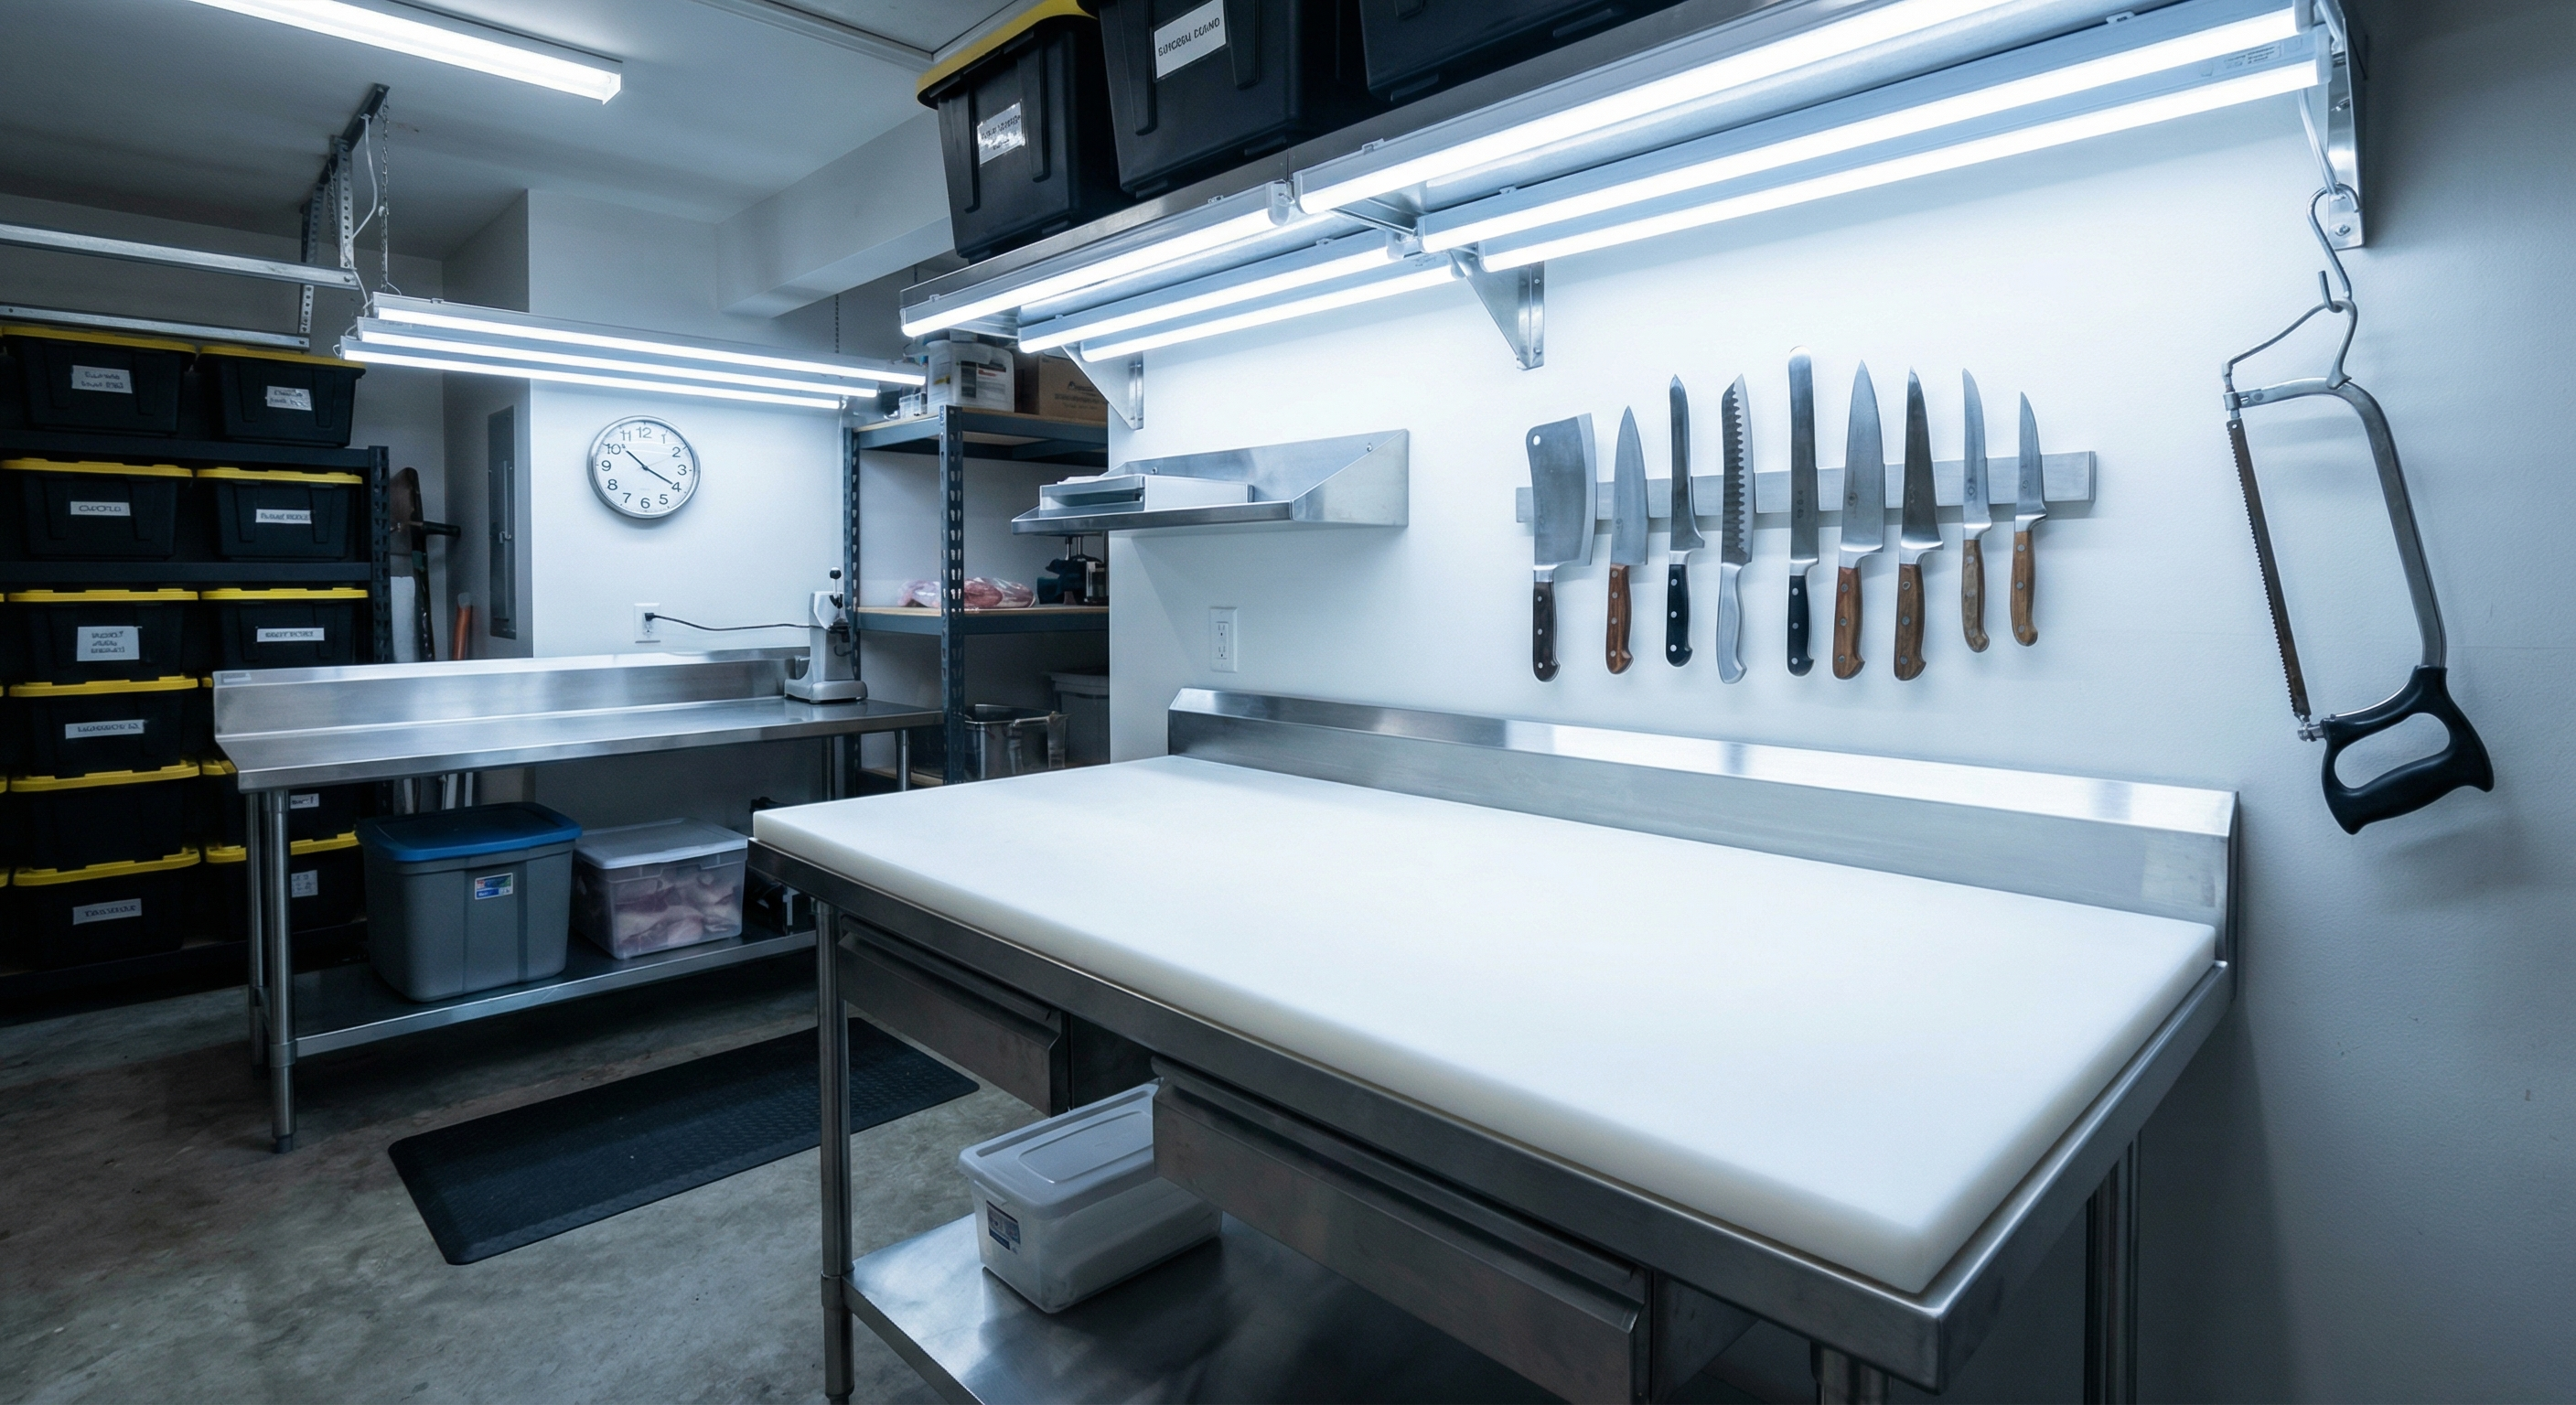
Knife and Tool Organization
Every tool should have a home within arm's reach of your cutting position.
Magnetic Knife Strip
Mount a magnetic knife strip ($15-25) on the wall directly behind or beside your table. Keeps knives visible, accessible, and protected. Much safer than leaving knives loose on the table surface where they can be knocked off or grabbed by the wrong end.
Tool Hooks
Install hooks or a pegboard for:
- Bone saw
- Honing steel
- Meat hooks
- Thermometer
- Sharpening supplies
Sanitizer Station
Keep a small bucket or spray bottle of sanitizer solution (1 tablespoon bleach per gallon of water, or quaternary ammonium sanitizer) at your station. Sanitize your knife between different cuts or animals. A pump-style dispenser mounted to the table edge keeps it within reach without cluttering the surface.
Temperature Control
Meat safety depends on keeping product below 40°F throughout processing. In a home setting, this means:
Ambient Temperature
- Ideal processing temperature: 35-50°F ambient. This is why many home processors prefer late fall and winter sessions.
- Summer processing: Add a portable AC unit or work in early morning hours when temperatures are lowest.
- Never process in direct sunlight or in rooms above 70°F — bacteria multiply rapidly in the danger zone (40-140°F).
Keep-Cold Strategy
During processing, have coolers with ice standing by. As you finish each cut, transfer it to the cooler immediately rather than letting it sit at room temperature on the table. This is especially critical for ground meat and trim, which have more surface area exposed to bacteria.
Water Access
Running water is extremely valuable at a butcher station:
- Rinsing hands between tasks
- Cleaning knives during processing
- Washing down the table and floor afterward
If your space does not have a sink, set up a large bucket of clean water with a dipper, or run a garden hose to your workspace. A utility sink ($80-150 from a hardware store) plumbed into your garage or basement is a worthwhile investment if you process regularly.
Waste Management
A whole deer generates 30-40 pounds of waste (bones, trim, fat, hide). A half hog can produce even more. Plan for it:
- Bone bin: Heavy-duty 5-gallon bucket lined with a contractor bag, positioned at table edge
- Trim bin: Separate container for usable trim (grinder material) — keep this on ice
- Fat bin: If you render tallow or lard, collect fat separately
- Waste disposal: Double-bag bones and unusable waste in contractor-grade bags. Freeze waste bags until trash day to prevent odor
Electrical Needs
Plan your electrical access for:
- Vacuum sealer (120V, standard outlet)
- Meat grinder (120V, may draw 5-8 amps on larger models)
- Band saw if applicable (120V or 220V depending on model)
- Overhead lighting
- Portable AC or fan
Run a heavy-duty extension cord or install a power strip with surge protection near your station. Avoid running grinder and vacuum sealer simultaneously on the same circuit — the combined draw can trip a 15-amp breaker.
Complete Butcher Station Setup Checklist
Use this checklist to build your station from scratch:
Essential (Start Here)
- Stainless steel or covered work table (24 x 48 minimum)
- Large HDPE cutting board (18 x 24 minimum)
- Overhead LED lighting (5000K, 4000+ lumens)
- Magnetic knife strip or knife block
- Waste bins (bone, trim, fat)
- Sanitizer spray bottle
- Anti-fatigue mat
- Paper towels and clean rags
- Coolers with ice for finished cuts
Recommended (After First Session)
- Utility sink or water access
- Vacuum sealer and bags
- Kitchen scale
- Labels and markers
- Tool hooks or pegboard
- Floor drain or wet-dry vacuum
Advanced (When You Are Serious)
- Second table for packaging zone
- Dedicated aging refrigerator
- Gambrel and hoist for hanging carcasses
- Commercial hand-wash sink
- Dedicated electrical circuit
Budget Breakdown
Here is what a complete home butcher station costs at different levels:
Starter station ($150-250): Folding table with plastic cover, two LED shop lights, HDPE cutting board, basic tool organization, buckets for waste.
Intermediate station ($400-700): Stainless steel table, mounted LED fixtures, magnetic knife strip, anti-fatigue mat, utility sink, vacuum sealer, proper waste management.
Professional home station ($1,000-2,000): Heavy-gauge stainless table with backsplash, dual-zone lighting, plumbed sink, floor drain, hanging system, dedicated refrigeration, complete tool organization.
Most home processors find the intermediate level hits the sweet spot — professional enough to work efficiently and safely, without the cost of a full commercial buildout.
Common Mistakes to Avoid
- Table too high or too low: Test your working height before committing. Process a chicken or a small primal at your proposed table height and see how your back feels after 30 minutes.
- Insufficient lighting: If you cannot clearly see the difference between fat and silverskin, add more light.
- No waste plan: Bones and trim pile up fast. Have bins ready before you start cutting.
- Skipping the sanitizer: Cross-contamination between raw surfaces and finished cuts is a real food safety risk. Keep sanitizer within arm's reach and use it.
- Working too warm: If the room is above 60°F, work in shorter sessions and keep finished cuts on ice at all times.
A well-designed butcher station transforms home meat processing from a chaotic mess into an efficient, safe, and even enjoyable operation. Start with the essentials, learn from each session, and upgrade as your needs grow. For premium beef, pork, and lamb to put your new station to work, check out The Meatery's full collection.
Frequently Asked Questions
What is the best table for a home butcher station?
A stainless steel commercial prep table is the gold standard — NSF-certified, non-porous, easy to sanitize, and built to last. A 24 x 48 inch table ($120-200) handles most home processing. For whole-animal work, step up to 30 x 72 inches. Restaurant supply stores and Amazon carry brands like Gridmann, ROCKPOINT, and Regency.
How much space do I need for a home butcher station?
For primal breakdown and portioning, a dedicated area of about 6 x 8 feet works well — enough for your main table, a side table or cooler for staging, and room to move around. For whole-animal processing with hanging, plan for at least 8 x 12 feet to accommodate a carcass, work table, and packaging area.
What height should a butcher table be?
Between 34 and 36 inches for most people — the height where your palms rest flat on the surface with a slight bend at the elbows. Go slightly lower (32-34 inches) for heavy pressing work, slightly higher (36-38 inches) for detailed knife work. Test before committing by processing a small cut at your proposed height.
How do I keep my butcher station sanitary?
Use a bleach solution (1 tablespoon per gallon of water) or quaternary ammonium sanitizer. Sanitize cutting surfaces between different cuts or animals. Use non-porous materials (stainless steel, HDPE) that do not absorb bacteria. Clean with hot soapy water first, then apply sanitizer. Seal concrete floors to prevent blood absorption.
Can I set up a butcher station in my garage?
Yes — garages are the most popular choice for home butcher stations. Benefits include concrete floors that handle liquids, proximity to freezers, and ample space. Key considerations: seal the concrete floor, add bright overhead lighting, ensure temperature stays below 50°F during processing (use portable AC in summer), and plan drainage for wash water.
How much does it cost to build a home butcher station?
A starter station costs $150-250 (folding table, lights, cutting board, basic organization). An intermediate setup runs $400-700 (stainless table, proper lighting, vacuum sealer, anti-fatigue mat, utility sink). A professional home station costs $1,000-2,000 with heavy-gauge table, plumbed sink, floor drain, and hanging system.
More Expert Guides
How to Trim a Brisket: The Complete Butcher's Guide
Proper brisket trimming is the difference between a backyard experiment and competition-quality results. Here is the professional technique for shaping a whole packer brisket before it ever touches the smoker.
14 min readHow to Butcher a Whole Chicken: Step-by-Step Guide
Breaking down a whole chicken yourself saves 40-50% compared to buying individual parts. Here is the professional technique for turning one bird into perfectly portioned pieces.
14 min readHome Butchering Safety Guide: Essential Protocols for Safe Meat Processing
Learn professional butchering safety protocols from a master butcher with 25+ years of experience. Essential guidance for anyone processing meat at home.