Home Butchering Safety Guide: Essential Protocols for Safe Meat Processing
After twenty-five years behind the butcher block, I have seen far too many preventable accidents and food safety issues that could have been avoided with proper knowledge and protocols. This home butchering safety guide represents the essential safety principles I teach every apprentice who walks through my shop door, principles that apply whether you are processing a whole lamb in your garage or breaking down a single pork shoulder in your kitchen.
Home butchering offers incredible rewards: connection to your food, cost savings, custom cuts tailored to your preferences, and the satisfaction of a skill well-learned. But these benefits come with serious responsibilities. Meat processing involves razor-sharp tools, potential bacterial contamination, and physical demands that can lead to injury if approached carelessly.
Knife Safety: The Foundation of Safe Butchering
In my career, I have witnessed more accidents from dull knives than sharp ones. That might seem counterintuitive, but it is absolutely true. A dull knife requires excessive force, slips unpredictably, and creates the conditions for serious injury. Knife safety is the absolute foundation of this home butchering safety guide because it addresses the single greatest risk in meat processing.
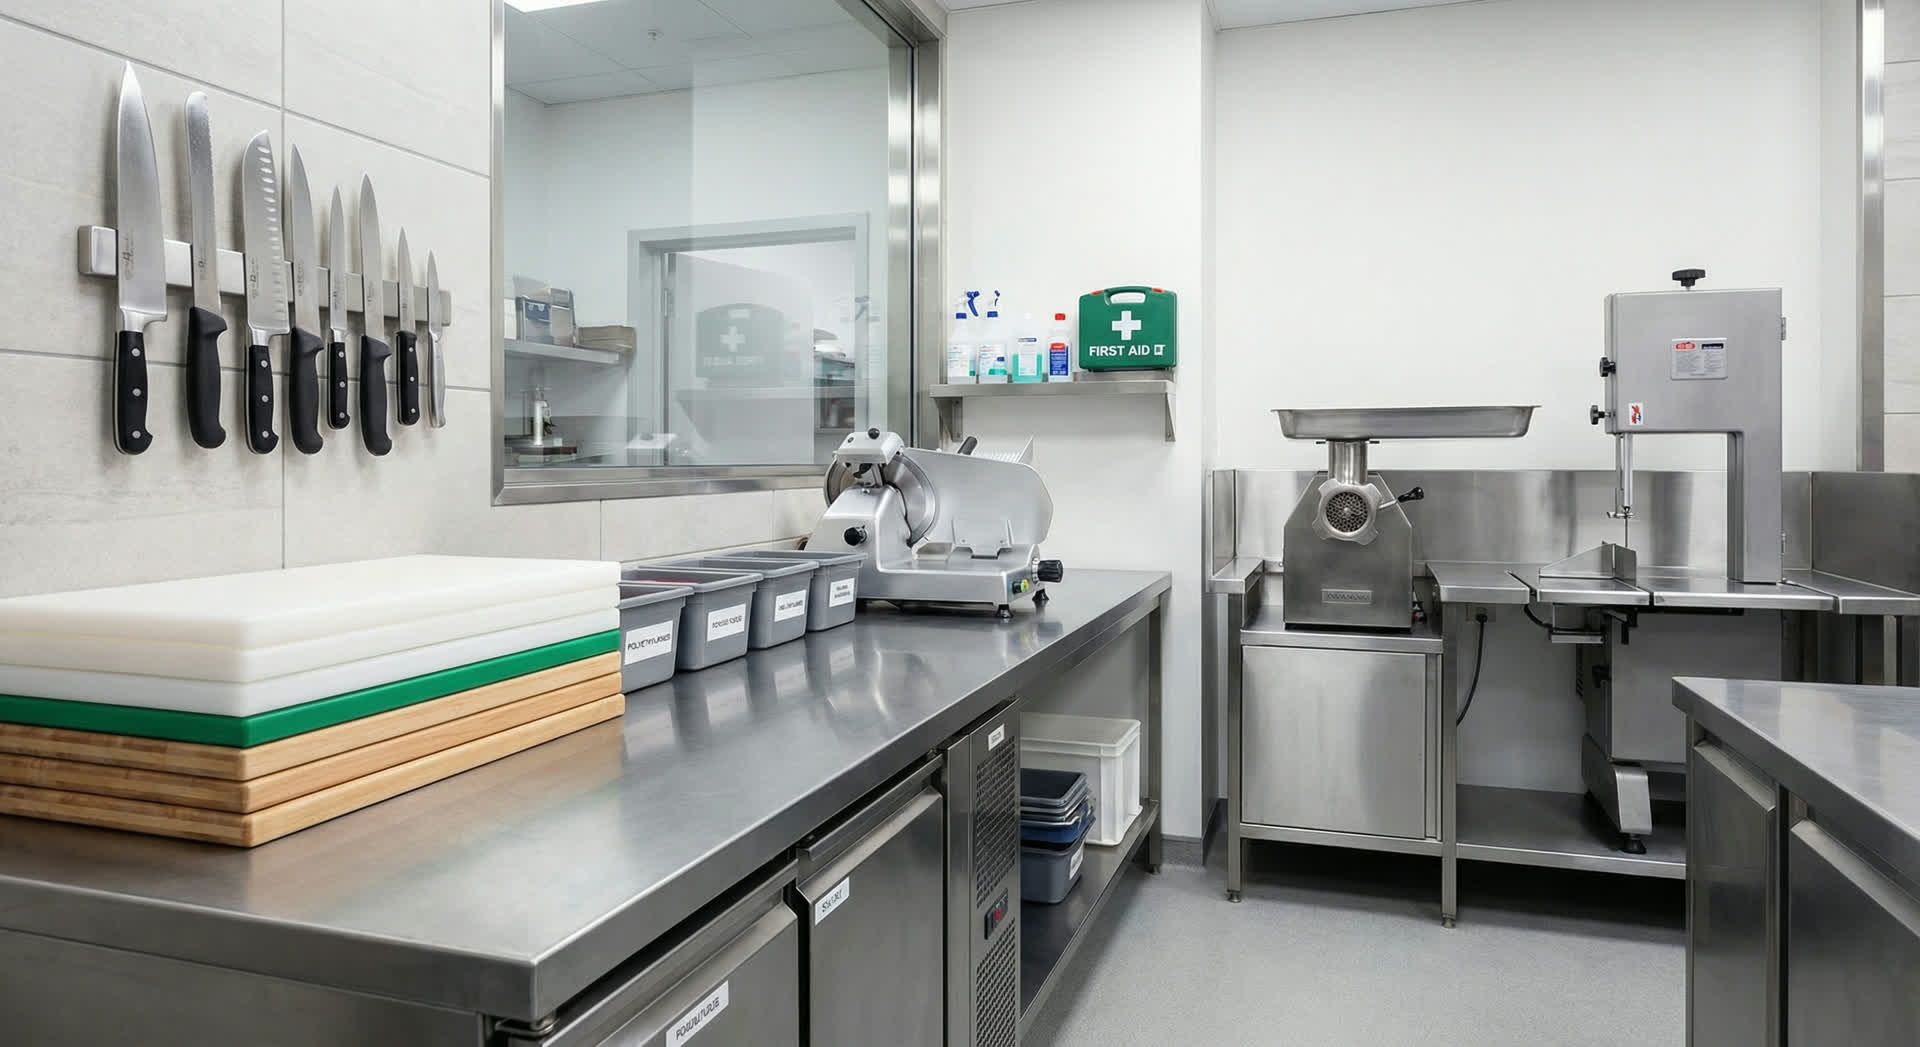
Selecting the Right Knives
For home butchering, I recommend starting with three essential knives: a 10-inch breaking knife with a curved blade for initial carcass breakdown, a 6-8 inch boning knife with a flexible blade for working around joints and bones, and a 10-12 inch slicing knife for portioning steaks and roasts.
Quality matters significantly. Professional-grade knives from manufacturers like Victorinox, Dexter-Russell, or F. Dick maintain edges longer, balance properly in your hand, and endure the rigors of meat processing. Expect to invest $150-300 for a starter set.
Sharpness and Maintenance
A properly sharp knife should cleanly slice through a sheet of paper with no tearing or resistance. If your knife will not do this, it is too dull for safe butchering. I sharpen my knives before every butchering session using a three-stage process: coarse diamond stone (400 grit) to establish the edge, fine ceramic stone (1000 grit) to refine it, and a leather strop to polish and align the edge.
Between sharpenings, use a honing steel before and during butchering to maintain edge alignment. Hold the steel vertically with the tip resting on a cutting board, position the knife at a 20-degree angle against the steel, and draw the blade down in a smooth arc from heel to tip. Repeat 4-5 times per side.
Proper Cutting Techniques
Safe cutting technique begins with proper grip. Use a pinch grip: thumb and index finger pinch the blade just ahead of the handle, while remaining fingers wrap the handle. This provides maximum control and reduces wrist strain. Never grip the handle alone.
Always cut away from your body and keep your free hand behind the blade path. When trimming or boning, secure the meat with your free hand positioned so that if the knife slips, it will slide away from your fingers. Never cut toward yourself, even for small trimming tasks.
Use a stable cutting surface at the proper height, typically just below waist level. The surface should never slide or shift when you apply cutting pressure. Commercial rubber cutting boards provide excellent stability and knife-edge preservation.
Knife Injury Response
Despite precautions, cuts happen. For minor cuts, immediately wash the wound with clean water, apply direct pressure with a clean cloth for 3-5 minutes, then bandage securely. For deep cuts, cuts that will not stop bleeding after 10 minutes of direct pressure, or any injury involving potential nerve or tendon damage, seek immediate medical attention.
Keep a well-stocked first aid kit in your butchering area including gauze pads, adhesive bandages, medical tape, antiseptic solution, and examination gloves.
Cross-Contamination Prevention
Bacterial cross-contamination represents the most common food safety failure in home butchering. Understanding and preventing cross-contamination is essential to this home butchering safety guide because it protects not just you, but everyone who consumes the meat you process.
Understanding Bacterial Risks
Raw meat harbors bacteria including E. coli, Salmonella, Campylobacter, and others. These pathogens naturally exist on animal hides, in intestinal tracts, and in processing environments. While proper cooking destroys these bacteria in the final meat product, contamination of surfaces, tools, hands, and other foods creates serious illness risks.
The Three Zones: Dirty, Processing, and Clean
Professional butcher shops organize workflow into distinct zones that prevent cross-contamination. The dirty zone contains incoming carcasses, hides, offal, and waste. The processing zone is where you actively cut and portion meat. The clean zone stores finished cuts, packaging materials, and cleaned tools.
Movement proceeds one direction only: dirty to processing to clean. Materials never move backward. Tools used in the dirty zone do not enter the clean zone without thorough sanitation.
Tool and Surface Sanitation Protocols
After completing any task involving raw meat contact, immediately sanitize tools and surfaces before proceeding. My standard protocol: remove visible meat and fat with a scraper, wash with hot water (minimum 110 degrees Fahrenheit) and detergent to remove organic matter, rinse thoroughly, then sanitize with an approved sanitizing solution.
For sanitizing, I use quaternary ammonium sanitizer at manufacturer-recommended concentrations (typically 200-400 ppm). The critical factor is contact time: sanitizing solutions need at least 60 seconds of contact with clean surfaces to be effective.
Personal Hygiene Protocols
Your hands are the primary vector for bacterial transfer. Wash hands thoroughly (20+ seconds with soap and hot water, including under nails and between fingers) before beginning work, after handling raw meat, after touching hair or face, after using the restroom, and before touching clean surfaces or packaging materials.
Wear clean protective clothing during butchering: apron, hairnet or cap, and ideally a clean smock or dedicated butchering clothes. Change gloves frequently, and remember that gloves do not eliminate the need for handwashing.
Temperature Control: The Critical Safety Factor
Temperature control might be the least visible aspect of this home butchering safety guide, but it is absolutely critical. Bacteria multiply rapidly at temperatures between 40 and 140 degrees Fahrenheit, the danger zone. Your job is minimizing time that meat spends in this temperature range.
Cold Chain Maintenance
Ideally, meat should remain below 40 degrees throughout processing. Schedule butchering sessions during cool weather and work in the coldest available location. Process animals in sections, keeping unworked portions refrigerated. Never leave meat at room temperature.
Rapid Chilling Protocols
After butchering, chill meat rapidly to below 40 degrees. Spread cuts in single layers on refrigerator shelves or in shallow pans that allow air circulation. Large roasts may take 12-24 hours to chill thoroughly. Use a probe thermometer to verify internal temperature has reached below 40 degrees before vacuum-sealing or freezing.
Monitoring and Documentation
Professional facilities maintain temperature logs documenting that meat remained in safe temperature ranges throughout processing and storage. I recommend home butchers adopt simplified documentation: note the start and end times of your butchering session, confirm that refrigerator and freezer temperatures are correct before beginning, and record the time finished portions went into refrigeration.
Equipment Sanitation and Workspace Hygiene
Pre-Processing Sanitation
Before bringing meat into your processing area, sanitize all surfaces, tools, and equipment. This includes cutting tables, equipment surfaces (grinder, slicer, saw), knife handles and blades, thermometers, containers for finished cuts, and any other items that will contact meat.
During Processing: Continuous Cleanliness
Maintain cleanliness throughout the butchering session. Keep a bucket of hot soapy water and sanitizing solution accessible for quick tool cleaning between tasks. Wipe down cutting surfaces regularly to remove accumulated blood, fat, and meat particles.
Manage waste actively. Trim, bones, and unusable portions should go directly into designated waste containers, not pile up on your work surface.
Post-Processing Deep Cleaning
After completing butchering, implement a systematic deep cleaning protocol. Remove all meat and packaging materials. Dispose of waste properly. Disassemble all equipment completely and wash each component. Wash all surfaces with hot soapy water. Rinse thoroughly. Apply sanitizing solution and allow proper contact time. Allow everything to air-dry completely.
First Aid and Emergency Preparedness
Essential First Aid Supplies
Your butchering first aid kit should include: multiple sizes of sterile gauze pads, adhesive bandages, medical tape, elastic bandages, antiseptic solution, disposable examination gloves, instant cold packs, scissors, tweezers, and a comprehensive first aid manual. For serious butchering work, I also recommend a tourniquet and Israeli pressure bandage for severe bleeding control.
Common Injuries and Response
Cuts and lacerations are the most common butchering injuries. For minor cuts: wash with clean water, apply direct pressure until bleeding stops, clean with antiseptic, and bandage securely. For deep cuts or severe bleeding: apply direct pressure, elevate the injured area, and call 911 or have someone drive you to emergency services immediately.
Strains and sprains from lifting or repetitive motions are also common. Stop the activity immediately, apply ice for 20 minutes, compress with an elastic bandage, elevate the affected area, and rest.
Comprehensive Safety Checklist
Pre-Work Checklist
- All knives are professionally sharp and properly maintained
- First aid kit is fully stocked and easily accessible
- Phone is charged and accessible for emergency calls
- All work surfaces and equipment have been sanitized
- Refrigeration and freezing equipment are functioning at proper temperatures
- Adequate lighting is available for precision cutting work
- Clean protective clothing, apron, and gloves are ready
- Waste disposal containers are positioned and ready
- Sanitizing solution is prepared at proper concentration
- You are well-rested, focused, and not impaired
During-Work Safety Practices
- Maintain clean, organized workspace throughout processing
- Change gloves regularly and wash hands frequently
- Keep knives sharp and properly handled at all times
- Monitor meat temperature and minimize time in danger zone
- Take regular breaks to prevent fatigue and maintain focus
- Clean and sanitize tools between tasks
- Never rush or take shortcuts that compromise safety
Post-Work Requirements
- All finished meat is properly refrigerated or frozen within 2 hours of cutting
- Complete deep cleaning and sanitation of all surfaces and equipment
- Proper disposal of all waste materials
- All knives are cleaned, dried, and safely stored
- Equipment is disassembled, cleaned, sanitized, and dried before storage
- Any injuries or near-misses are documented for future prevention
Building a Culture of Safety
Safety is not a checklist you complete once. It is a mindset you cultivate with every butchering session. In my shop, we have a saying: there is the fast way, the cheap way, and the right way. We only do it the right way.
Home butchering is an incredibly rewarding skill that connects you to your food in ways few modern people experience. Approached with proper respect for safety protocols, it is also remarkably safe. Every butcher I know has been doing this work for decades without serious injury, not because they are lucky, but because they are disciplined.
This home butchering safety guide provides the foundation you need to join that tradition. Study these principles, implement them rigorously, and never compromise safety for convenience. Stay sharp, stay clean, and stay safe.
Frequently Asked Questions
What are the most important safety rules for home butchering?
The most critical safety rules are: always use professionally sharp knives and cut away from your body, maintain strict sanitation protocols to prevent bacterial cross-contamination, keep meat below 40 degrees throughout processing, sanitize all surfaces and tools before and after use, and have proper first aid supplies immediately accessible.
How do I prevent cross-contamination when butchering at home?
Prevent cross-contamination by organizing your workspace into dirty, processing, and clean zones with one-way workflow. Wash hands and change gloves frequently, sanitize tools and surfaces between tasks, use separate cutting boards for raw and ready-to-eat products, and ensure sanitizing solutions have at least 60 seconds of contact time.
What temperature should meat be kept at during home butchering?
Meat should remain below 40 degrees Fahrenheit throughout processing. Work in the coldest available location, process animals in sections keeping unworked portions refrigerated, and minimize cumulative time above 40 degrees to under 2 hours.
What first aid supplies do I need for home butchering?
Essential supplies include sterile gauze pads, adhesive bandages, medical tape, antiseptic solution, disposable gloves, instant cold packs, elastic bandages, scissors, tweezers, and a first aid manual. For serious work, also include a tourniquet and pressure bandage.
How often should I sharpen butchering knives?
Sharpen knives before every butchering session using a three-stage process: coarse stone, fine stone, and leather strop. Use a honing steel multiple times during processing to maintain edge alignment. A properly sharp knife should cleanly slice through paper with no tearing.
More Expert Guides
How to Trim a Brisket: The Complete Butcher's Guide
Proper brisket trimming is the difference between a backyard experiment and competition-quality results. Here is the professional technique for shaping a whole packer brisket before it ever touches the smoker.
14 min readHow to Butcher a Whole Chicken: Step-by-Step Guide
Breaking down a whole chicken yourself saves 40-50% compared to buying individual parts. Here is the professional technique for turning one bird into perfectly portioned pieces.
10 min readComplete Guide to Butcher Knife Types and Their Uses
After three generations in the butchery trade, I've learned that the right knife makes all the difference between clean, efficient cuts and wasted meat. This guide covers every essential butcher knife, when to use each blade, and what separates professional-grade tools from kitchen knives.