Setting Up a Home Butchery Station
When I first began my training in Buenos Aires, my master emphasized that the workspace reflects the butcher's respect for the craft. "Un espacio digno para una herramienta digna," he would say — a worthy space for a worthy tool. Your home butchery station should embody this philosophy, creating an environment that supports both safety and precision.
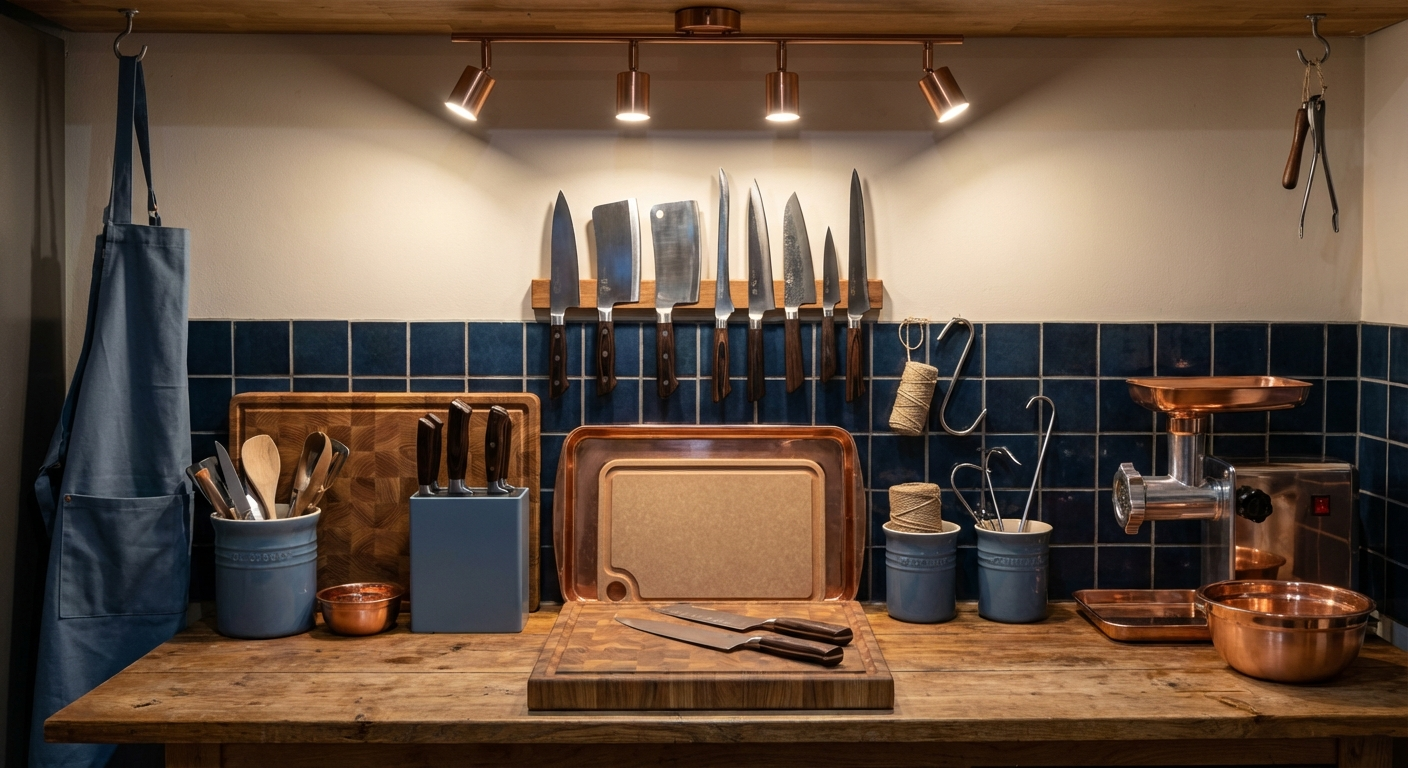
Transforming a corner of your kitchen into a proper butchery station requires careful planning and the right equipment. This investment pays dividends in both safety and the quality of your work. A proper station elevates home butchery from a chore to a craft.
Workspace Requirements
Space Planning
Allocate sufficient space for safe operation:
- Minimum Size: 4 feet by 2 feet of clear working surface
- Height: Counter height of 36-38 inches (adjustable if possible)
- Clearance: 18 inches above the surface for comfortable movement
- Storage Space: Adjacent area for tools and supplies
- Lighting: Bright, even illumination without shadows
Consider the workflow: incoming product, preparation area, cutting zone, and finished product storage.
Surface Materials
Choose appropriate cutting surfaces:
- Wooden Butcher Blocks: End-grain construction is ideal; self-healing surface
- Plastic Cutting Boards: Easy to sanitize; dishwasher safe
- Composite Materials: Bamboo or other engineered surfaces
- Size: Minimum 24" x 18" for most tasks
Avoid glass or stone surfaces which can damage knife edges and pose safety risks.
Essential Equipment
Knives
Start with these fundamental tools:
- 10-inch Breaking Knife: For primal separation and heavy cutting
- 8-inch Carving Knife: For slicing cooked meats and large cuts
- 6-inch Utility Knife: For detailed work and trimming
- 6-inch Boning Knife: Flexible blade for precision work
- 8-inch Chef's Knife: General kitchen tasks and prep work
Invest in quality over quantity. Well-made knives will serve you for decades.
Sharpening System
Maintain sharp edges with proper tools:
- Whetstone Set: 1000/3000 grit combination stone
- Stropping Compound: For final edge refinement
- Sharpening Guide: To maintain consistent angles
- Leather Strop: For edge maintenance
Sharp knives are safer and more effective than dull ones.
Specialized Tools
Additional tools for advanced work:
- Butcher's Steel: For daily edge maintenance
- Meat Thermometer: Digital instant-read for safety
- Butcher's Twine: Heavy cotton for trussing
- Meat Hooks: For hanging and working with large cuts
- Scale: Digital scale for portioning
Organization and Layout
Workflow Zones
Organize your station into functional zones:
- Preparation Area: Where you unwrap and inspect incoming product
- Cutting Zone: Primary work area with main cutting surface
- Tool Zone: Organized storage for knives and implements
- Waste Area: Designated space for bones and trim
- Storage Zone: Finished cuts ready for refrigeration
Storage Solutions
Keep tools organized and accessible:
- Magnetic Knife Strip: For daily-use knives
- Knife Block: Alternative storage for multiple knives
- Drawer Inserts: For smaller tools and accessories
- Wall Organization: Hooks for thermometers and other tools
- Under-Cabinet Storage: For sharpening stones and maintenance tools
Lighting and Ventilation
Proper Illumination
Adequate lighting is essential for safety:
- Brightness: Minimum 500 lux at the cutting surface
- Color Temperature: 4000K-5000K for accurate color perception
- Shadow Elimination: Position lights to eliminate shadows
- Backup Lighting: Redundant sources in case of failure
Ventilation Considerations
Manage odors and maintain air quality:
- Range Hood: If available, activate during work
- Window Ventilation: Open windows for air circulation
- Fans: Portable fans for additional air movement
- Odor Control: Baking soda or activated charcoal nearby
Safety Equipment
Protective Gear
Essential safety items:
- Cut-Resistant Gloves: For the non-knife hand
- Apron: Waterproof or easy-to-clean material
- Non-Slip Shoes: Closed-toe with good traction
- First Aid Kit: Immediately accessible
Safety Protocols
Establish safe working habits:
- Knife Awareness: Always know where your knives are
- Proper Handling: Carry knives properly when moving
- Focus: Avoid distractions during cutting tasks
- Cleaning: Clean spills immediately to prevent slips
Temperature Control
Product Storage
Maintain proper temperatures:
- Refrigeration: Keep products at 40°F or below
- Work Period: Minimize time at room temperature
- Finished Products: Rapid cooling to safe temperatures
- Tool Storage: Keep knives in appropriate environment
Environmental Considerations
Control your working environment:
- Ambient Temperature: Cooler environment for comfort
- Humidity: Moderate humidity for grip comfort
- Climate Control: Air conditioning if possible
Maintenance and Sanitation
Daily Cleaning Protocol
Maintain cleanliness throughout the process:
- Pre-Work: Sanitize all surfaces and tools
- During Work: Clean surfaces as needed
- Post-Work: Thorough cleaning and sanitizing
- Tool Care: Clean and dry all knives immediately
Deep Cleaning Schedule
Regular deep cleaning tasks:
- Weekly: Deep clean cutting surfaces
- Monthly: Sanitize storage areas
- Quarterly: Inspect and maintain equipment
Progressive Setup
Basic Setup
Start with essentials:
- Large cutting board
- One good knife
- Sharpening stone
- Basic safety gear
Advanced Setup
Expand as needed:
- Specialized cutting surfaces
- Multiple knives for different tasks
- Professional tools and equipment
- Specialized storage solutions
Cost Considerations
Investment ranges:
- Basic Setup: $200-400 for essential tools and surface
- Intermediate Setup: $400-800 with quality knives and equipment
- Advanced Setup: $800-1500+ with professional-grade tools
Quality tools are an investment that pays dividends in performance and longevity.
Personalization
Adapt the station to your needs:
- Work Style: Adjust layout for your technique
- Space Constraints: Maximize efficiency in limited space
- Frequency: Scale equipment to your usage
- Goals: Match equipment to your objectives
Your butchery station should reflect your commitment to the craft while supporting safe, efficient work. Take time to plan and execute a setup that serves both your current needs and future aspirations in the art of butchery. Once your station is ready, order a whole sub-primal from The Meatery and put your setup to the test.
Frequently Asked Questions
What is the minimum space needed for a home butchery station?
A minimum of 4 feet by 2 feet of clear working surface is needed, with 36-38 inch counter height. Include additional space for tool storage, waste disposal, and finished product storage. Proper ventilation and lighting are also essential.
What are the essential knives for a home butchery station?
Essential knives include: 10-inch breaking knife, 8-inch carving knife, 6-inch utility knife, 6-inch boning knife, and 8-inch chef's knife. Start with quality pieces rather than quantity, as these will serve you for decades with proper care.
How important is knife sharpening equipment?
Critical. Sharp knives are safer and more effective than dull ones. Start with a 1000/3000 grit whetstone combination, and add a steel for daily maintenance. Proper sharpening equipment is essential for any butchery station.
What safety equipment is necessary?
Essential safety equipment includes cut-resistant gloves for the non-knife hand, waterproof apron, non-slip shoes, and immediately accessible first aid kit. Proper lighting and ventilation also contribute to safety.
More Expert Guides
How to Trim a Brisket: The Complete Butcher's Guide
Proper brisket trimming is the difference between a backyard experiment and competition-quality results. Here is the professional technique for shaping a whole packer brisket before it ever touches the smoker.
14 min readHow to Butcher a Whole Chicken: Step-by-Step Guide
Breaking down a whole chicken yourself saves 40-50% compared to buying individual parts. Here is the professional technique for turning one bird into perfectly portioned pieces.
14 min readHome Butchering Safety Guide: Essential Protocols for Safe Meat Processing
Learn professional butchering safety protocols from a master butcher with 25+ years of experience. Essential guidance for anyone processing meat at home.