How to Break Down a Beef Tenderloin: Step-by-Step Butcher's Guide

How to Break Down a Beef Tenderloin: Step-by-Step Butcher's Guide
Buying a whole beef tenderloin and breaking it down yourself is one of the best value moves in home butchery. Pre-cut filet mignon steaks run $30–50 per pound at most butcher shops. A whole, untrimmed tenderloin from a warehouse club or wholesale butcher? Often $10–18 per pound.
That price gap exists because you are paying for labor when you buy individual steaks. The trimming and portioning takes about 20 minutes once you know what you are doing. This guide walks you through every step — from understanding the anatomy to cutting perfect steaks.
Understanding Tenderloin Anatomy
Before you make a single cut, you need to understand what you are looking at. A whole beef tenderloin is the psoas major muscle that runs along both sides of the spine in the loin section. It is the least-exercised muscle on the animal, which is why it is the most tender cut of beef.
A whole untrimmed tenderloin weighs 5–7 pounds and has a distinctive torpedo shape — thick at one end (the butt) and tapering to a thin point (the tail). When you pull it out of the packaging, it will be covered in fat and connective tissue, with a long strip of meat called the chain running along one side.
Here are the parts you will be working with:
- Butt end (head): The thick end closest to the sirloin. Best for chateaubriand roast or thick-cut steaks.
- Center-cut: The most uniform section. This is where your filet mignon steaks come from.
- Tail (tip): The thin, tapered end. Too narrow for steaks — save it for tenderloin tips, stir-fry, or beef stroganoff.
- Chain: A long, thin strip of meat attached along the side. Irregular shape, but flavorful. Good for grinding or quick-cooking.
- Silverskin: A thin, silvery-white membrane that covers parts of the tenderloin. Must be removed — it does not break down when cooked.
- Fat cap: External fat covering portions of the muscle. Most of it needs to come off.
What You Need
Gather your tools before you start. Having everything ready means you can work efficiently without stopping to dig through drawers with greasy hands.
Essential tools:
- 6-inch boning knife (semi-flexible): Your primary tool. The semi-flexible blade follows the contours of the meat and gets under silverskin. A Victorinox Fibrox Pro ($30) is the industry standard.
- 10-inch slicing or chef's knife: For portioning clean meat into steaks. Must be sharp — dull knives compress the meat.
- Large cutting board: At least 20 inches long. The tenderloin is big, and you need room to work.
- Paper towels: For patting the meat dry and maintaining grip.
- Sheet pan or plate: For collecting trim, fat, and chain meat.
- Butcher twine (optional): For tying the chateaubriand or evening out thickness on uneven portions.
Prep notes: Remove the tenderloin from the refrigerator 10 minutes before you start. Cold meat is actually easier to work with because the fat is firmer, but you want the surface slightly drier for better grip. Pat it thoroughly with paper towels before you begin.
Step 1: Remove the Chain
Flip the tenderloin so you can see the side with the chain — a long, narrow strip of meat separated from the main muscle by a seam of fat. On some tenderloins the chain is obvious; on others it may already be partially removed.
Use your boning knife to follow the natural fat seam between the chain and the main tenderloin. Pull the chain gently away from the body as you cut, letting the fat guide your blade. You are not cutting through muscle — you are separating two muscles along their natural division.
The chain will come off in one long piece. Set it aside on your sheet pan. It is perfectly good meat — use it for stir-fry, stew, chili, or grind it into a burger blend. Some people dice it for beef tips or kebabs.
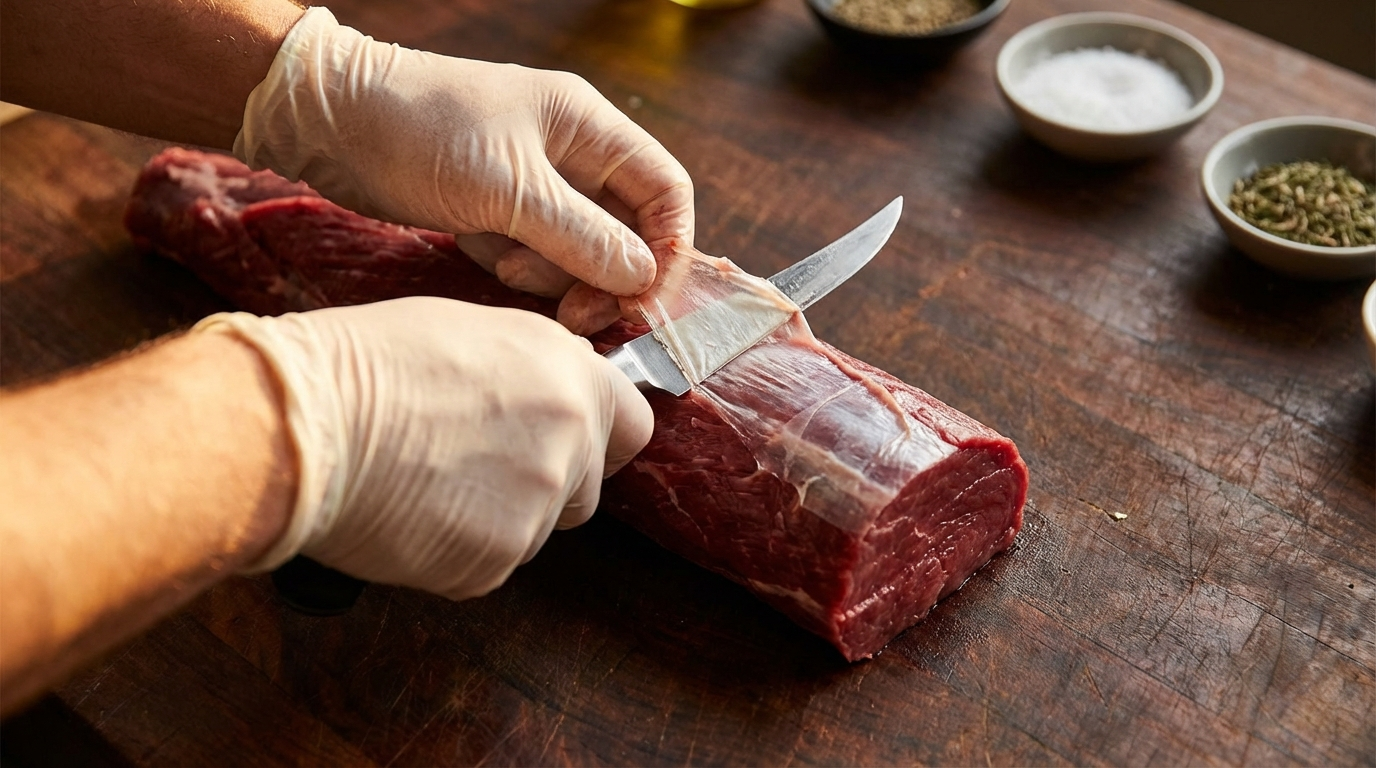
Step 2: Remove the Silverskin
This is the step most people find intimidating, but the technique is simple once you get the feel for it. Silverskin is a thin, silvery-white membrane of connective tissue that covers portions of the tenderloin's surface. It does not break down during cooking — leaving it on will cause steaks to curl and develop an unpleasant chewy texture.
Here is the technique:
- Find an edge. Locate where the silverskin ends or where there is a natural starting point. Slip the tip of your boning knife under the silverskin, angling the blade slightly upward.
- Anchor and pull. Once you have a small flap of silverskin separated, grab it with a paper towel (it is slippery) and pull it taut away from the meat.
- Long, shallow strokes. With the silverskin pulled tight, angle your blade almost flat against the meat and slide it along, separating the membrane from the muscle. The key is keeping the blade angle shallow — too steep and you lose meat; too flat and you won't cut through.
- Work in strips. Do not try to remove all the silverskin in one piece. Work in 2–3 inch wide strips, starting a new cut each time. Smaller strips give you better control.
Common mistake: Taking too much meat with the silverskin. If you see thick red muscle coming off with the membrane, flatten your blade angle. You should be removing a nearly translucent sheet, not carving away meat.
Step 3: Trim Excess Fat
With the chain and silverskin gone, look over the tenderloin and trim any thick patches of external fat. You want to leave a thin layer — about ⅛ inch — which will render during cooking and add flavor. Remove any thick deposits, loose flaps, or hard pieces of suet.
Do not obsess over removing every speck of fat. A little surface fat on a tenderloin is not a problem. Focus on removing anything thicker than a few millimeters and any pieces that would prevent even searing.
At this point, your tenderloin should look clean, smooth, and deep red with minimal surface fat. It will also be noticeably smaller than when you started — expect to lose 1.5–2 pounds of trim from a 6-pound untrimmed tenderloin.
Step 4: Portion the Tenderloin
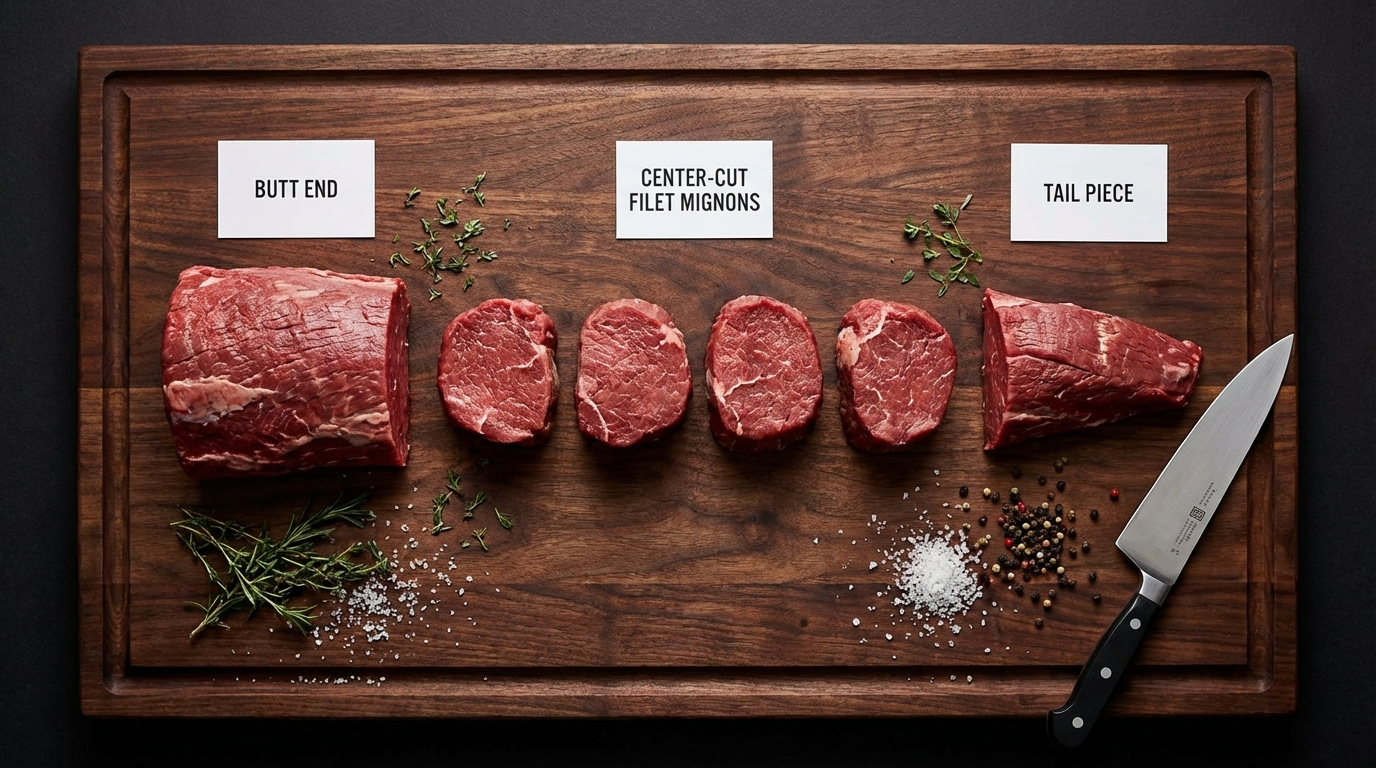
Now you have a clean, trimmed tenderloin ready to portion. You will divide it into three sections based on thickness and intended use.
The Butt End (Chateaubriand)
The thick end of the tenderloin — typically 3–4 inches in diameter — is ideal for a chateaubriand roast. Cut a 6–8 inch section from the thick end. This piece can be roasted whole (tied with butcher twine for even cooking), or you can cut it into two thick steaks (2.5–3 inches) for a special occasion.
If the butt end has a noticeable side muscle (the psoas minor or "wing"), you can leave it attached for roasting or remove it for a cleaner presentation. The wing cooks faster than the main muscle, so removing it gives more even results.
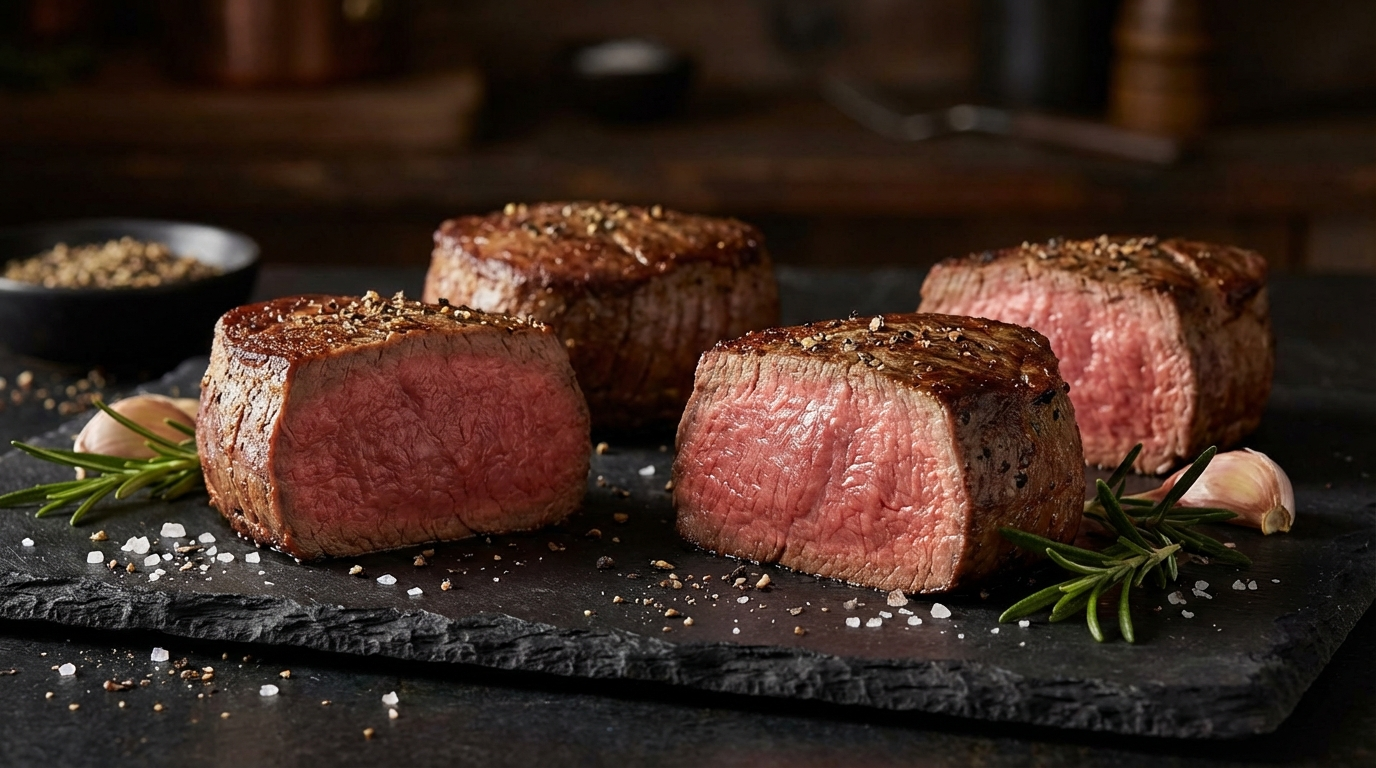
The Center-Cut (Filet Mignon)
The center section is the most uniform in diameter — usually 2.5–3 inches across — and this is where your filet mignon steaks come from. Using your sharp slicing knife, cut the center into steaks 1.5 to 2 inches thick.
Thickness matters more than weight for tenderloin steaks. Thin filets overcook easily and lack the characteristic rare-to-medium-rare center that makes tenderloin special. Cut them thick and adjust cooking time.
From a typical tenderloin, expect 4–6 center-cut filet mignon steaks. Each one should weigh 6–8 ounces.
The Tail (Tenderloin Tips)
The tapered tail end is too thin and uneven for steaks, but the meat is just as tender. Cut it into 1–1.5 inch cubes for:
- Beef tenderloin tips: Sear in a hot pan with garlic and butter for a quick weeknight dinner.
- Beef stroganoff: Slice thin and cook in a creamy mushroom sauce.
- Kebabs: Thread onto skewers with vegetables for the grill.
- Stir-fry: Slice thin against the grain for the most tender stir-fry of your life.
Alternatively, fold the tail back on itself and tie it with butcher twine to create one more steak-sized portion. It won't be as uniform as a center-cut filet, but it cooks fine.
What to Do With the Trim
After breaking down a tenderloin, you will have a pile of trim: the chain meat, fat, silverskin scraps, and possibly the wing muscle. Do not throw this away.
- Chain meat + wing: Grind for premium burger blend, or dice for stew, chili, or beef bourguignon. Tenderloin trim makes exceptionally tender ground beef.
- Fat: Render for tallow (excellent for high-heat frying), or add to lean ground meat for a better burger.
- Silverskin and sinew: Discard. This is the only part with no culinary use.
A smart approach: save trim from multiple butchering sessions in the freezer. When you have 2–3 pounds accumulated, grind it all together for a premium burger blend that rivals anything from a high-end butcher shop.
Storage and Freezing
Freshly cut tenderloin steaks and portions should be used within 3–5 days if refrigerated. For longer storage:
- Vacuum seal individual steaks for the best freezer results. Vacuum-sealed tenderloin keeps for 6–12 months in the freezer with minimal quality loss.
- Wrap tightly in plastic wrap, then aluminum foil if you do not have a vacuum sealer. Press out as much air as possible. Use within 3–4 months.
- Label everything with the cut name and date. A frozen tenderloin tip looks identical to a frozen filet mignon, and you do not want to discover the difference after thawing.
- Freeze flat on a sheet pan first, then stack. This prevents steaks from freezing into awkward shapes that are hard to store.
Thawing: Always thaw tenderloin steaks in the refrigerator overnight. Never use the microwave — the uneven heating will partially cook the edges while the center stays frozen. For a faster method, seal the steak in a zip-lock bag and submerge in cold water, changing the water every 30 minutes.
Buying Tips: Choosing the Right Tenderloin
Where and what you buy affects your final yield and quality. Here is what to look for:
- PSMO (Peeled, Side Meat On): The most common whole tenderloin at warehouse stores. Some external fat removed, chain still attached. Best value for home butchery — this is what you want.
- Unpeeled: Heavy fat covering still intact. More trimming work, but sometimes cheaper per pound. Only worth it if the price is significantly lower.
- Peeled: Fat and chain already removed. Costs more per pound but saves trimming time. Less value overall since you are paying premium prices for removed meat.
Grade matters: Look for USDA Choice or Prime. Choice provides good tenderness and flavor at a reasonable price. Prime has more marbling and richer flavor but costs significantly more. Select grade tenderloins work fine but may lack the buttery richness you expect from filet mignon.
Weight: A 5–7 pound PSMO tenderloin will yield approximately 4–5 pounds of portioned meat after trimming. Plan for about 6–8 ounces of finished steak per person for a dinner portion.
Common Mistakes to Avoid
After years of watching home cooks and students tackle their first tenderloin, these are the mistakes that come up repeatedly:
- Cutting steaks too thin. One-inch filet mignon steaks are nearly impossible to cook to a proper medium-rare. Go 1.5 inches minimum, ideally 2 inches.
- Leaving silverskin on. Even a small patch will cause the steak to curl and chew tough. Take the time to remove it all.
- Removing too much meat with the silverskin. Keep your blade angle shallow. If you see thick red coming off, adjust.
- Throwing away the chain and trim. This is premium beef. Use it for burgers, stew, or stir-fry.
- Using a dull knife. A dull blade compresses the meat, makes ragged cuts, and is actually more dangerous because it requires more force. Sharpen before you start.
- Working too fast. Speed comes with practice. On your first tenderloin, take your time and focus on clean, deliberate cuts.
Cost Comparison: Whole vs. Pre-Cut
Here is the math on a typical whole tenderloin purchase:
- Whole PSMO tenderloin (6 lbs at $14/lb): $84 total
- Usable meat after trimming (~4.5 lbs): Effective cost = $18.67/lb
- Pre-cut filet mignon at a butcher shop: $35–50/lb
- Your savings: 47–63% off retail filet mignon prices
From that $84 tenderloin you get roughly 6 filet mignon steaks (worth ~$150 at retail), a chateaubriand roast (worth ~$40), tenderloin tips (worth ~$20), and trim for grinding (worth ~$10). Total retail value: approximately $220 worth of beef for $84.
Even accounting for the 20 minutes of your time, this is one of the highest-return butchery projects you can do at home.
Frequently Asked Questions
How much does a whole beef tenderloin cost compared to filet mignon?
A whole untrimmed beef tenderloin typically costs $10–18 per pound at warehouse stores, while pre-cut filet mignon runs $30–50 per pound at butcher shops. Breaking it down yourself saves 40–60% on average.
How many filet mignon steaks can you get from one tenderloin?
A typical whole tenderloin weighs 5–7 pounds untrimmed. After removing the chain, silverskin, and fat, you will have about 4–5 pounds of usable meat, yielding 6–8 filet mignon steaks (1.5–2 inches thick) plus a chateaubriand roast and tenderloin tips.
What is the chain on a beef tenderloin?
The chain is a long, thin strip of meat running along one side of the tenderloin. It is attached by fat and connective tissue. While edible, it is removed during breakdown because its irregular shape makes it unsuitable for steaks. Use it for stir-fry, stew, or grind it into burger blend.
Should you remove all the silverskin from a tenderloin?
Yes. Silverskin is a thin, silvery-white membrane of connective tissue that does not break down during cooking. It will cause steaks to curl and become chewy. Remove it completely with a sharp boning knife using long, shallow strokes.
What knife do you need to break down a tenderloin?
A 6-inch semi-flexible boning knife handles most of the work — removing the chain, silverskin, and fat. A sharp 10-inch slicing knife or chef's knife is best for portioning the clean tenderloin into steaks.
More Expert Guides
How to Trim a Brisket: The Complete Butcher's Guide
Proper brisket trimming is the difference between a backyard experiment and competition-quality results. Here is the professional technique for shaping a whole packer brisket before it ever touches the smoker.
14 min readHow to Butcher a Whole Chicken: Step-by-Step Guide
Breaking down a whole chicken yourself saves 40-50% compared to buying individual parts. Here is the professional technique for turning one bird into perfectly portioned pieces.
14 min readHome Butchering Safety Guide: Essential Protocols for Safe Meat Processing
Learn professional butchering safety protocols from a master butcher with 25+ years of experience. Essential guidance for anyone processing meat at home.