How to Break Down a Whole Duck: Complete Butchering Guide
A whole duck is one of the most rewarding birds to butcher at home. Unlike chicken, every part of a duck serves a distinct culinary purpose: the breasts are pan-seared like steaks, the legs are braised into confit, the fat is rendered into liquid gold for cooking, and the carcass makes stock richer than anything you can buy. By breaking down a whole duck yourself, you save 40-60% compared to buying individual duck breasts and legs — and you get the fat and bones as a bonus.
The anatomy of a duck is similar to a chicken but with key differences that change how you approach the breakdown. Duck has a thicker layer of subcutaneous fat, denser breast meat, and proportionally smaller breasts relative to the leg quarters. Once you understand these differences, the breakdown is straightforward and takes about 15 minutes.

What You Need
Tools
- Sharp boning knife (5-6 inches): A flexible boning knife gives you the control needed to work around the duck's frame. A chef's knife works but is less precise around joints.
- Kitchen shears or poultry shears: Essential for cutting through the backbone and rib bones. Duck bones are harder than chicken bones.
- Large cutting board: At least 18x12 inches. Place a damp towel underneath for stability.
- Paper towels: Duck skin is slippery. Dry hands and dry skin mean safer cutting.
- Container for fat and trimmings: You will collect a surprising amount of fat. Save every piece.
Choosing Your Duck
The most common duck available to home cooks is the Pekin (Long Island) duck, typically 4.5-5.5 pounds. Muscovy ducks are larger (6-8 pounds) with leaner, more intensely flavored breast meat. Moulard ducks (a Muscovy-Pekin cross) are prized for foie gras production and have the largest breasts.
For your first breakdown, start with a Pekin. They are widely available, affordably priced, and their moderate size makes them easy to handle. Remove the duck from the refrigerator 15-20 minutes before starting — cold fat is firmer and easier to work with than room-temperature fat.
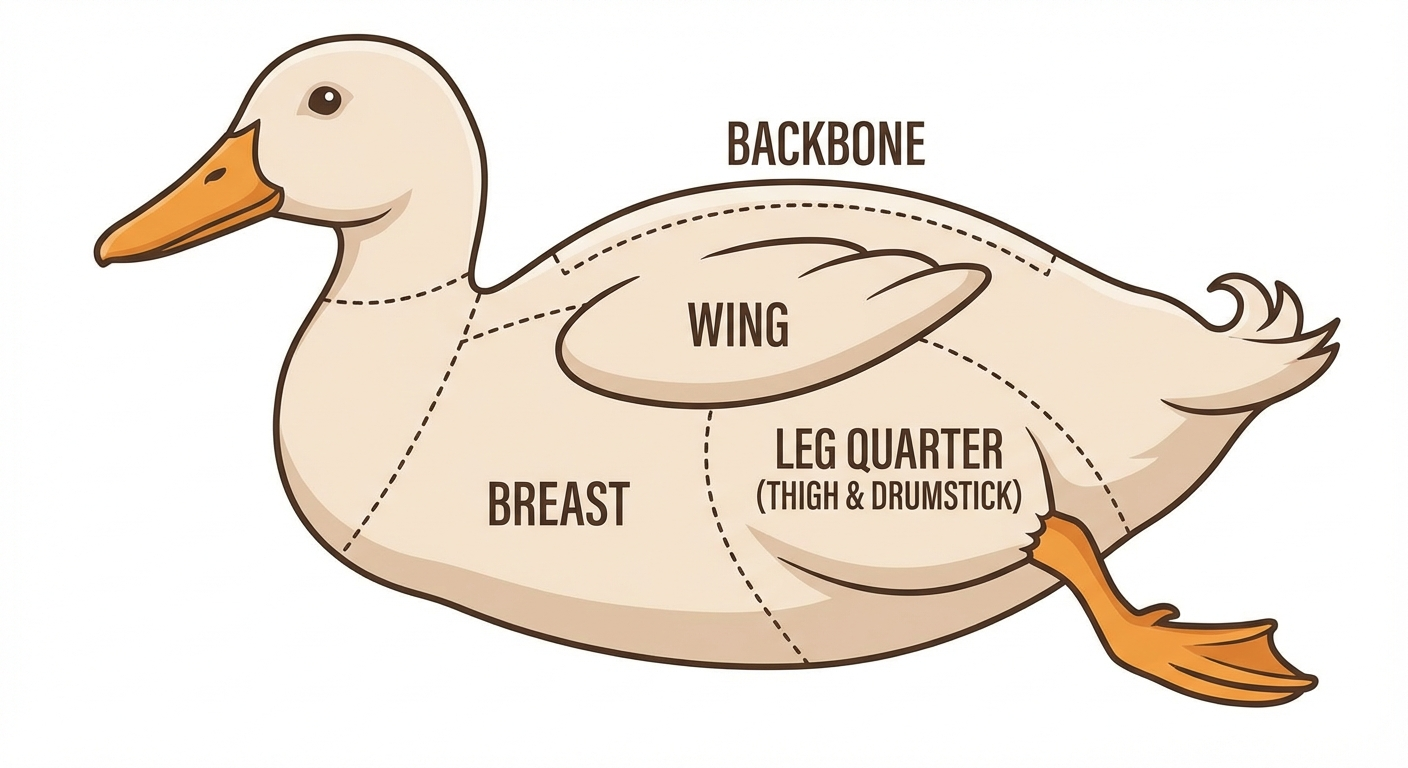
Understanding Duck Anatomy
Before you pick up a knife, understand what you are working with. A duck has the same basic structure as any poultry:
- 2 leg quarters (thigh + drumstick, connected at the knee joint)
- 2 breasts (attached along the keel bone/breastbone)
- 2 wings (connected at the shoulder joint)
- 1 backbone (the spine)
- 1 wishbone (Y-shaped bone at the front of the breast cavity)
The critical differences from chicken:
- Fat layer: Duck has a thick subcutaneous fat layer between the skin and meat, especially on the breast and around the cavity opening. This fat is your reward — save it all.
- Breast shape: Duck breasts are longer and narrower than chicken breasts, with a pronounced ridge along the keel bone.
- Leg attachment: Duck legs sit tighter against the body than chicken legs. You need to pull harder to expose the hip joint.
- Skin toughness: Duck skin is thicker and more resilient than chicken skin. Your knife needs to be sharp.
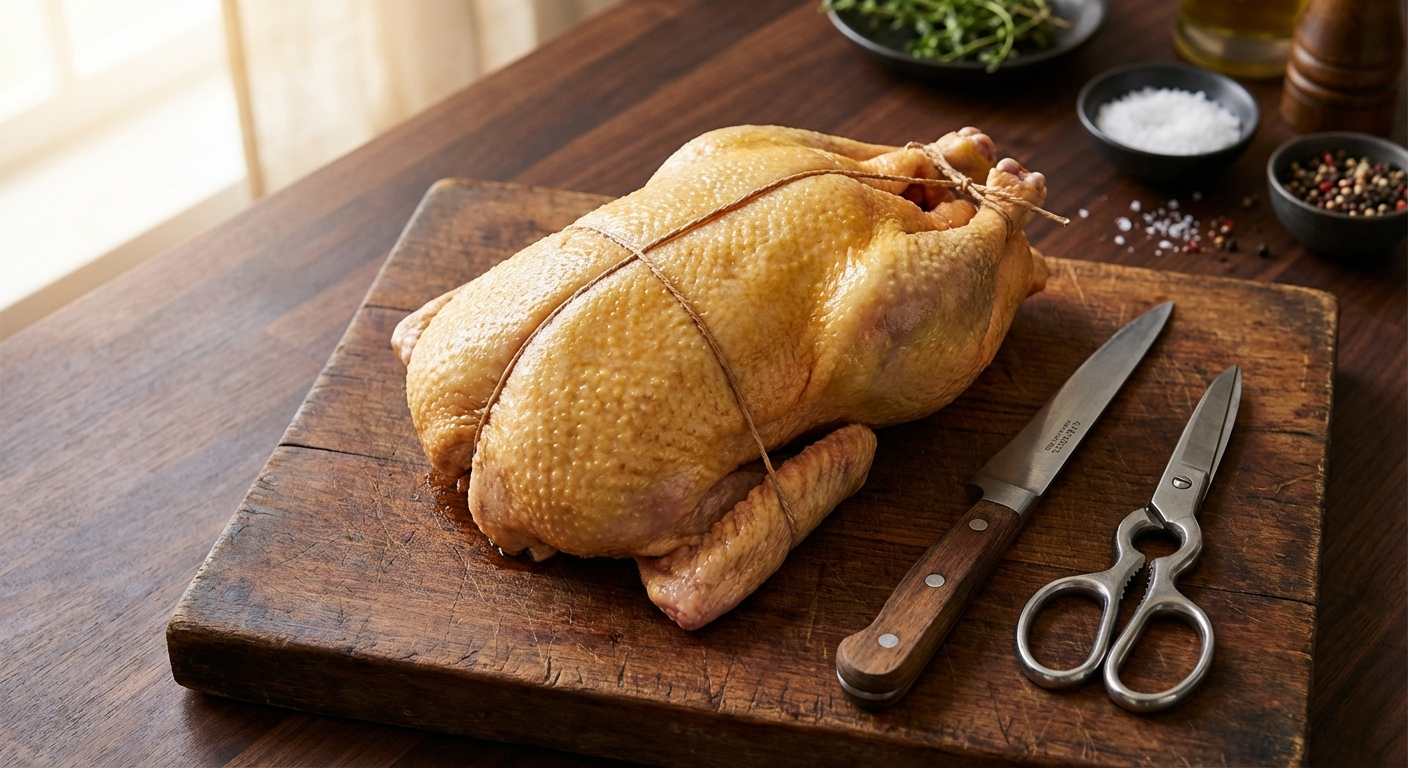
Step 1: Prepare the Duck
Remove the giblets and neck from the cavity if included. Set the neck aside with the carcass — it adds incredible depth to stock. Pat the entire duck dry with paper towels, inside and out.
Check for the two large fat deposits inside the cavity near the tail end. Pull these out with your fingers — they come away easily. These cavity fat pads, sometimes called leaf fat, are the purest duck fat you will render. Set them in your fat container.
Trim any loose skin flaps around the neck and cavity openings. Add these to your fat container as well. Every scrap of skin and fat from a duck renders beautifully.
Step 2: Remove the Leg Quarters
Place the duck breast-side up on your cutting board. This is the same fundamental technique as chicken, with one adjustment: you need more force to expose the joint.
- Slice the skin between the thigh and the breast. Cut only through skin, following the natural crease where the leg meets the body.
- Pull the leg away from the body firmly. Duck legs sit tighter than chicken legs — really pull it outward and downward. You will see the thigh meat begin to separate and the joint area become visible.
- Pop the hip joint by pressing the leg down toward the cutting board until you feel the ball-and-socket joint release. With duck, you may need to use both hands — one pressing the body down, one pressing the leg.
- Cut through the joint once it is exposed. Your knife should pass through cartilage, not bone. If you hit bone, reposition slightly.
- Follow the backbone with your blade to capture the oyster meat — the small, tender oval nestled against the spine. This is the best bite on the duck.
Repeat on the other side. You now have two leg quarters.
Separating Thighs from Drumsticks (Optional)
For confit, most cooks keep the leg quarters whole. If you want separate pieces:
- Lay the leg quarter skin-side down.
- Find the knee joint by flexing the leg — you will see a line of fat marking where drumstick meets thigh.
- Cut straight through the joint. The knife should slide through with minimal resistance.
Duck drumsticks are smaller and bonier than chicken drumsticks. They are best used in braises, stews, or added to the stock pot.
Step 3: Remove the Wings
With the duck still breast-side up:
- Pull the wing away from the body to expose the shoulder joint.
- Cut through the skin and meat around the joint, then slice through the cartilage connecting the wing to the body.
- Feel for the joint — it is a ball-and-socket like the hip. Once you find the gap, the knife passes through cleanly.
Repeat on the other side. Duck wings have less meat than chicken wings but are excellent in stock or can be roasted as a snack. Many butchers remove the wing tips (the third joint with no meat) and add them to the stock pile, keeping the drumette and flat for cooking.
Step 4: Remove the Backbone
This is where kitchen shears earn their place. With the wings and legs removed, you are left with the breast section attached to the backbone.
- Flip the carcass so the backbone faces up.
- Cut along one side of the backbone with your shears, from tail to neck. Duck rib bones are harder than chicken — use strong, deliberate cuts.
- Cut along the other side of the backbone to remove it completely.
The backbone goes into your stock pile. You now have a boneless or semi-boneless breast section (the crown).
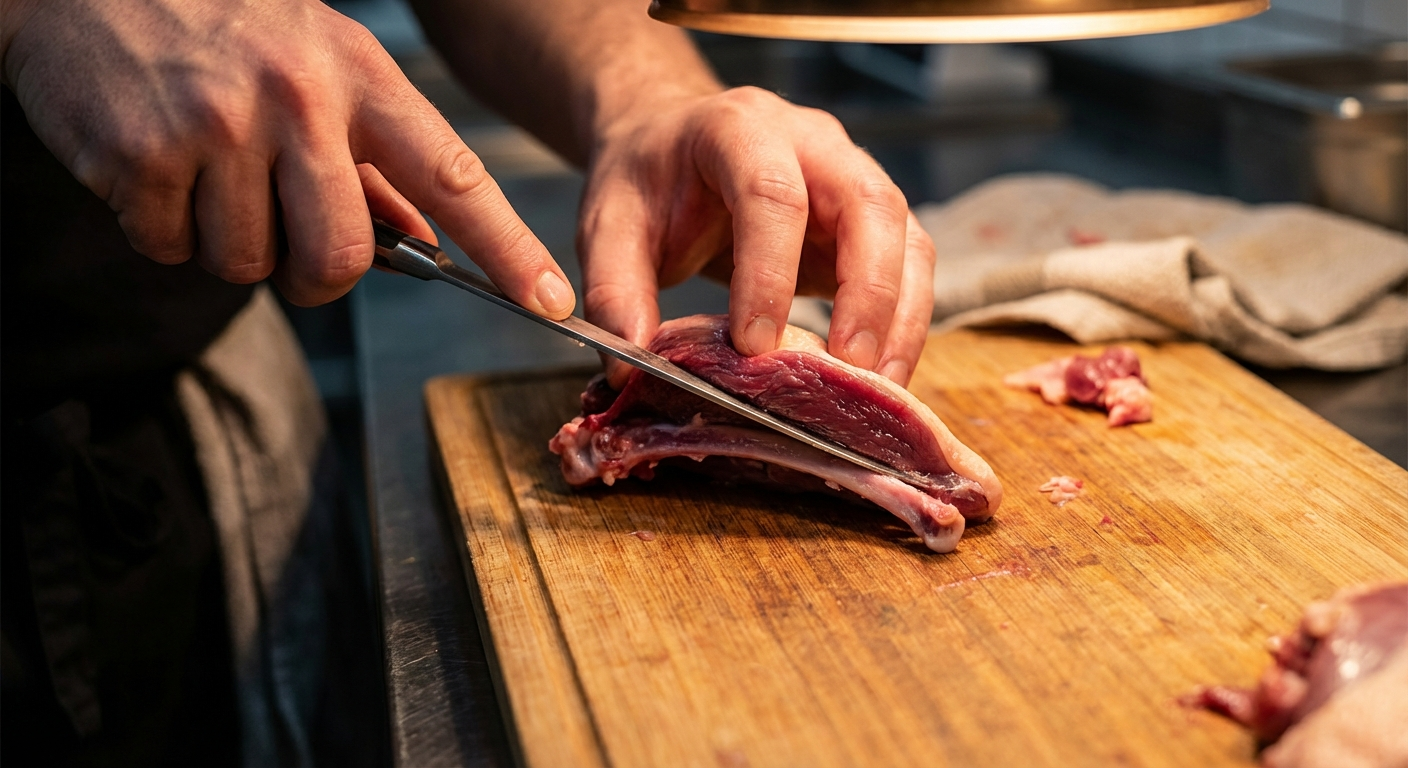
Step 5: Remove the Breasts
This is the most important step. Duck breasts are the premium cut — treat them with care.
- Place the breast section skin-side down on your cutting board.
- Find the keel bone — the prominent ridge running down the center of the breast.
- Score along one side of the keel bone with the tip of your boning knife, cutting just deep enough to reach bone.
- Follow the bone downward with short, scraping strokes. Keep your blade against the bone at all times — let the bone guide your knife. You are peeling the breast meat away from the rib cage.
- Work outward from the keel bone toward the ribs, using the tip of your knife to separate meat from bone. Take your time here. Every bit of meat left on the bone is wasted breast.
- Peel the breast away as you cut. When you reach the edge of the rib cage, the breast will come free in one piece with the skin attached.
Repeat on the other side. You should have two oblong breast portions, each with a thick layer of skin and fat on one side.
Trimming the Breasts
Duck breasts need light trimming before cooking:
- Remove the tenderloin: A small strip of meat on the underside of each breast, attached by a thin membrane. Peel it off and save for stir-fry or stock.
- Trim excess skin: If the skin extends more than half an inch beyond the meat on any edge, trim it flush. Save the trimmings for rendering.
- Score the fat cap: This is done before cooking, not during butchery. Crosshatch the skin with shallow cuts spaced half an inch apart, cutting through fat but not into meat. This allows fat to render during cooking and creates crispy skin.
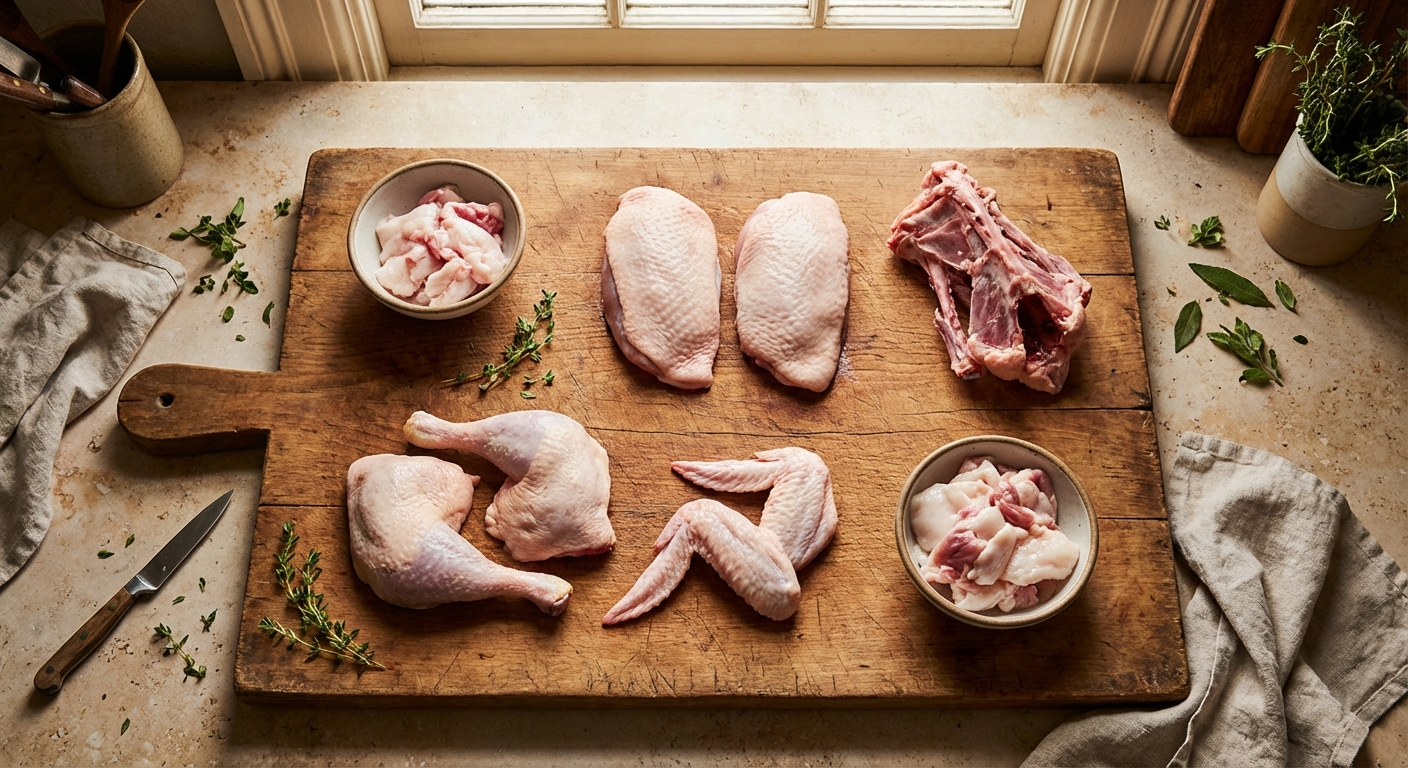
Step 6: Collect and Sort Your Pieces
From one 5-pound Pekin duck, you should now have:
| Piece | Approximate Weight | Best Use |
|---|---|---|
| 2 boneless breasts (skin-on) | 6-8 oz each | Pan-seared, grilled |
| 2 leg quarters | 6-8 oz each | Confit, braised |
| 2 wings | 3-4 oz each | Roasted, stock |
| Backbone + rib cage | 8-12 oz | Stock, broth |
| Fat and skin trimmings | 4-6 oz | Rendered duck fat |
| Neck + giblets | 3-5 oz | Stock, pâté |
Nothing is wasted. A well-broken-down duck yields cooking portions, cooking fat, and stock ingredients from a single purchase.
Rendering Duck Fat
All those skin trimmings, cavity fat pads, and excess fat pieces are culinary treasure. Duck fat has a high smoke point (375°F), rich flavor, and stores for months.
Stovetop Method
- Cut all fat and skin trimmings into small pieces (half-inch or smaller).
- Place in a heavy saucepan with 2 tablespoons of water. The water prevents scorching as the fat begins to render.
- Cook over low heat, stirring occasionally, for 45-60 minutes. The skin pieces will turn golden and crispy (these are cracklings — they are delicious salted).
- Strain through a fine-mesh strainer or cheesecloth into a clean jar.
- Store in the refrigerator for up to 6 months, or freeze for up to a year.
Use rendered duck fat for roasting potatoes, searing steaks, making confit, frying eggs, or anywhere you want rich, savory depth. Once you cook with duck fat, you will understand why French cuisine considers it essential.
Making Duck Stock
The backbone, rib cage, wing tips, neck, and any scraps make exceptional stock. Duck stock is richer and more deeply flavored than chicken stock.
- Roast the bones at 425°F for 30-40 minutes until deeply browned. This step is optional but dramatically improves flavor.
- Add to a stockpot with cold water (about 3 quarts), an onion (halved), a carrot, a celery stalk, a few peppercorns, and a bay leaf.
- Simmer for 3-4 hours, skimming any foam that rises. Do not boil — a gentle simmer produces clear stock.
- Strain and cool. The fat will solidify on top when refrigerated. Remove the fat cap (save it — this is more duck fat) and you have concentrated duck stock.
Duck stock freezes well for up to 6 months. Use it in risotto, sauces, braises, and French onion soup for noticeably better results than chicken stock.
Storage and Shelf Life
Proper storage keeps your butchered duck in peak condition:
- Refrigerator (1-2 days): Wrap each piece tightly in plastic wrap or place in sealed containers. Use within 48 hours for best quality.
- Freezer (up to 6 months): Vacuum seal individual pieces for longest freezer life. If you do not have a vacuum sealer, wrap tightly in plastic wrap, then aluminum foil, removing as much air as possible. Label with the date and cut.
- Breasts: Freeze individually so you can thaw one at a time for dinner.
- Legs: Freeze in pairs for confit batches.
- Fat: Render before freezing if possible. Raw fat trimmings freeze well but take up more space.
Common Mistakes and How to Avoid Them
- Cutting through bone instead of joints: If you feel bone resistance, stop and reposition. Joints are cartilage — the knife should pass through with minimal effort.
- Leaving meat on the carcass: After removing the breasts, run your fingers along the rib cage. Any meat left behind is waste. Use the tip of your boning knife to scrape it off.
- Throwing away fat and skin trimmings: This is the biggest mistake home cooks make with duck. Every scrap of fat and skin has value. Rendered duck fat costs $10-$15 for a small jar at specialty stores.
- Working with a dull knife: Duck skin is tougher than chicken skin. A dull knife will slip and tear instead of cutting cleanly. Hone your knife before starting.
- Rushing the breast removal: Take your time separating the breast from the keel bone. Short, precise strokes against the bone yield cleaner breasts than trying to remove them in a few large cuts.
Scaling Up: Breaking Down Multiple Ducks
Once you are comfortable with the technique, breaking down multiple ducks in a session is efficient and economical. Many butchers and home cooks buy ducks in bulk (often 4-6 at a time when on sale) and process them all at once.
- Assembly-line approach: Remove all legs first, then all wings, then all backbones, then all breasts. Repetition builds speed and consistency.
- Batch render fat: Combine fat trimmings from multiple ducks for one large rendering session.
- Stock day: Roast all carcasses together and make one large batch of stock.
- Confit prep: Salt all leg quarters with cure (salt, thyme, garlic, black pepper) and refrigerate for 24-48 hours before confiting in the rendered fat.
A skilled home butcher can break down a duck in 10 minutes once the technique becomes muscle memory. The first one takes 20-25 minutes — that is completely normal.
Frequently Asked Questions
How long does it take to break down a whole duck?
Your first duck will take 20-25 minutes. With practice, the breakdown takes 10-15 minutes. The technique is identical to chicken with minor adjustments for the thicker fat layer and tighter joint connections.
What knife is best for breaking down a duck?
A 5-6 inch flexible boning knife gives the best control around joints and along the keel bone. A sharp chef's knife works for most steps, but kitchen shears are essential for cutting through the backbone and rib bones.
Can I freeze duck parts after breaking it down?
Yes. Vacuum-sealed duck breasts and leg quarters freeze well for up to 6 months. Wrap individual pieces tightly in plastic wrap and aluminum foil if you do not have a vacuum sealer. Freeze breasts individually and legs in pairs.
What do I do with duck fat trimmings?
Render them into duck fat by cooking slowly over low heat for 45-60 minutes, then straining. Rendered duck fat stores in the refrigerator for 6 months and is excellent for roasting potatoes, searing meat, and making confit.
Is breaking down a duck the same as breaking down a chicken?
The technique is very similar — same joint locations and same basic approach. The key differences are that duck has a thicker fat layer, tougher skin, tighter leg joints, and proportionally smaller breasts. Duck bones are also harder, making kitchen shears more important.
More Expert Guides
How to Trim a Brisket: The Complete Butcher's Guide
Proper brisket trimming is the difference between a backyard experiment and competition-quality results. Here is the professional technique for shaping a whole packer brisket before it ever touches the smoker.
14 min readHow to Butcher a Whole Chicken: Step-by-Step Guide
Breaking down a whole chicken yourself saves 40-50% compared to buying individual parts. Here is the professional technique for turning one bird into perfectly portioned pieces.
14 min readHome Butchering Safety Guide: Essential Protocols for Safe Meat Processing
Learn professional butchering safety protocols from a master butcher with 25+ years of experience. Essential guidance for anyone processing meat at home.