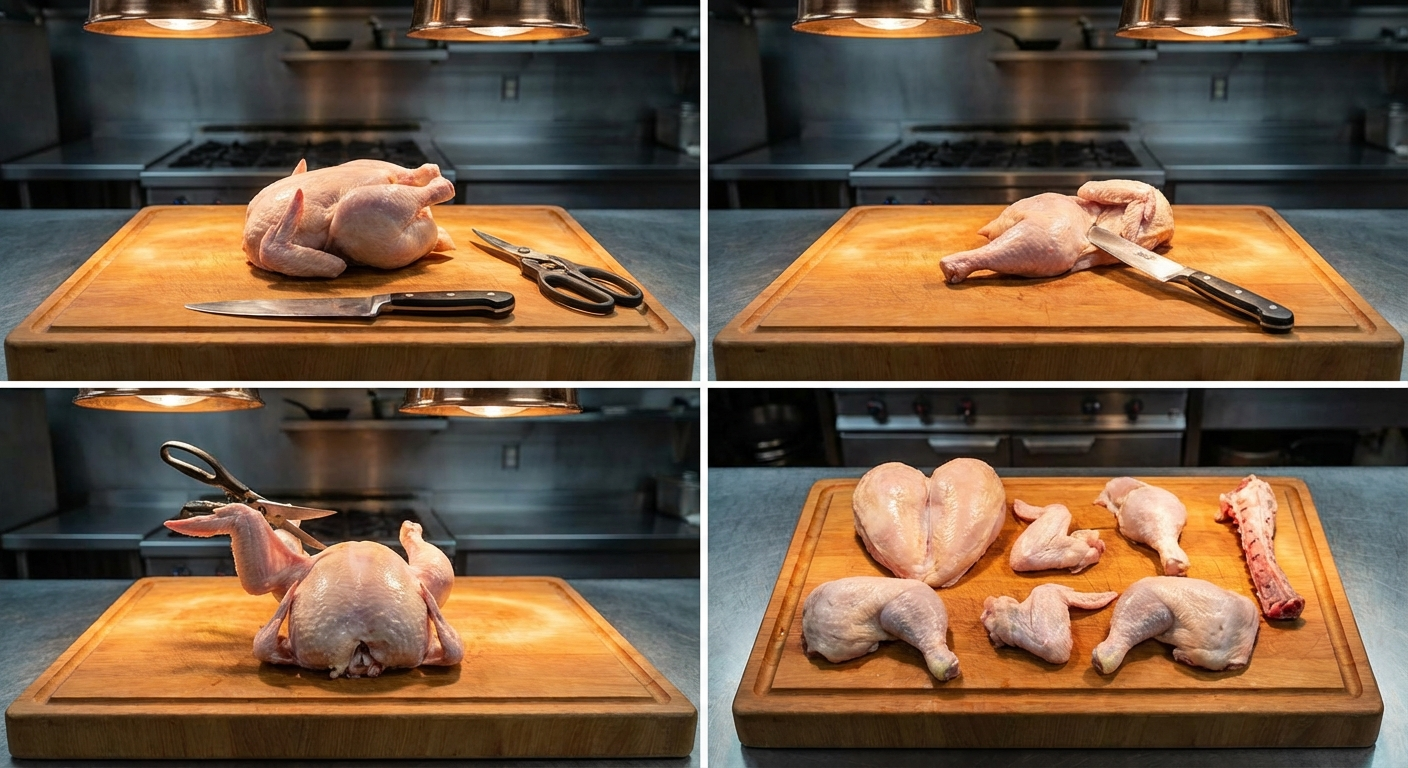
How to Butcher a Whole Chicken: Step-by-Step Guide
Buying whole chickens and breaking them down yourself is one of the smartest moves any home cook can make. A whole chicken costs $1.50-$2.50 per pound. Boneless skinless breasts? $4-$6 per pound. Thighs and drumsticks sold separately? $3-$4. By learning one 10-minute technique, you cut your chicken budget nearly in half — and you get a carcass for stock that would cost another $5-$8 at the store.
I have broken down more chickens than I can count during my years in the trade. The technique is simple, but it requires understanding the bird's anatomy. Once you feel where the joints connect and where the natural separations lie, you will wonder why you ever paid someone else to do this.
What You Need
Tools
- Sharp chef's knife or boning knife (6-8 inches): A chef's knife handles every step. A boning knife gives more precision around joints but is not required.
- Large cutting board: At least 18x12 inches. Place a damp towel underneath to prevent sliding.
- Kitchen shears (optional): Useful for cutting through the backbone if spatchcocking or removing the spine.
- Paper towels: For drying the bird and keeping your grip secure.
The Chicken
Start with a whole chicken, 3.5-5 pounds. Remove it from the refrigerator 10-15 minutes before breaking it down — a slightly less cold bird is easier to work with. Remove the giblets and neck from the cavity if included (save them for stock).
Pat the chicken dry with paper towels. A dry bird is safer to handle — wet skin is slippery, and slippery means less control.
Understanding Chicken Anatomy
Before making a single cut, understand the structure. A chicken has:
- 2 leg quarters (thigh + drumstick connected at the knee joint)
- 2 wings (connected at the shoulder joint)
- 2 breasts (connected along the breastbone/keel)
- 1 backbone (the spine running the length of the bird)
- 1 wishbone (Y-shaped bone at the front of the breast)
Every joint is held together by cartilage and tendons — not solid bone. This is the key insight: you should almost never need to cut through bone. If you feel bone resistance, reposition your knife. You are looking for the soft spot between bones where the joint connects.
The 8-Piece Breakdown
This is the standard butcher's breakdown: 2 drumsticks, 2 thighs, 2 wing pieces, 2 breast halves. Plus the backbone and trimmings for stock.
Step 1: Remove the Leg Quarters
Place the chicken breast-side up on your cutting board. Pull one leg away from the body to expose the skin between the thigh and breast.
- Slice through the skin connecting the thigh to the body. Cut through skin only — do not force through meat yet.
- Pull the leg further away from the body. You will see the thigh meat begin to separate from the breast.
- Pop the thigh joint out of the hip socket by bending the leg backward until you feel it release. You will hear or feel a soft pop.
- Once the joint is exposed, cut through it with your knife. The blade should pass through cartilage with minimal resistance.
- Follow the natural curve of the carcass with your blade to remove the entire leg quarter (thigh and drumstick together) in one piece. Include the "oyster" — the small, tender oval of dark meat nestled against the backbone. Scrape along the backbone to capture it.
Repeat on the other side. You now have two leg quarters and a bird with just wings and breasts remaining.
Step 2: Separate Drumsticks from Thighs
Lay each leg quarter skin-side down. You will see a thin line of fat running across the joint between the drumstick and thigh — this marks the exact location of the knee joint.
- Cut along this fat line. Your knife should pass through the joint with almost no resistance.
- If you hit bone, adjust your angle slightly. The sweet spot is a gap between the two bones — once you find it, the knife falls right through.
You now have 2 drumsticks and 2 thighs.
Step 3: Remove the Wings
With the remaining breast-and-wing carcass breast-side up:
- Pull one wing away from the body to find the shoulder joint.
- Cut into the joint where the wing meets the breast. Feel for the ball-and-socket connection.
- Slice through the joint — again, almost no bone resistance when you hit the right spot.
Repeat on the other side. For each wing, you can optionally cut off the wing tip (the bony, meatless end segment) and save it for stock. The remaining wing piece — the flat and drumette still connected — is a single serving piece. Or separate them at the middle joint for party-style wings.
Step 4: Remove the Backbone
This step separates the breast from the spine. You have two options:
Option A — Kitchen Shears (easier): Cut along both sides of the backbone from tail to neck. The shears handle the small rib bones easily. Remove the backbone in one piece.
Option B — Chef's Knife: Place the carcass breast-side down. Cut along one side of the backbone through the thin rib bones, then the other side. Requires more force but works fine with a sharp, heavy knife.
Save the backbone for stock. It contains tremendous flavor.
Step 5: Split the Breast
With the backbone removed, you have a butterflied breast with the keel bone (breastbone) running down the center.
- Place the breast skin-side down on the cutting board.
- Score down the center of the keel bone cartilage with your knife.
- Open the breast like a book to expose the keel bone.
- Use your thumbs or knife tip to pop the keel bone free — it comes out easily, especially in younger birds.
- Cut through the center to create two breast halves.
Alternatively, simply cut straight through the breastbone with a firm press of your chef's knife. This is faster but leaves small bone fragments — most butchers prefer the cleaner keel-removal method.
Result: 8 pieces — 2 drumsticks, 2 thighs, 2 breast halves, 2 wings. Plus backbone, wing tips, and neck for stock.
The 10-Piece Breakdown
For more evenly sized pieces (ideal for braising, frying, or curry), cut each breast half crosswise into two pieces:
- Place each breast half skin-side up.
- Cut crosswise at a slight angle, creating one piece from the thicker end and one from the tapered end.
- Aim for roughly equal weight in both pieces.
This gives you 10 pieces that cook more evenly — the thinner breast pieces finish around the same time as the thicker thighs and drumsticks.
Going Boneless
Boneless Skinless Breasts
After splitting the breast:
- Peel the skin away (save it — chicken skin crisps beautifully when roasted flat).
- Use your boning knife to follow the rib bones, separating the meat from the bone cage.
- Remove the tenderloin (the small strip of meat on the underside) and trim the tendon running through it.
Boneless Skinless Thighs
Lay each thigh skin-side down:
- Locate the thigh bone running through the center.
- Cut along both sides of the bone to expose it.
- Scrape the meat away from the bone, working from one end to the other.
- Cut around the joints at each end to free the bone completely.
- Remove the skin if desired.
Boneless thighs from a whole chicken are identical to what you pay premium prices for in the store.
What to Do with the Scraps
A properly broken-down chicken produces zero waste:
- Backbone + wing tips + neck + giblets: Roast at 400°F for 30 minutes, then simmer in water with aromatics for 2-4 hours. Yields 6-8 cups of rich stock worth $8-$12 at the store.
- Chicken skin: Lay flat on a baking sheet, season with salt, bake at 375°F until crispy. Chicken cracklings — use as a salad topper or snack.
- Fat trimmings: Render slowly in a pan for schmaltz (chicken fat). Jewish grandmother's secret weapon for cooking.
- Bones from boneless pieces: Add to stock pot.
Money Saved: The Real Numbers
Let us run the math on a typical 4-pound whole chicken at $2.00/lb ($8.00 total):
| Piece | Yield | Store Price | Store Cost |
|---|---|---|---|
| 2 bone-in breasts (1.2 lb) | 30% | $4.50/lb | $5.40 |
| 2 thighs (0.8 lb) | 20% | $3.00/lb | $2.40 |
| 2 drumsticks (0.6 lb) | 15% | $2.50/lb | $1.50 |
| 2 wings (0.5 lb) | 12% | $3.50/lb | $1.75 |
| Stock parts (0.9 lb) | 23% | $3.00 equiv | $3.00 |
| Total value | $14.05 |
You paid $8.00 for $14.05 in value. That is a 43% savings — and it only takes 10 minutes once you have the technique down.
Common Mistakes and How to Avoid Them
Cutting Through Bone
If your knife meets hard resistance, stop. You are off the joint. Wiggle the leg or wing to see where the joint flexes, then reposition your blade at that exact point. Joints are soft — bones are hard. Let the anatomy guide you.
Dull Knife
A dull knife is the number one cause of chicken-butchering frustration. Skin tears instead of slicing, and you end up sawing instead of cutting. Sharpen before you start. See our knife sharpening guide for proper technique.
Missing the Oyster
The oyster is a small medallion of dark meat on the back of the bird, right where the thigh meets the spine. Most people leave it on the carcass. Scrape your knife along the backbone when removing the leg quarter to capture it — it is the most tender bite of dark meat on the bird.
Uneven Breast Pieces
Chicken breasts taper dramatically from thick to thin. For even cooking, either pound them to uniform thickness after cutting, or use the 10-piece method to separate the thick and thin halves.
Slippery Bird
Dry the chicken thoroughly with paper towels before starting. Keep a dry towel nearby to wipe your hands. Some butchers grip with a paper towel for extra traction. A slippery bird is a safety hazard.
Speed and Efficiency
Your first time will take 15-20 minutes. By your fifth chicken, you will be under 10 minutes. Professional butchers break down a chicken in under 2 minutes — you do not need that speed at home, but it shows what practice produces.
Buy whole chickens in bulk when they go on sale ($0.99-$1.29/lb sales happen regularly). Break them all down in one session, portion into freezer bags, and you have weeks of protein ready to go.
Cooking Suggestions by Piece
- Breasts: Pan-sear, grill, bread and fry, slice for stir-fry
- Thighs: Braise, roast, grill, curry — the most versatile and forgiving cut
- Drumsticks: Roast, fry, braise, grill — great for kids and casual meals
- Wings: Fry, bake, grill, air-fry — separate drumettes and flats for classic wings
- Whole leg quarters: Grill, roast, smoke — impressive single-serving piece
Dark meat (thighs, drumsticks) tolerates higher internal temperatures without drying out — cook to 175-180°F for the best texture. White meat (breasts) should come off heat at 160-165°F to stay juicy.
Building Your Butchery Skills
Chicken is the perfect training ground for knife skills. The joints are accessible, the anatomy is simple, and mistakes are inexpensive. Once you are comfortable breaking down chickens, the same principles apply to larger animals:
- Find the joints — they are always softer than bone
- Follow natural separations — muscles want to come apart at the seams
- Let the knife do the work — if you are forcing, you are in the wrong spot
- Keep your blade sharp — always
These fundamentals connect directly to breaking down whole beef and every other protein. Master the chicken, and you have mastered the mindset.
Ready to take your butchery further? Practice these techniques and then graduate to breaking down whole beef sub-primals from The Meatery — the same joint-finding, seam-following principles scale up beautifully to larger cuts.
Frequently Asked Questions
How long does it take to butcher a whole chicken?
For beginners, expect 15-20 minutes. With practice, you will be under 10 minutes by your fifth chicken. Professional butchers can do it in under 2 minutes. Speed comes naturally with repetition — focus on clean cuts first.
What knife do I need to butcher a chicken?
A sharp 8-inch chef's knife handles every step. A 6-inch boning knife provides more precision around joints but is not required. The most important factor is sharpness — a dull knife makes the job frustrating and unsafe.
How much money do you save butchering a whole chicken?
Approximately 40-50% compared to buying individual parts. A 4-pound whole chicken at $2.00/lb ($8.00) yields about $14 worth of parts plus stock ingredients. Over a year of weekly chicken meals, this saves $300-$400.
Do I need to cut through bone when butchering a chicken?
Almost never. Every major joint connects with cartilage and tendons, not solid bone. If your knife meets hard resistance, stop and reposition — you are off the joint. The only bone-cutting step is splitting the breast or removing the backbone, which kitchen shears handle easily.
What do I do with the chicken carcass after butchering?
Make stock. Roast the backbone, wing tips, and neck at 400°F for 30 minutes, then simmer with water, onion, carrot, and celery for 2-4 hours. Strain and you have 6-8 cups of rich chicken stock worth $8-$12 at the store. Freeze in portions for future use.
Can I freeze chicken pieces after butchering?
Yes. Wrap pieces tightly in plastic wrap, then place in freezer bags with air removed. Label with the date. Frozen chicken pieces maintain quality for 9-12 months. For best results, vacuum-seal individual portions.
More Expert Guides
How to Trim a Brisket: The Complete Butcher's Guide
Proper brisket trimming is the difference between a backyard experiment and competition-quality results. Here is the professional technique for shaping a whole packer brisket before it ever touches the smoker.
14 min readHome Butchering Safety Guide: Essential Protocols for Safe Meat Processing
Learn professional butchering safety protocols from a master butcher with 25+ years of experience. Essential guidance for anyone processing meat at home.
10 min readComplete Guide to Butcher Knife Types and Their Uses
After three generations in the butchery trade, I've learned that the right knife makes all the difference between clean, efficient cuts and wasted meat. This guide covers every essential butcher knife, when to use each blade, and what separates professional-grade tools from kitchen knives.