How to Butcher a Whole Pig: Step-by-Step Guide for Home Butchers
A whole hog hanging in your garage or barn is one of the most satisfying sights in home butchery — and one of the most intimidating. That 180-pound carcass needs to become chops, roasts, ribs, bacon, ham, sausage, and ground pork. The good news: pig anatomy is logical, the cuts are forgiving, and the process is more straightforward than beef.
Whether you raised the hog yourself, bought one from a local farm, or split a whole pig with friends, this guide covers every step from receiving the carcass to packaging the final retail cuts. We will work through the breakdown methodically — splitting, separating primals, then fabricating each primal into the cuts you actually want in your freezer.
Understanding Pork Primal Cuts
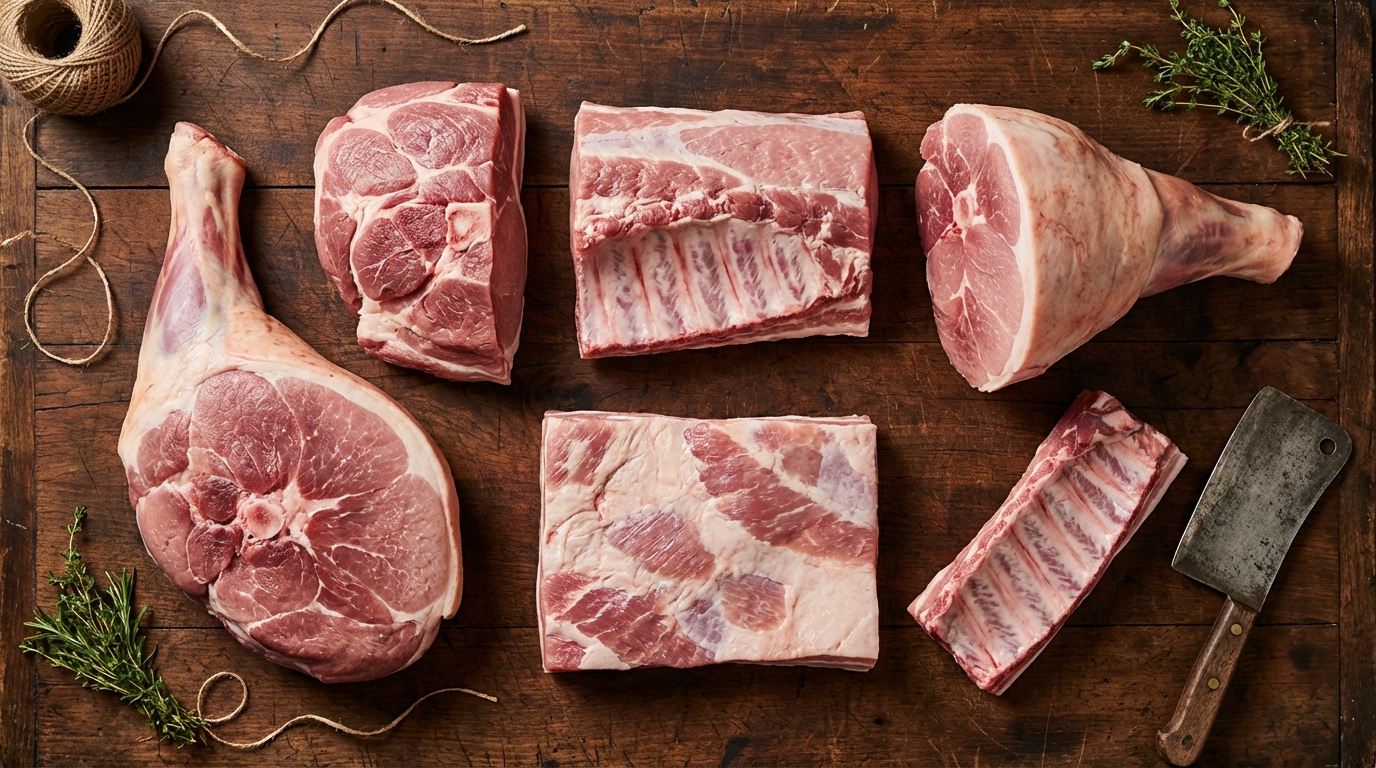
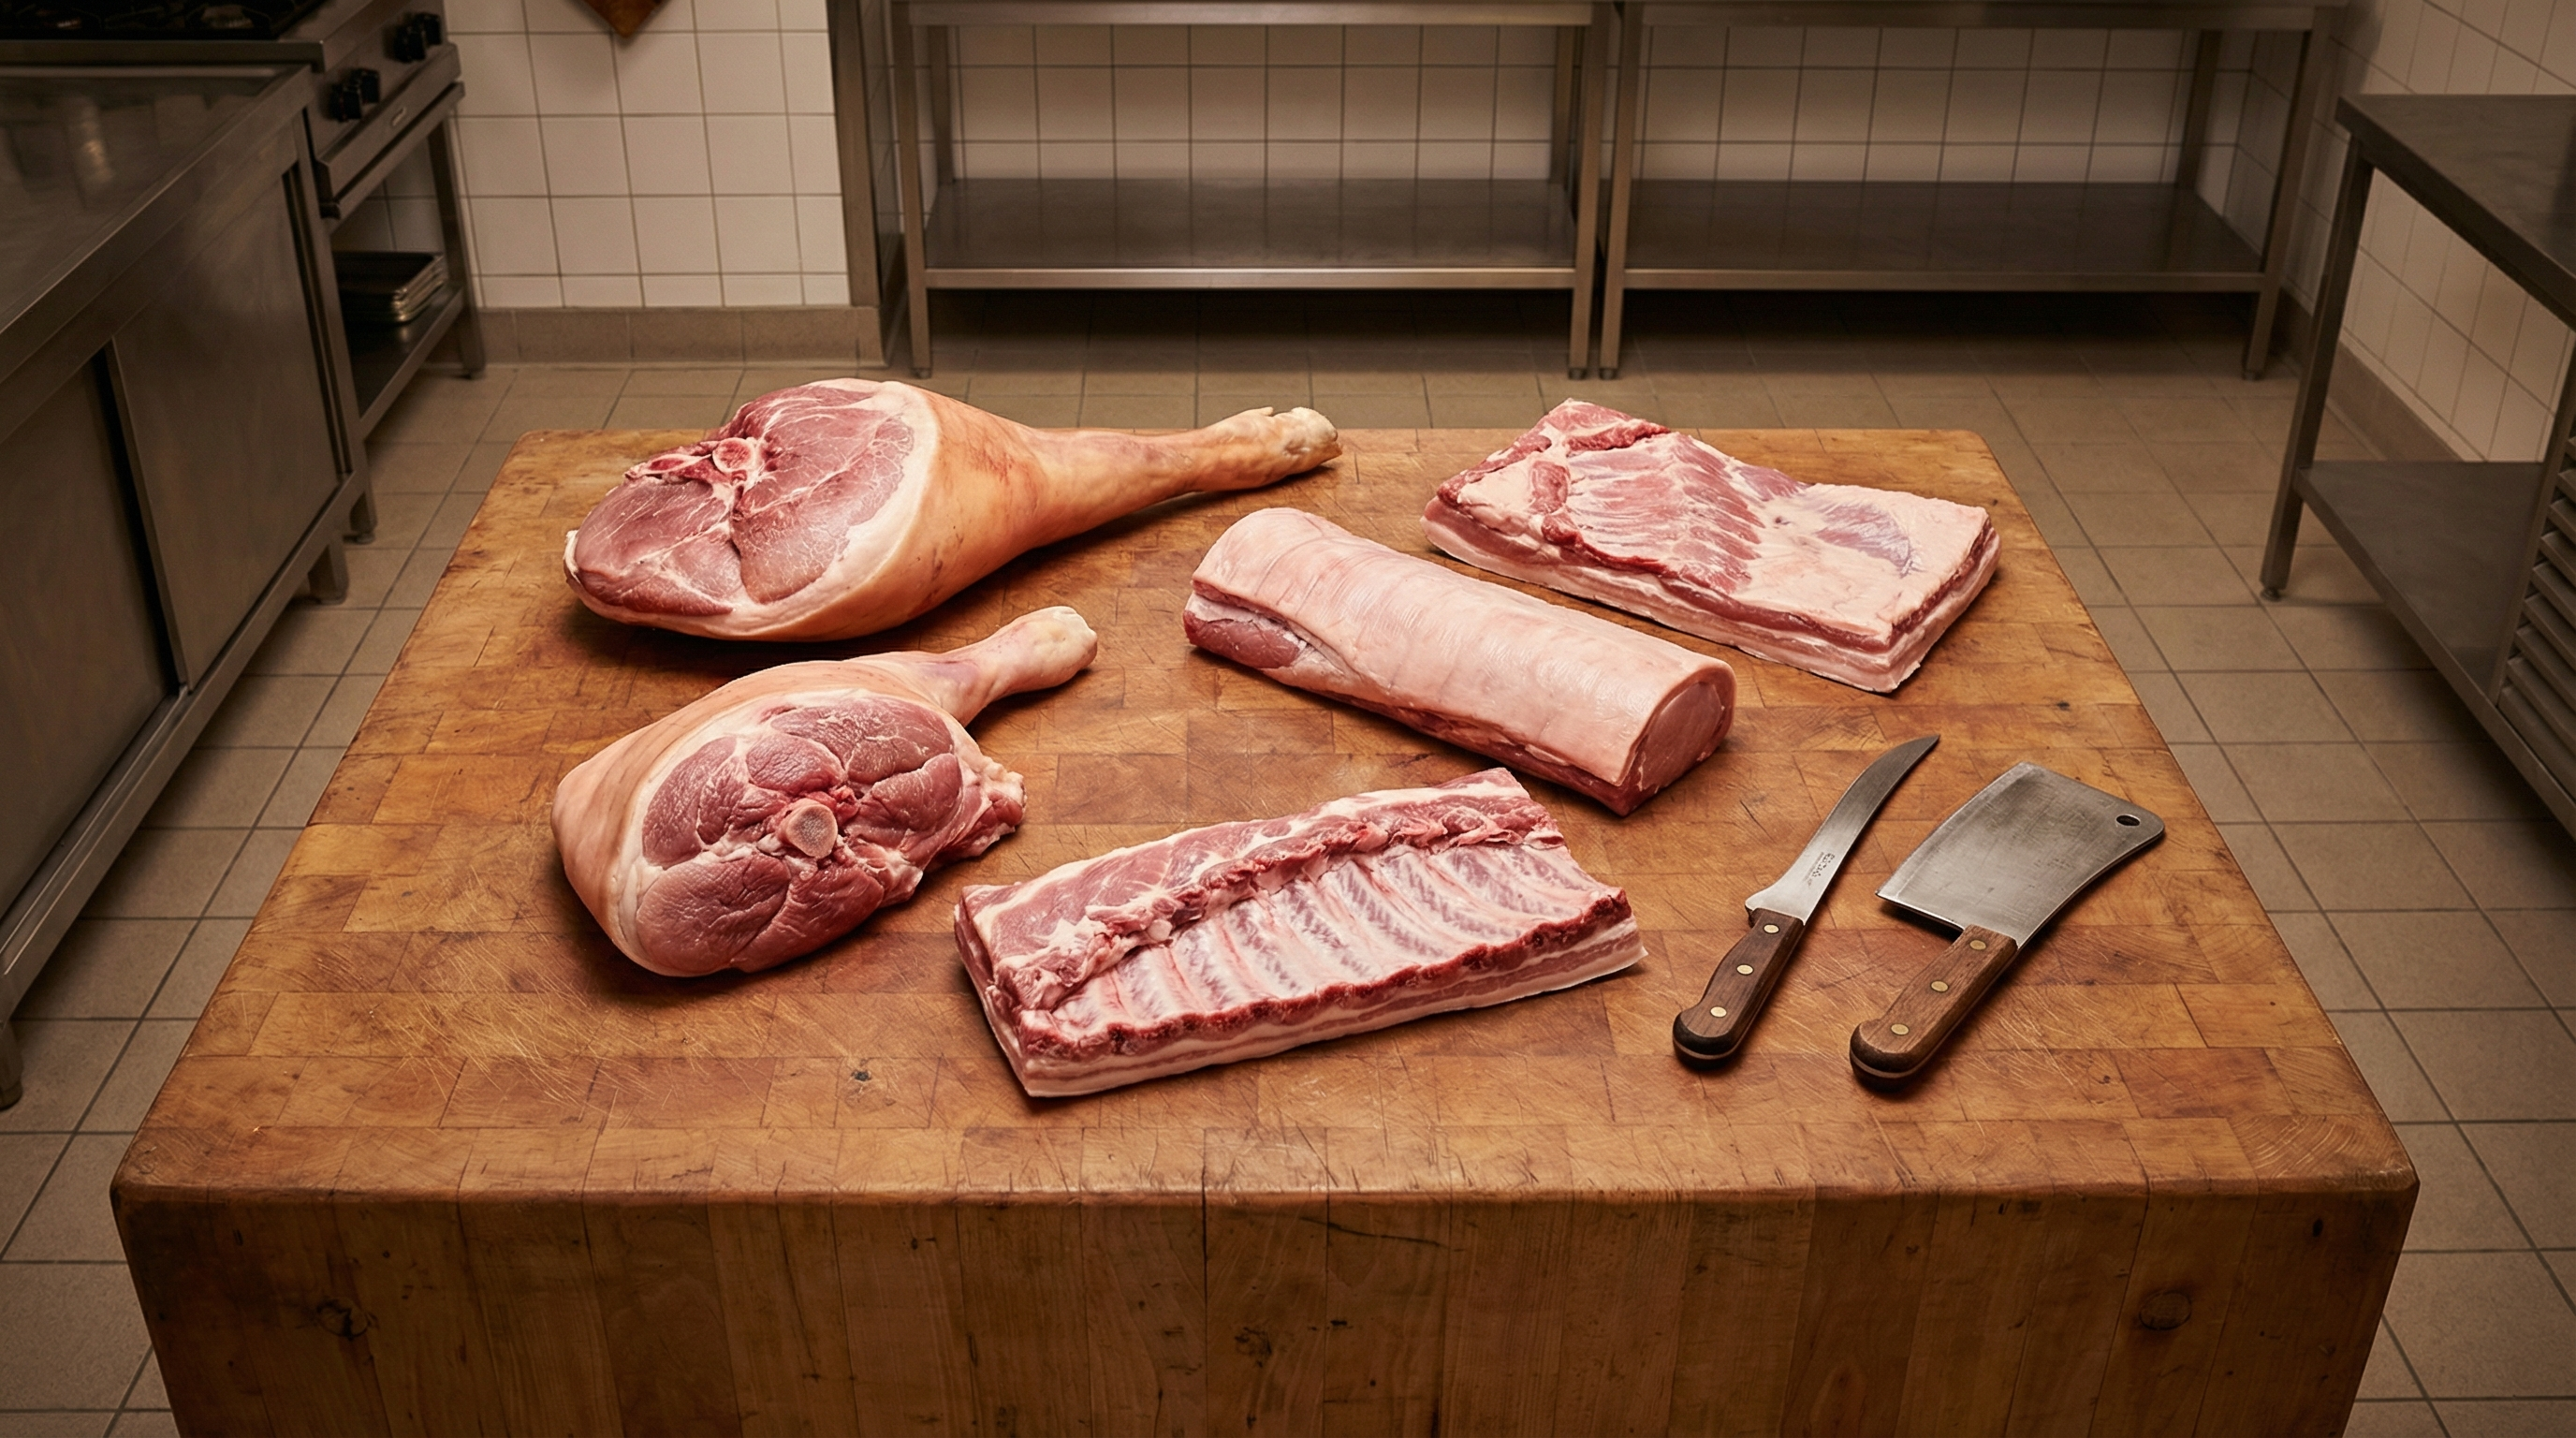
Before you pick up a knife, you need a mental map of the animal. A pig is simpler than beef — fewer primals, more intuitive anatomy. Each side of a split hog contains four main primals:
- Shoulder (front leg and Boston butt): The entire front quarter, from the neck down through the front leg. This divides further into the Boston butt (upper shoulder, excellent for pulled pork) and the picnic shoulder (lower portion including the front leg). Rich in connective tissue and intramuscular fat — ideal for slow cooking, grinding, and sausage.
- Loin: The long muscle running along the spine from behind the shoulder to the hip. This is where pork chops, tenderloin, back ribs, and boneless loin roasts come from. The leanest primal on the pig and the most valuable per pound.
- Belly: The underside of the pig below the loin. This is bacon. Also used for pancetta, porchetta, and braised pork belly. A thick, layered cut of alternating meat and fat that benefits from curing or slow rendering.
- Ham (rear leg): The entire hind quarter from the hip through the rear leg. This is the largest primal — a single ham can weigh 15 to 20 pounds. Fresh ham makes outstanding roasts, and the whole leg can be cured into country ham, prosciutto, or city ham.
Additionally, each side yields spare ribs (from the belly side) and optionally the head for headcheese, jowl bacon (guanciale), or stock. The trotters (feet), tail, and organ meats are bonus items depending on your appetite for offal.
Tools and Setup
Proper equipment makes the difference between a clean, efficient breakdown and a frustrating wrestling match. You do not need a commercial butcher shop, but you do need the right tools.
Essential Cutting Tools
- Bone saw or reciprocating saw: You cannot split a pig without a saw. A traditional bone saw works but is slow and exhausting on a whole carcass. A reciprocating saw (Sawzall) with a clean, food-grade stainless steel blade cuts through the spine in minutes. Dedicate the blade to meat — never use one that has cut wood or metal.
- 10-inch breaking knife: Your primary knife for separating primals. The curved blade and stiff spine let you make long, sweeping cuts through large muscle groups. A Victorinox or Dexter-Russell works perfectly.
- 6-inch boning knife (semi-flexible): For detail work — following bones, removing silverskin, separating joints. The shorter blade gives you precision around curves and in tight spaces.
- Honing steel: You will touch up your edge dozens of times during a whole hog breakdown. A smooth or fine-grooved steel keeps you sharp between passes. Dull knives are dangerous and make ragged cuts that waste meat.
Work Surface and Environment
- Large cutting surface: A 4-by-8-foot table covered with food-grade cutting boards or heavy-duty plastic sheeting. You need room to lay out half a pig and work around it. A folding table in a clean garage works well in cool weather.
- Temperature control: Keep the carcass at 34 to 40 degrees Fahrenheit throughout processing. If you are working outdoors, ambient temperature below 40°F is ideal. In warmer weather, work fast and keep primals in coolers with ice as you separate them.
- Containers: Large food-safe bins or bus tubs for collecting primals, trim, fat, and bones separately. Organization saves time later when you are grinding, packaging, or rendering.
- Vacuum sealer and bags: The single best investment for home meat processing. Vacuum-sealed pork lasts 12 to 18 months in the freezer versus 3 to 4 months in butcher paper.
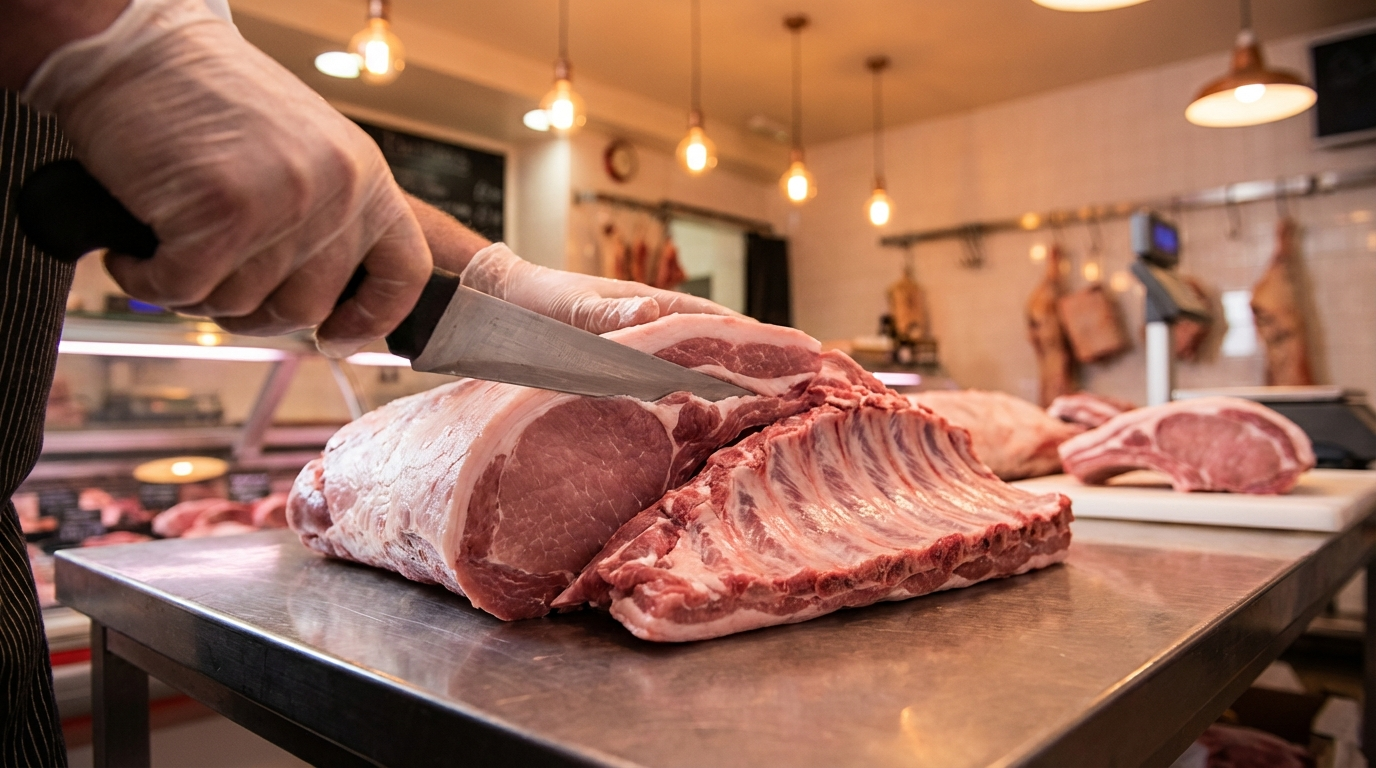
Step 1: Splitting the Carcass
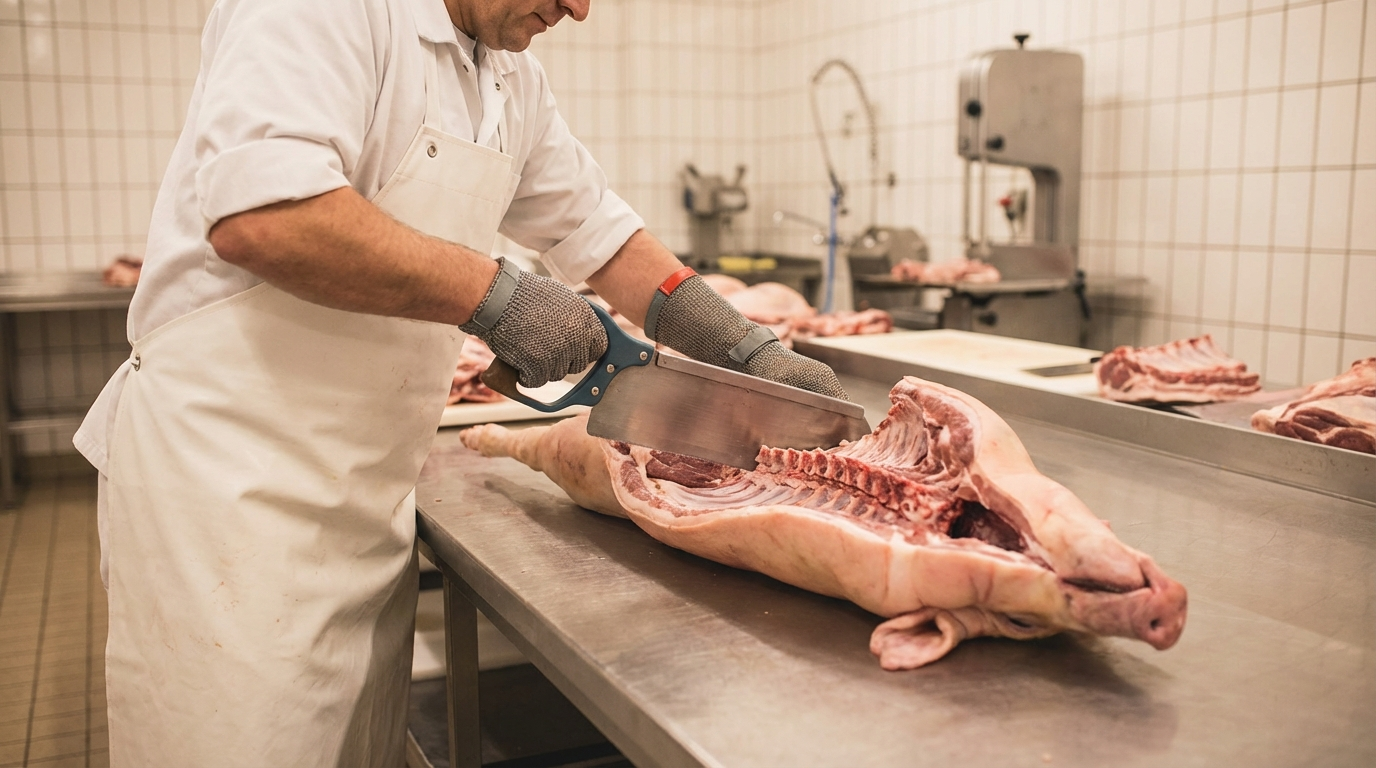
If your pig arrives whole (not already split by the processor), your first job is cutting it into two sides. Lay the carcass on its back — belly up, legs in the air. You are cutting straight down the center of the spine from tail to head.
With a reciprocating saw, start at the tail end. Line the blade up with the exact center of the spine — you want to split the vertebrae in half, not cut to one side. Apply steady pressure and let the saw do the work. Move slowly and keep the cut centered. If you drift to one side, you will end up with uneven chops later.
Work your way from the tail through the loin, past the ribs, through the shoulder, and out through the head if you are keeping it. The whole split takes 5 to 10 minutes with a reciprocating saw.
Once split, lay one side skin-down on your work surface. Set the other side in a cooler or hang it to stay cold while you work. Process one side at a time — it keeps your workspace manageable and the meat cold.
Step 2: Removing the Shoulder
With one side laid out skin-down, the shoulder is at the front (head end). Your goal is to separate the entire front quarter — shoulder, front leg, and associated ribs — from the middle section.
Count the ribs from the front. Between the 4th and 5th rib, make a straight cut perpendicular to the spine. Cut through the meat with your breaking knife, then use the bone saw to cut through the spine and ribs. This single crosswise cut separates the shoulder primal from the rest of the side.
You now have the whole shoulder as one piece. Set it aside — we will fabricate it into Boston butt and picnic shoulder later.
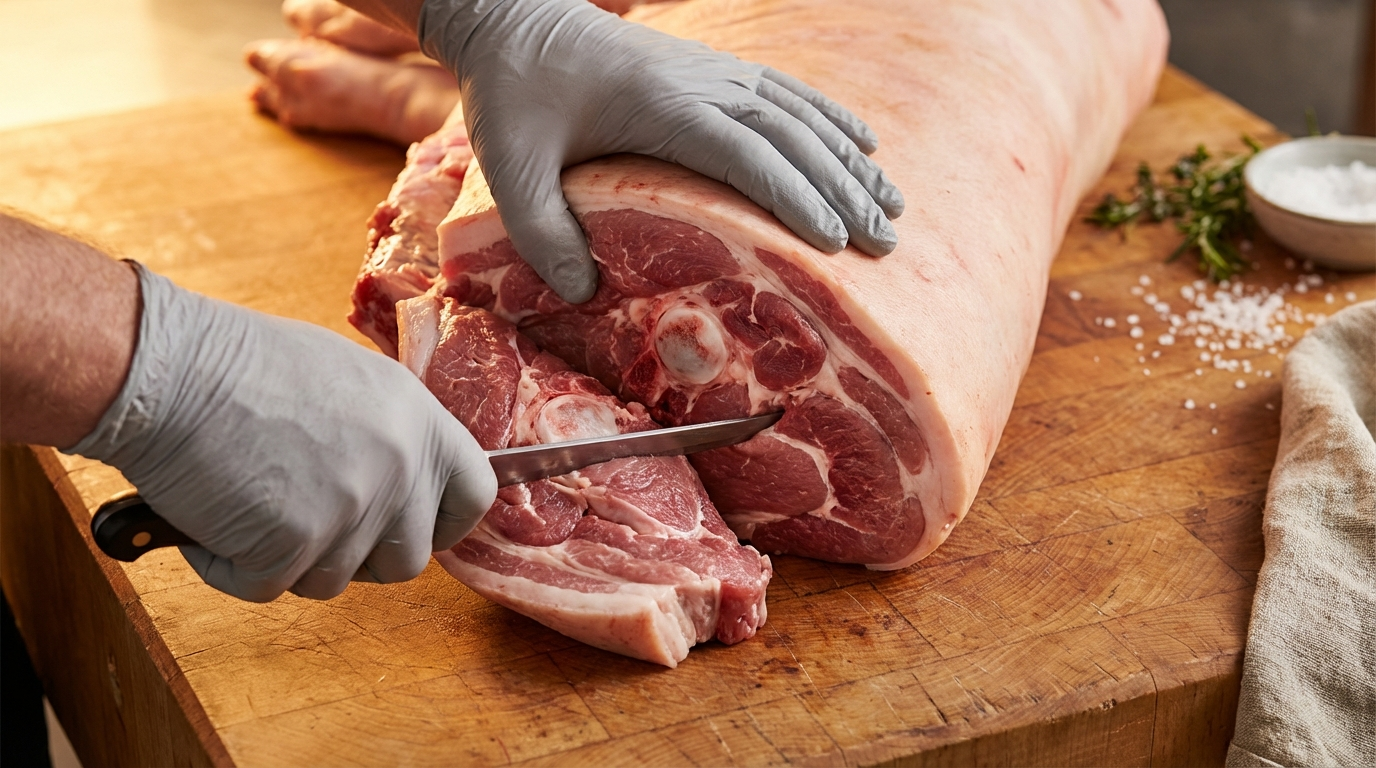
Fabricating the Shoulder
The shoulder primal divides into two sub-primals at a natural seam roughly halfway down:
- Boston butt (upper shoulder): Find the shoulder blade bone. Cut horizontally across the shoulder about an inch above where the blade bone sits. The Boston butt is above this cut — a roughly rectangular piece of well-marbled meat weighing 6 to 9 pounds. This is your pulled pork cut. Leave it whole for smoking, or cut it into 2-pound chunks for braising.
- Picnic shoulder (lower shoulder and front leg): Everything below the Boston butt cut, including the front leg and hock. The picnic can be smoked whole (skin-on for crackling), cut into roasts, or boned out entirely for grinding and sausage. The front hock makes excellent smoked ham hocks for beans and soups.
For maximum yield, bone out the picnic completely: remove the arm bone and shank bone, separate the lean meat for grinding, save the skin for chicharrones or stock, and set the bones aside for broth.
Step 3: Removing the Ham
Go to the opposite end of your side — the rear leg. The ham separates from the loin and belly section at the hip joint, right where the pelvis meets the spine.
Feel for the aitch bone (the pelvic bone) on the inside of the leg. Make a cut perpendicular to the spine at the point where the last lumbar vertebra meets the pelvis. Cut through the meat with your knife, then saw through the aitch bone and spine.
The whole ham comes off as a single piece weighing 15 to 20 pounds with bone in. You have several options:
- Fresh ham roast (bone-in): Score the skin, season, and roast at 325°F until 145°F internal. Feeds 15 to 20 people.
- Cured ham: Brine for 7 to 14 days, then smoke at 225°F to 155°F internal for city-style ham. Or dry-cure with salt for country ham or prosciutto — a project that takes months but produces extraordinary results.
- Boneless ham steaks and roasts: Remove the femur, aitch bone, and shank bone. Separate the muscles along natural seams into 3 to 5 smaller roasts, or slice crosswise into ham steaks 3/4-inch thick.
- Ground pork and sausage: Bone out completely and add to your trim pile. Ham meat is leaner than shoulder, so balance it with fattier trim when grinding.
Step 4: Separating the Loin from the Belly
You are now looking at the middle section — everything between where the shoulder was and where the ham was. This section contains the loin (top) and belly (bottom), connected by the spare ribs.
To separate them, make a cut parallel to the spine. Measure about 3 to 4 inches down from the chine bone (the split vertebrae along the top). Cut in a straight line from one end to the other with your breaking knife. Where you hit ribs, use the bone saw to cut through them.
This gives you two pieces:
- The loin section (top): Contains the loin eye muscle, tenderloin, back ribs, and chine bones.
- The belly and spare ribs section (bottom): Contains the belly slab with spare ribs still attached.
Fabricating the Loin
The loin is the most versatile primal on the pig. Start by removing the tenderloin — the small, tender muscle that runs along the inside of the spine. Peel it out by hand, using your boning knife to free the ends. Each tenderloin weighs about 1 to 1.5 pounds. Vacuum seal these separately — they are the filet mignon of pork.
Next, decide how you want your chops and roasts:
- Bone-in pork chops: With the chine bone removed (saw it off flush with the rib ends), cut between each rib for individual chops 1 to 1.5 inches thick. A full loin yields 10 to 14 chops.
- Boneless loin roast: Remove the entire loin eye from the bones. You get a clean, cylindrical roast perfect for roasting, slicing into boneless chops, or cutting into medallions.
- Back ribs: If you removed the loin eye as boneless, you are left with baby back ribs. Trim the membrane from the bone side, and you have a rack ready for the smoker or grill.
- Crown roast: Leave 8 to 10 rib chops connected, french the rib ends, and curve the rack into a circle for a showpiece roast.
Fabricating the Belly and Spare Ribs
The belly slab arrives with spare ribs still attached on the bone side. Lay the slab bone-side up. You can see the spare ribs running across the surface.
Slide your boning knife under the ribs, following the curve of the bones. Work from one end to the other, peeling the ribs away from the belly meat. Take your time — rushing means leaving meat on the ribs or cutting into the belly.
Once separated:
- Spare ribs: Trim the rib tips (the cartilaginous flap at the bottom) to create St. Louis-style ribs — a clean rectangular rack that cooks evenly. The rib tips can be braised, smoked, or added to the grind.
- Pork belly: The boneless belly slab is your bacon. Square it up by trimming the edges (save trim for grinding). For home-cured bacon, apply a cure of salt, sugar, and pink curing salt, refrigerate for 7 days, then cold-smoke or oven-roast at 200°F to 150°F internal. Slice thin on a deli slicer or by hand.
Step 5: Processing the Trim
Throughout the breakdown, you have been collecting trim — irregular pieces of meat, fat, and scraps from every primal. This is not waste. On a whole hog, trim typically accounts for 25 to 35 percent of the take-home weight, and it becomes some of the best eating.
- Ground pork: Run lean trim through a grinder fitted with a 3/8-inch plate for general-purpose ground pork. Target a fat ratio of 70/30 for flavorful results. Too lean and it dries out in cooking.
- Sausage: Season ground pork with your preferred spice blend. Italian sausage (fennel, red pepper, garlic), breakfast sausage (sage, thyme, maple), or bratwurst (nutmeg, white pepper, marjoram) are all excellent starting points. Stuff into natural hog casings or leave as bulk sausage.
- Fat rendering: Separate clean white fat (especially leaf lard from around the kidneys) from trim. Render slowly at 250°F until the fat liquefies and the cracklings turn golden. Strain through cheesecloth. Home-rendered lard is extraordinary for pie crusts, biscuits, and frying.
Step 6: Packaging and Storage
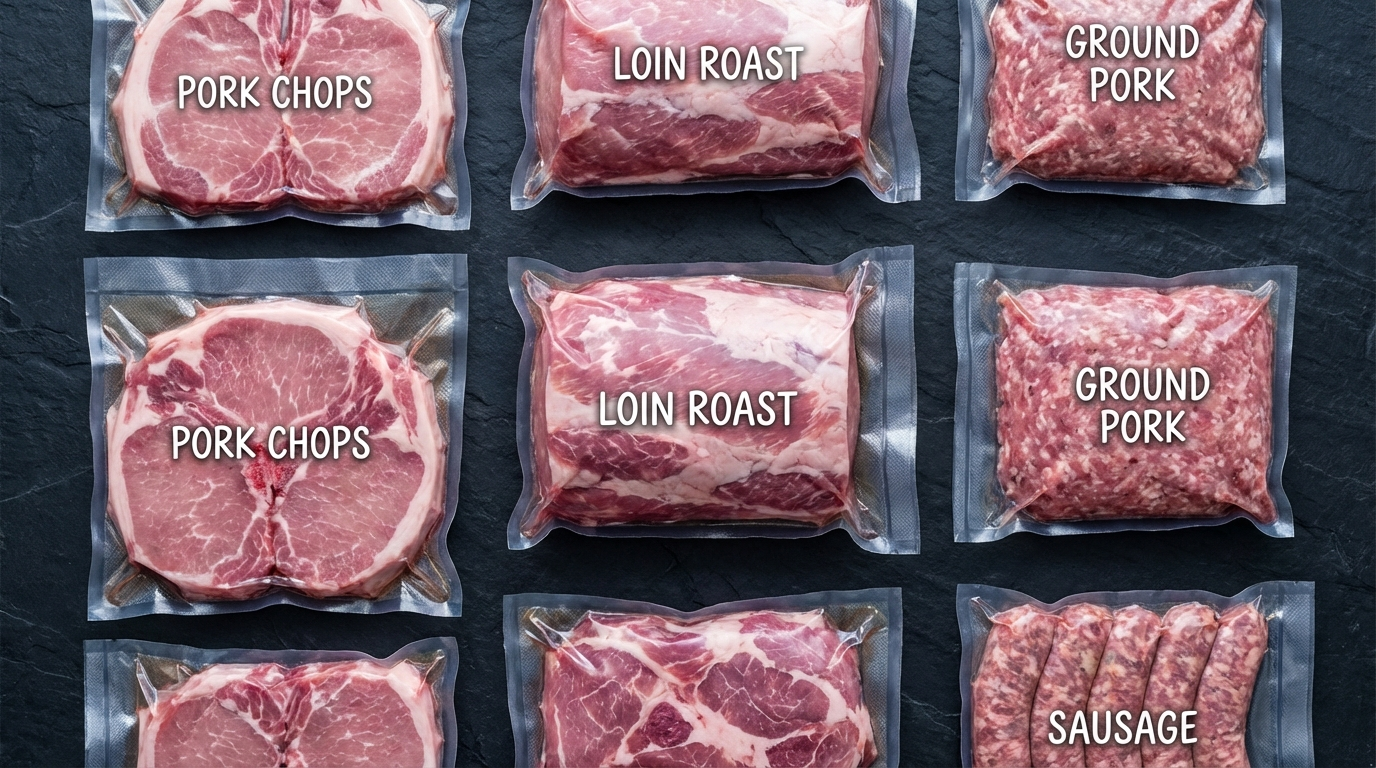
Package everything in meal-sized portions before freezing. There is nothing worse than thawing a 10-pound block of ground pork when you only need one pound for dinner.
Packaging Guidelines
- Chops: 2 to 4 per package depending on family size. Separate individual chops with parchment paper so you can pull one at a time without thawing the whole pack.
- Roasts: One per package, 2 to 4 pounds each. Label with the cut name, weight, and date.
- Ground pork and sausage: 1-pound packages. Flatten the bags before sealing so they stack efficiently and thaw quickly.
- Ribs: One rack per package. Full racks can be cut in half to fit standard vacuum bags.
- Belly/bacon: If curing, package after the curing and smoking process is complete. Slice first, then vacuum seal in half-pound or one-pound portions.
- Bones and stock materials: Bag bones, trotters, and skin scraps together for stock. These freeze well and make outstanding pork bone broth.
Expected Yield from a 250-Pound Pig
A typical 250-pound live weight hog produces approximately:
- 180 pounds hanging weight (after slaughter and evisceration)
- 120 to 130 pounds of take-home packaged meat
- 25 to 30 pounds of bones and stock materials
- 10 to 15 pounds of rendered fat and lard
That breaks down roughly as: 30 pounds ham, 20 pounds shoulder and butt, 15 pounds loin and chops, 2 to 3 pounds tenderloin, 12 pounds belly, 10 pounds ribs, and 30 to 40 pounds ground pork and sausage from trim. These numbers vary based on how aggressively you trim and how much you bone out versus leaving bone-in.
Common Mistakes to Avoid
After processing dozens of whole hogs, these are the errors that cost the most meat and cause the most frustration:
- Dull knives: The single biggest mistake. A dull knife tears meat, wastes product, and is far more dangerous than a sharp one. Steel your knife every 5 to 10 minutes throughout the process.
- Working warm: Pork fat softens quickly above 40°F, making the meat slippery and difficult to cut cleanly. If the fat starts feeling greasy instead of firm, get the meat back in the cooler for 30 minutes.
- Cutting too fast through joints: When separating at a joint, take the time to find the natural separation point. Cutting through bone when you could cut through cartilage wastes saw time and creates bone chips.
- Uneven spine split: If you drift to one side when splitting the carcass, every bone-in chop from the loin will be asymmetric. Go slow, stay centered, and use the saw — do not try to split the spine with a cleaver.
- Throwing away fat: Pork fat is culinary gold. Save leaf lard, back fat, and clean trim fat for rendering, sausage-making, and cooking. The only fat to discard is anything bruised, bloodshot, or contaminated.
From Whole Hog to Full Freezer
Butchering a whole pig is a full-day project the first time you do it. By the third or fourth hog, the entire process — splitting, breaking into primals, fabricating retail cuts, grinding sausage, and vacuum sealing — flows naturally in 3 to 4 hours. The cost savings over buying retail pork are significant: a whole hog from a local farm typically runs $2.50 to $4.00 per pound hanging weight, which means your pork chops, tenderloin, and bacon are all coming in at a fraction of grocery store prices.
More importantly, you control the quality. You know where the animal came from, how it was raised, and exactly what went into every package. That connection between the whole animal and the food on your table is what home butchery is really about.
Frequently Asked Questions
How long does it take to butcher a whole pig?
For an experienced home butcher, breaking down a whole pig takes 2 to 3 hours. First-timers should budget 4 to 5 hours. The actual cutting goes faster than you expect — most time is spent on trimming, packaging, and cleanup.
What size pig is best for home butchering?
A 200 to 250 pound live weight pig (140 to 180 pounds hanging weight) is ideal for home processing. This size yields manageable primal cuts that fit on a standard work surface and produces enough meat to fill a chest freezer without being overwhelming.
What tools do I need to butcher a whole pig?
At minimum you need a bone saw or reciprocating saw with a clean blade, a 6-inch boning knife, a 10-inch breaking knife, a steel or sharpener, a large cutting surface, and food-safe gloves. A meat grinder and vacuum sealer are highly recommended for processing trim and packaging.
How much meat do you get from a whole pig?
A 250 pound live weight pig yields approximately 180 pounds hanging weight and roughly 120 to 130 pounds of take-home meat after trimming. That breaks down to about 30 pounds of ham, 20 pounds of shoulder and Boston butt, 15 pounds of loin and chops, 12 pounds of belly and bacon, 10 pounds of ribs, and 30 to 40 pounds of trim for sausage and ground pork.
Can you butcher a pig without a bone saw?
You can do most of the breakdown without a bone saw by working around bones with a knife and separating at joints. However, splitting the carcass down the spine and cutting through the aitch bone on the ham require a saw. A reciprocating saw with a clean stainless blade works as a substitute for a traditional bone saw.
More Expert Guides
How to Trim a Brisket: The Complete Butcher's Guide
Proper brisket trimming is the difference between a backyard experiment and competition-quality results. Here is the professional technique for shaping a whole packer brisket before it ever touches the smoker.
14 min readHow to Butcher a Whole Chicken: Step-by-Step Guide
Breaking down a whole chicken yourself saves 40-50% compared to buying individual parts. Here is the professional technique for turning one bird into perfectly portioned pieces.
14 min readHome Butchering Safety Guide: Essential Protocols for Safe Meat Processing
Learn professional butchering safety protocols from a master butcher with 25+ years of experience. Essential guidance for anyone processing meat at home.