How to Butcher a Whole Ribeye: Complete Step-by-Step Guide
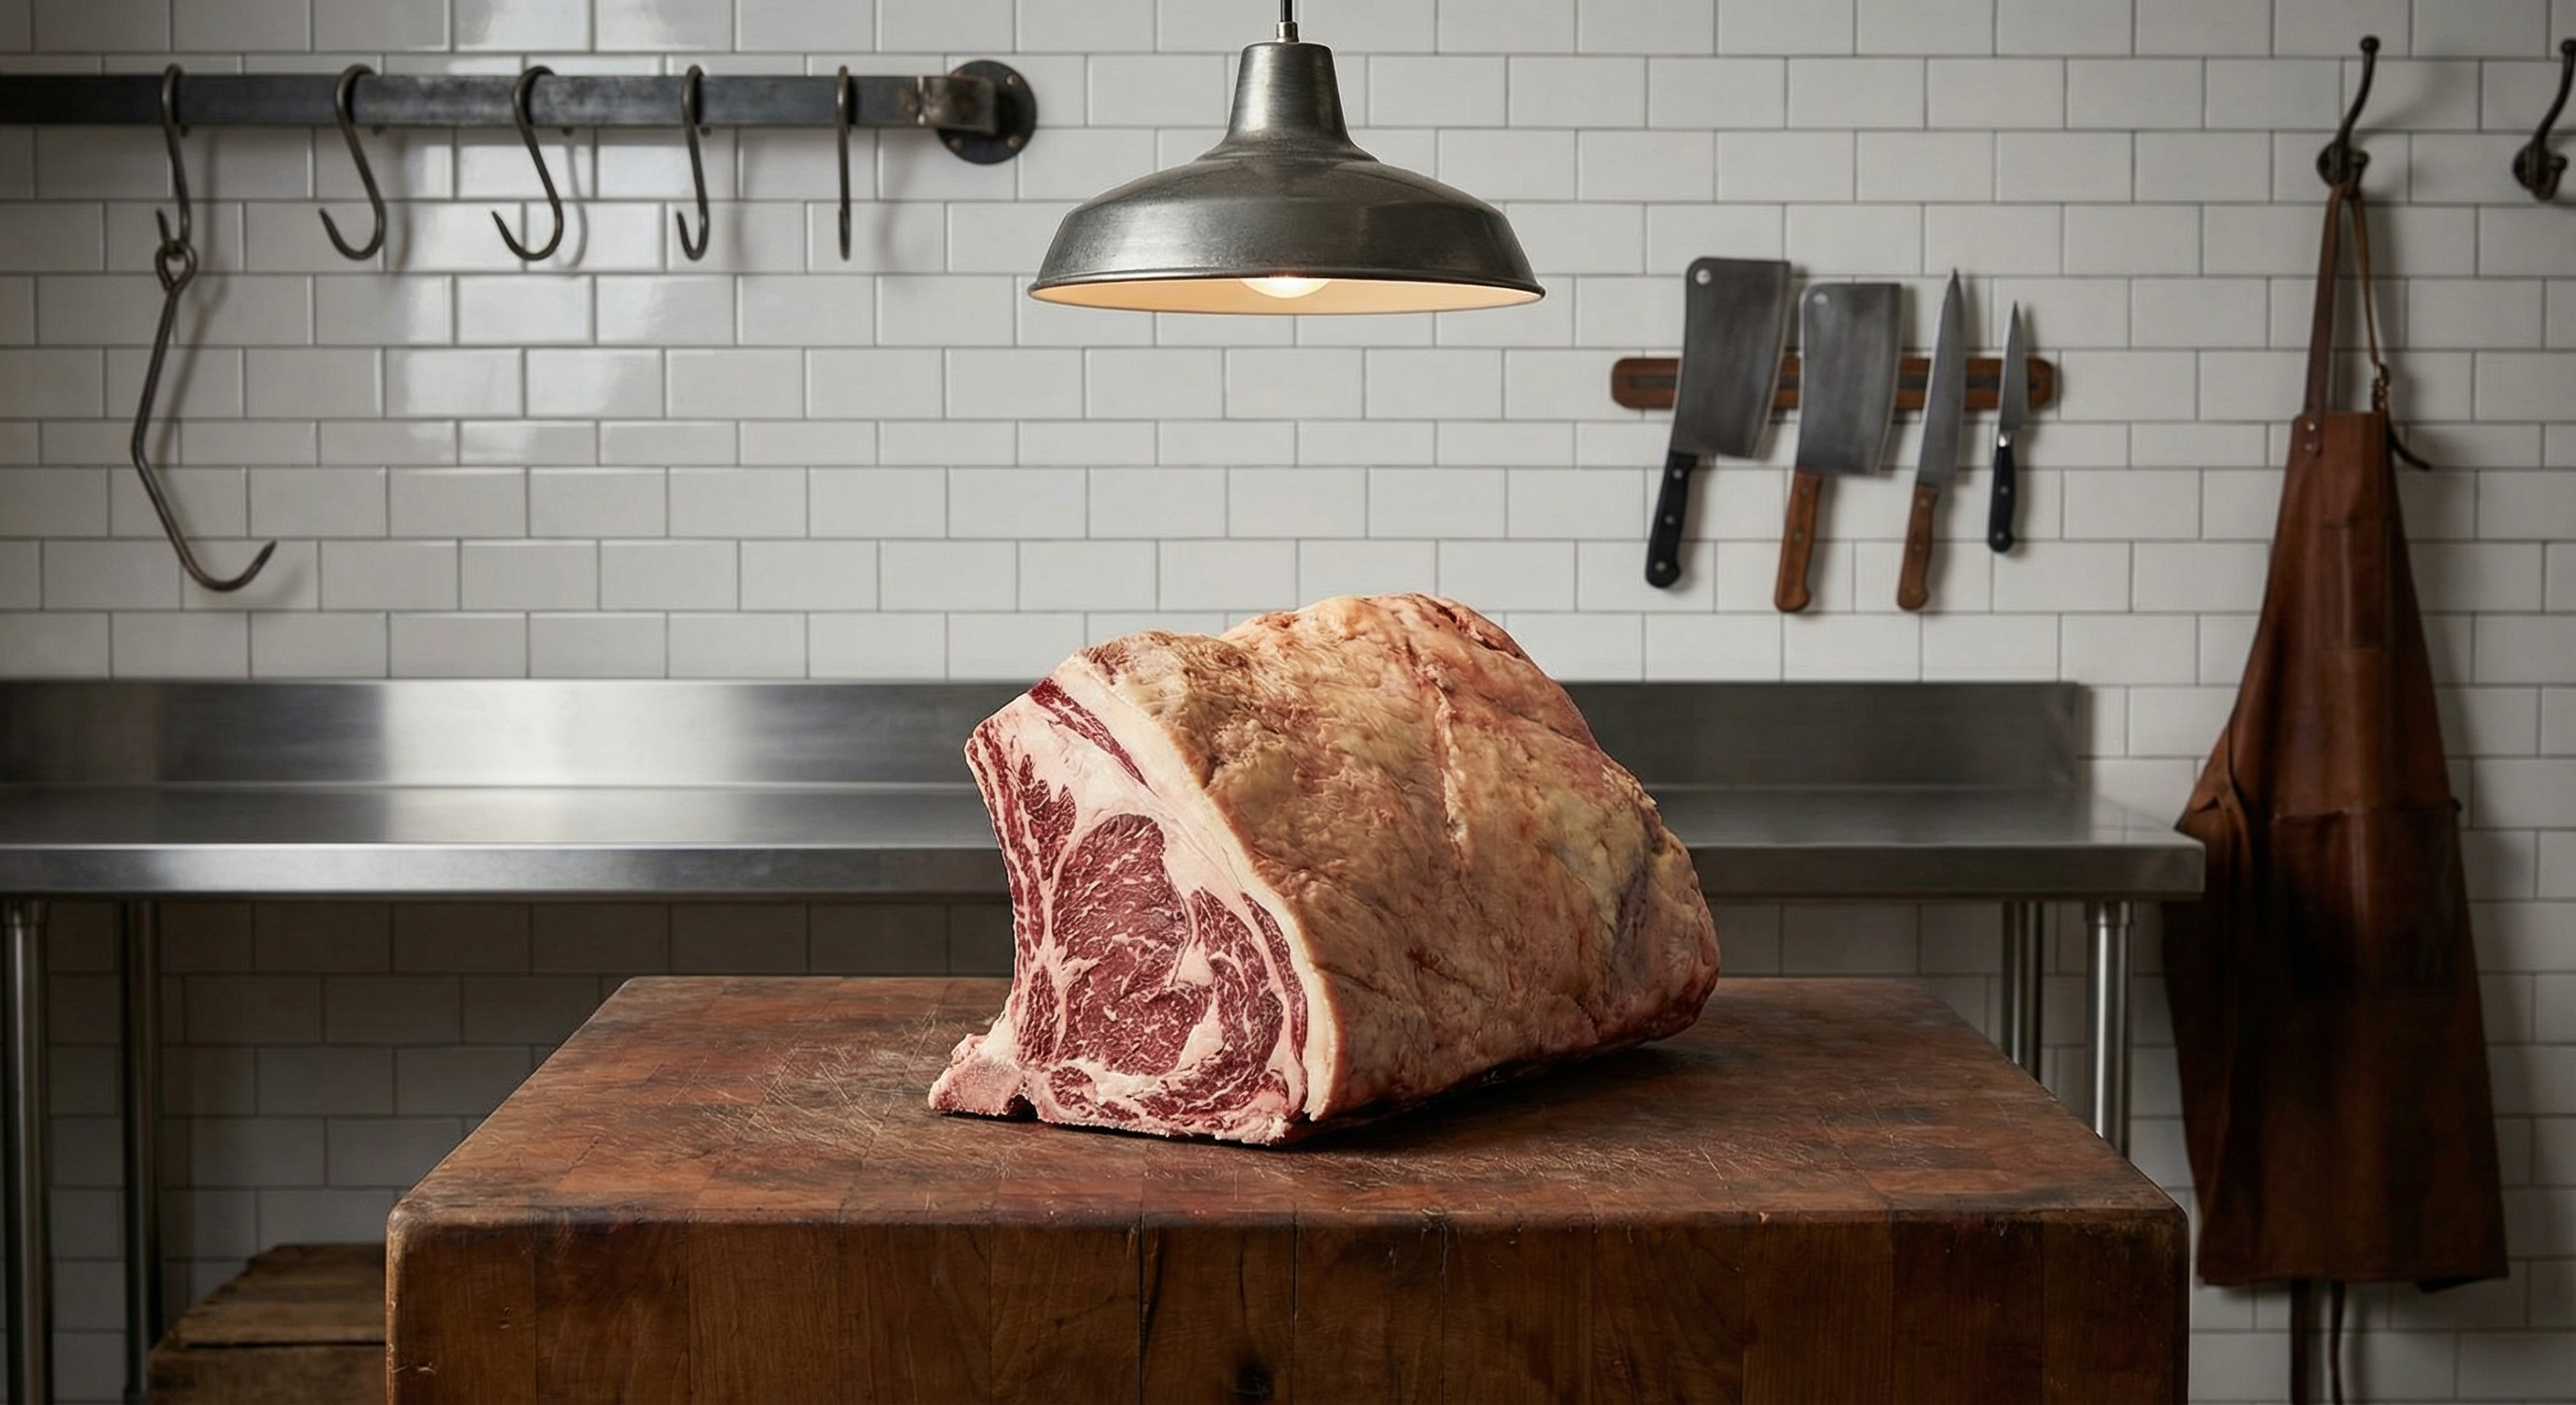
There is a particular satisfaction in taking a whole ribeye primal — that magnificent 15-pound slab of beef from ribs 6 through 12 — and transforming it into perfectly portioned steaks. In my years working the carnicería in Buenos Aires and later in the Basque Country, I've broken down thousands of ribeyes. Each one teaches you something about the animal, about the muscle, about the craft.
Buying a whole ribeye primal and butchering it yourself saves significant money compared to purchasing individual steaks — often 30-40% — while giving you complete control over thickness, portions, and how you separate the coveted rib cap (spinalis dorsi). Whether you're stocking your freezer for months of steaks or preparing for a special gathering, this guide will teach you professional techniques that deliver restaurant-quality results.
Understanding the Ribeye Primal
Before we begin cutting, let's understand what we're working with. The ribeye primal comes from the rib section of the steer, specifically ribs 6 through 12. This section contains some of the most prized muscles in beef butchery:
- Longissimus dorsi (Ribeye Eye): The main muscle that runs the length of the primal — well-marbled, tender, and rich in beefy flavor
- Spinalis dorsi (Rib Cap): The crescendo-shaped muscle that wraps around the eye — widely considered the single most flavorful and tender cut on the entire animal
- Complexus: A smaller muscle at the chuck end that adds texture variation
- Multifidus dorsi: The small muscle between the rib bones and the main eye
A whole ribeye primal typically weighs 12-18 pounds depending on the size of the animal and how the processor separated the primals. USDA Choice and Prime grades will show more marbling throughout, which affects both flavor and the ease of portioning.
Essential Tools for Ribeye Butchery
Proper tools make the difference between struggling through the process and executing clean, professional cuts. Here's what you need:
Knives
- 10-inch Breaking Knife: Your primary tool for portioning steaks. The length provides leverage for clean, single-stroke cuts through the thick primal. I recommend the Victorinox Fibrox 10-inch Cimeter for excellent value, or the Dexter-Russell 10-inch Breaking Knife for professional-grade performance.
- 6-inch Boning Knife: Essential for trimming fat and separating the rib cap. A semi-flexible blade works best here. The Victorinox Curved Boning Knife is my everyday choice.
- Utility Knife (5-6 inches): For detail work and cleaning up edges
For comprehensive knife selection guidance, see my Essential Butcher Knife Guide.
Equipment
- Large Cutting Board: At minimum 18x24 inches with a juice groove — the primal needs room
- Kitchen Scale: For consistent portioning
- Butcher Paper or Vacuum Sealer: For storing your finished steaks
- Sharp Steel or Honing Rod: Maintain your edge throughout the process
Step 1: Prepare Your Workspace
Set up before the meat leaves the refrigerator. Your cutting board should be stable — place a damp towel underneath if needed. Arrange your knives within easy reach. Have paper towels available for wiping hands and surfaces.
Remove the ribeye primal from refrigeration and unwrap it. Allow it to sit at room temperature for 15-20 minutes while you prepare — slightly warmer meat is easier to cut than ice-cold meat, though you don't want it to warm significantly for food safety reasons.
Examine the primal. Identify the fat cap (the thick layer of external fat covering one side), the eye muscle, and the rib cap. Note where the bones were removed — on a boneless ribeye primal, you'll see a smooth surface where the ribs were separated.
Step 2: Trim the Fat Cap
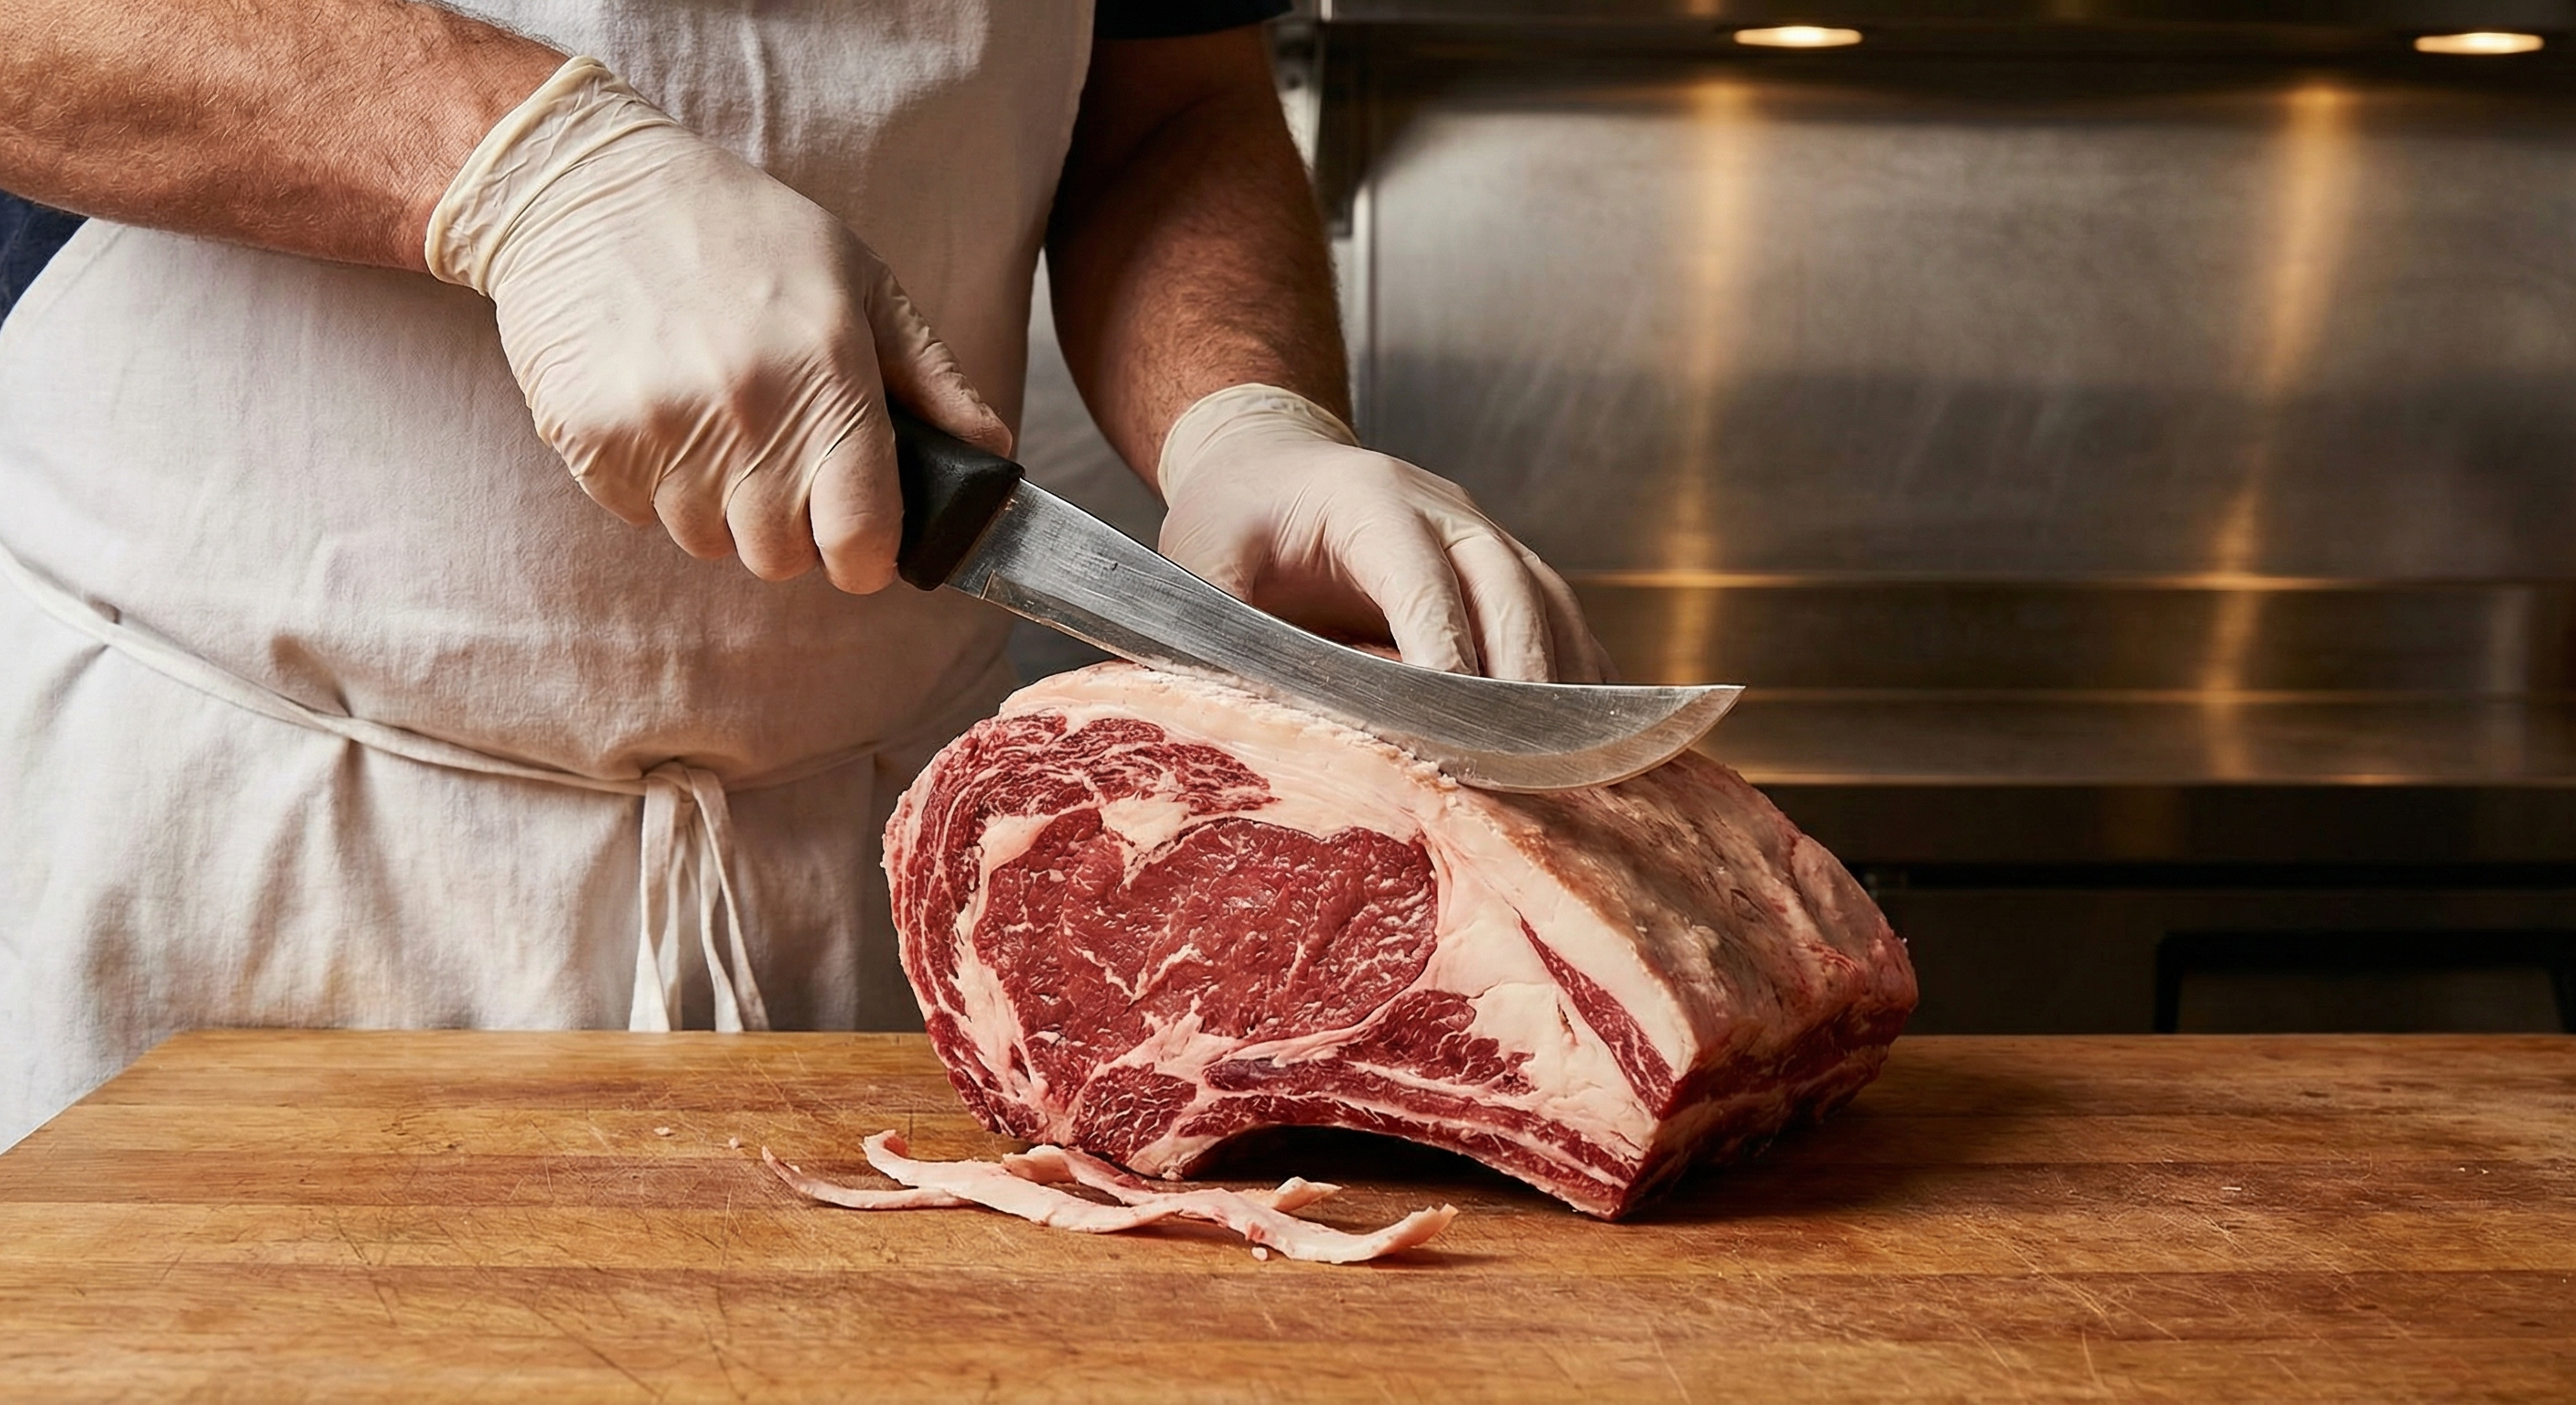
The fat cap serves a purpose during aging and transport, but for most steak preparations, you'll want to trim it to approximately ¼ inch thickness. Too much external fat prevents proper seasoning and searing; too little removes flavor and protection during cooking.
Technique:
- Position the primal with the fat cap facing up
- Using your breaking knife, start at one end with the blade held nearly parallel to the meat surface
- Use long, smooth strokes to shave away the excess fat — work from one end to the other in consistent passes
- Leave approximately ¼ inch of fat covering the exterior
- Don't discard this fat — it renders beautifully for cooking or can be ground into burger blends
The key is consistency. An even fat layer ensures uniform rendering during cooking. Thick spots will remain chewy; thin spots may expose the meat to excessive heat.
Step 3: Clean the Edges
Examine both ends of the primal — the chuck end (larger, with more muscles visible) and the loin end (smaller, more uniform). These ends often have ragged edges, dried surfaces, or irregularities from the initial primal separation.
Using your boning knife or utility knife, trim away:
- Any dried or discolored meat on the cut surfaces
- Excessive connective tissue or silver skin
- Ragged edges that won't yield clean steak portions
These end trimmings make excellent stir-fry meat, cube steaks, or additions to your grind pile. Nothing goes to waste in proper butchery — this principle from my seam cutting training applies to every breakdown.
Step 4: Decide on Your Portioning Strategy
Before making your first steak cut, decide how you want to portion the primal. Common approaches include:
Standard Steak Portions
- 1-inch steaks: 12-14 oz each, ideal for quick grilling or pan-searing
- 1.5-inch steaks: 16-20 oz each, perfect for reverse searing or sous vide
- 2-inch steaks: 24-28 oz each, restaurant-style thick cuts for sharing
Mixed Approach
I often recommend a mixed approach: cut thicker steaks from the center (where the eye is largest and most uniform) and thinner steaks from the ends (where the shape becomes irregular). This maximizes both yield and presentation quality.
Rib Cap Separation
Alternatively, you can separate the rib cap from the eye before portioning — this allows you to treat the spinalis as its own roast or cut it into rib cap steaks, while portioning the eye muscle separately.
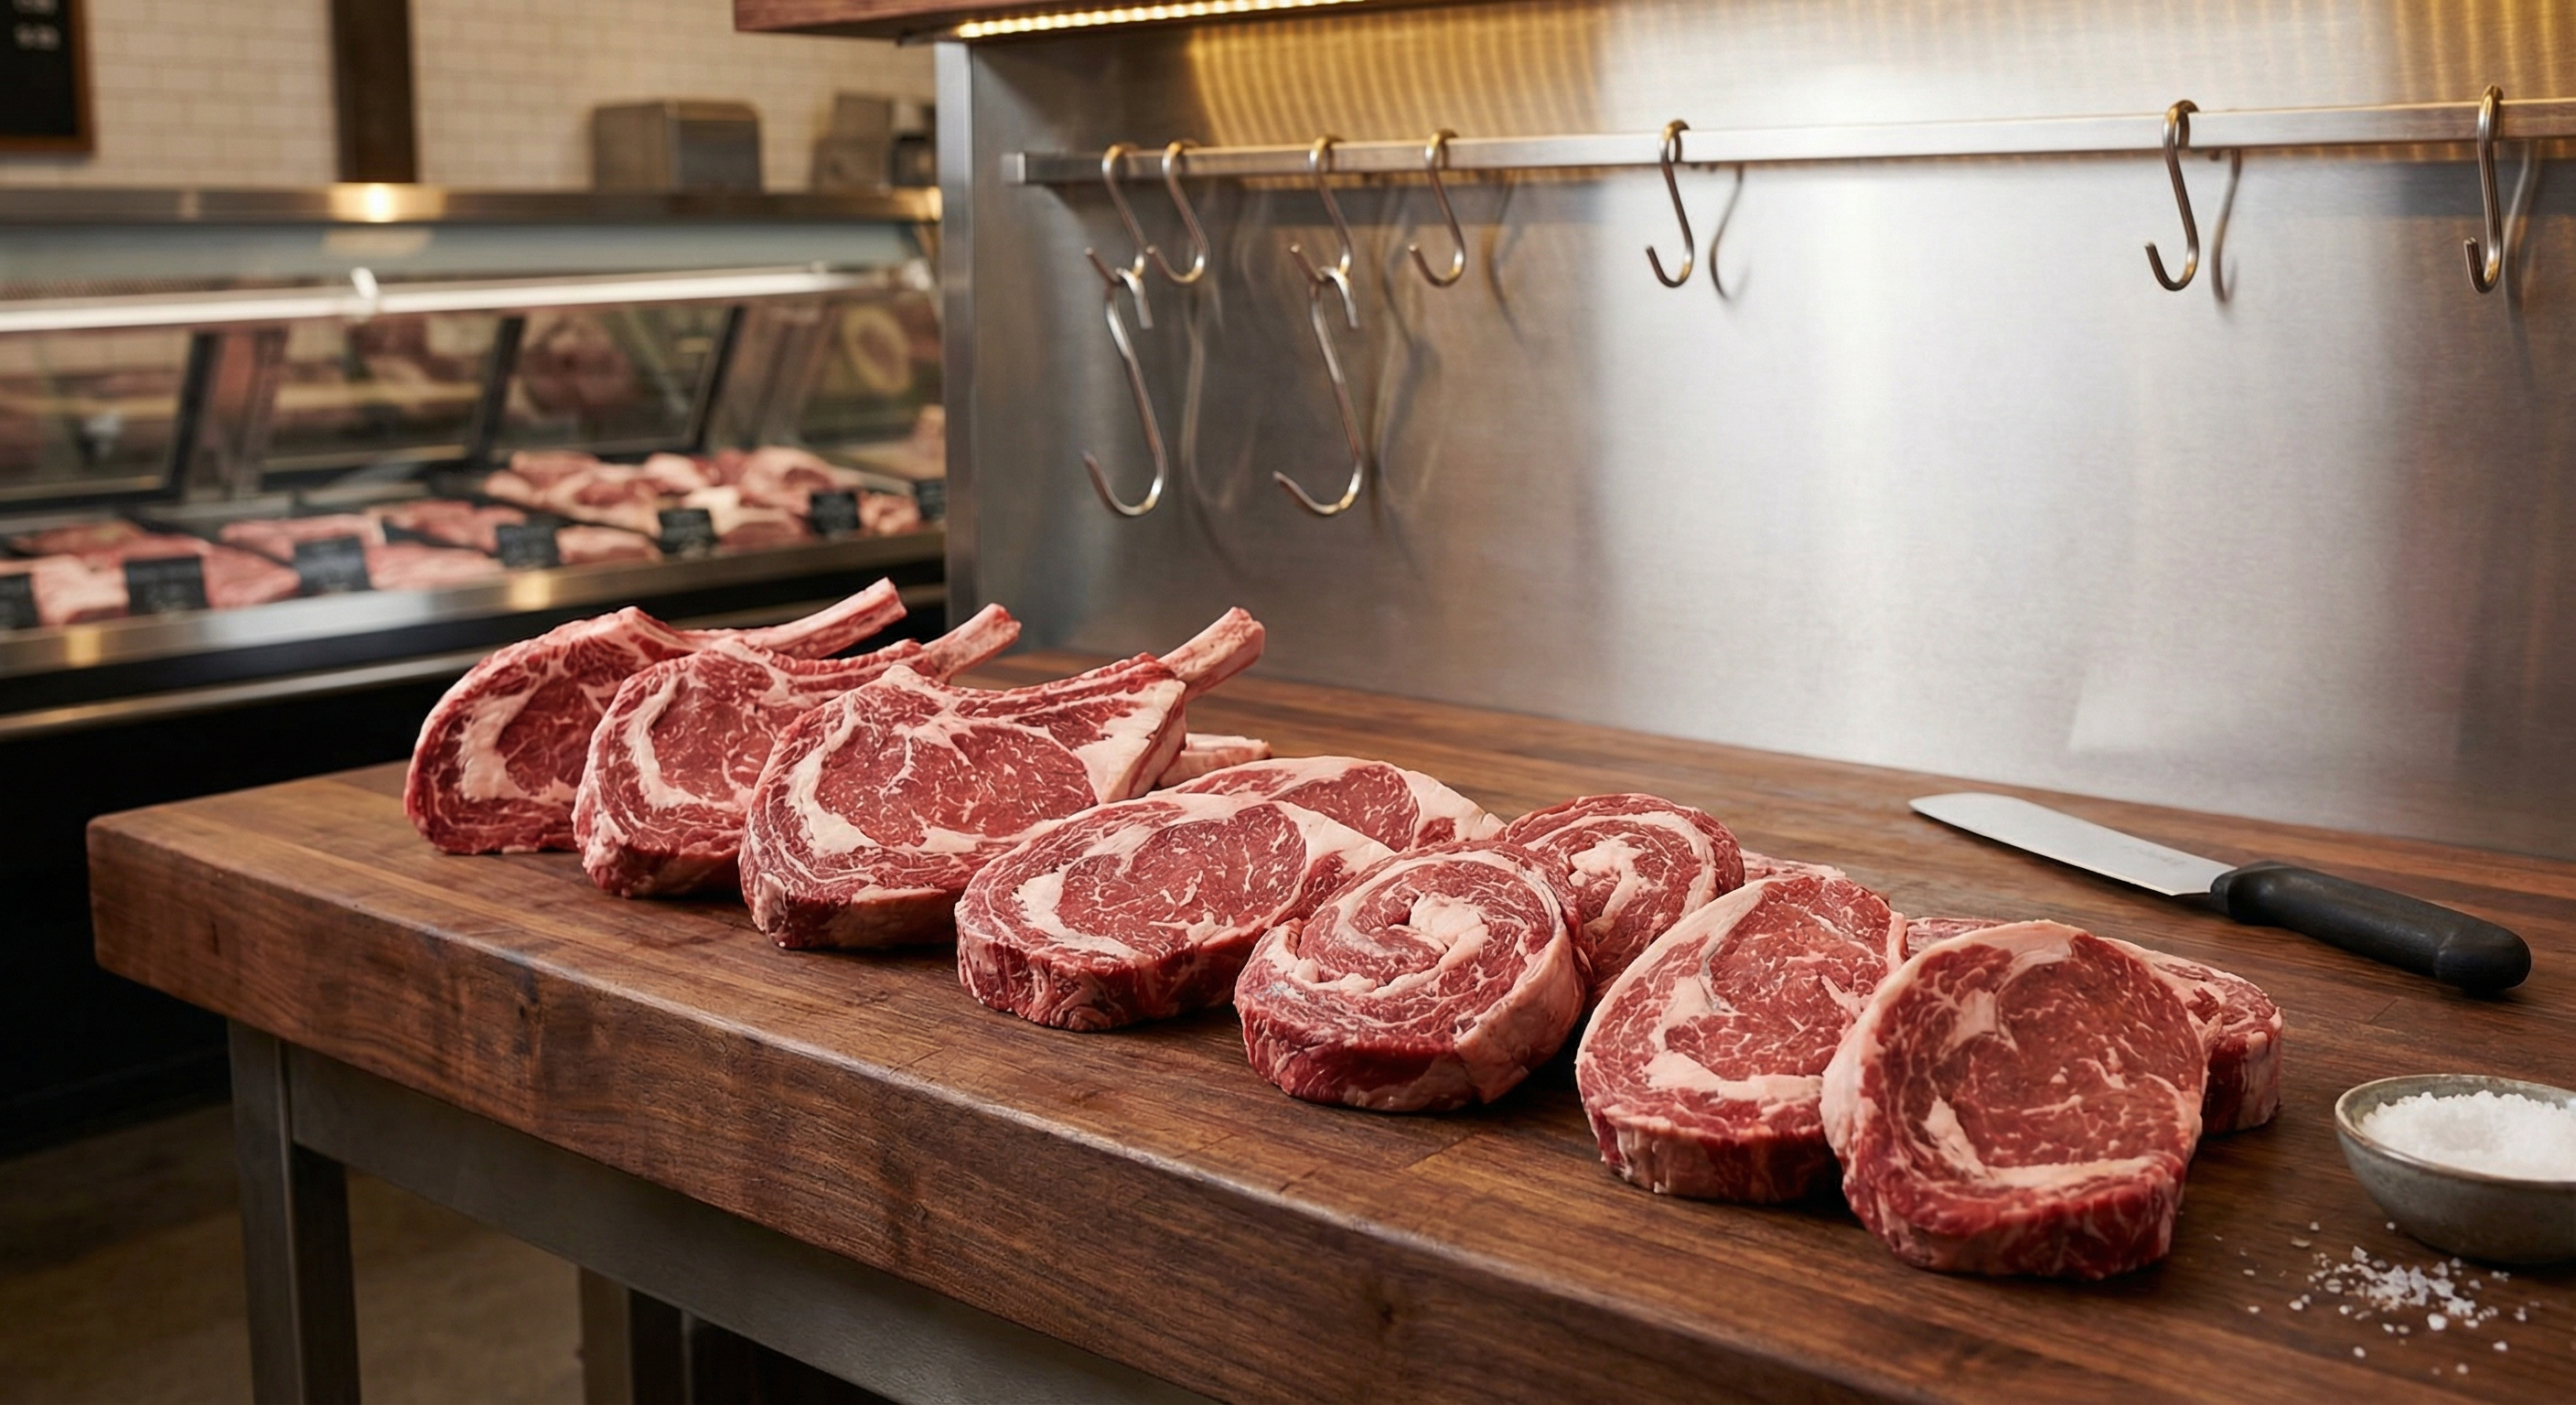
Step 5: Portion the Ribeye into Steaks

This is where your breaking knife earns its keep. The goal is single-stroke cuts that create clean steak faces — sawing back and forth tears muscle fibers and creates an uneven surface that cooks unevenly.
Technique:
- Position the primal with the grain running left to right (you'll cut perpendicular to the grain)
- Measure your desired thickness from the end
- Position your breaking knife at the mark, blade perpendicular to the cutting board
- In one smooth motion, draw the knife through the meat — start at the heel and finish at the tip
- Apply steady, even pressure but let the sharp blade do the work
- If the primal is very thick, you may need two strokes — but aim for one
Working Through the Primal:
Move systematically from one end to the other. As you work from the chuck end toward the loin end, you'll notice the steaks become more uniform in shape. The chuck-end steaks will have more of the complexus muscle and irregular edges; the loin-end steaks will be rounder and more classic in appearance.
A typical 15-pound primal will yield:
- 10-12 steaks at 1.5-inch thickness
- 8-10 steaks at 2-inch thickness
- Plus end pieces for stir-fry, kabobs, or grinding
Step 6: Separating the Rib Cap (Optional)
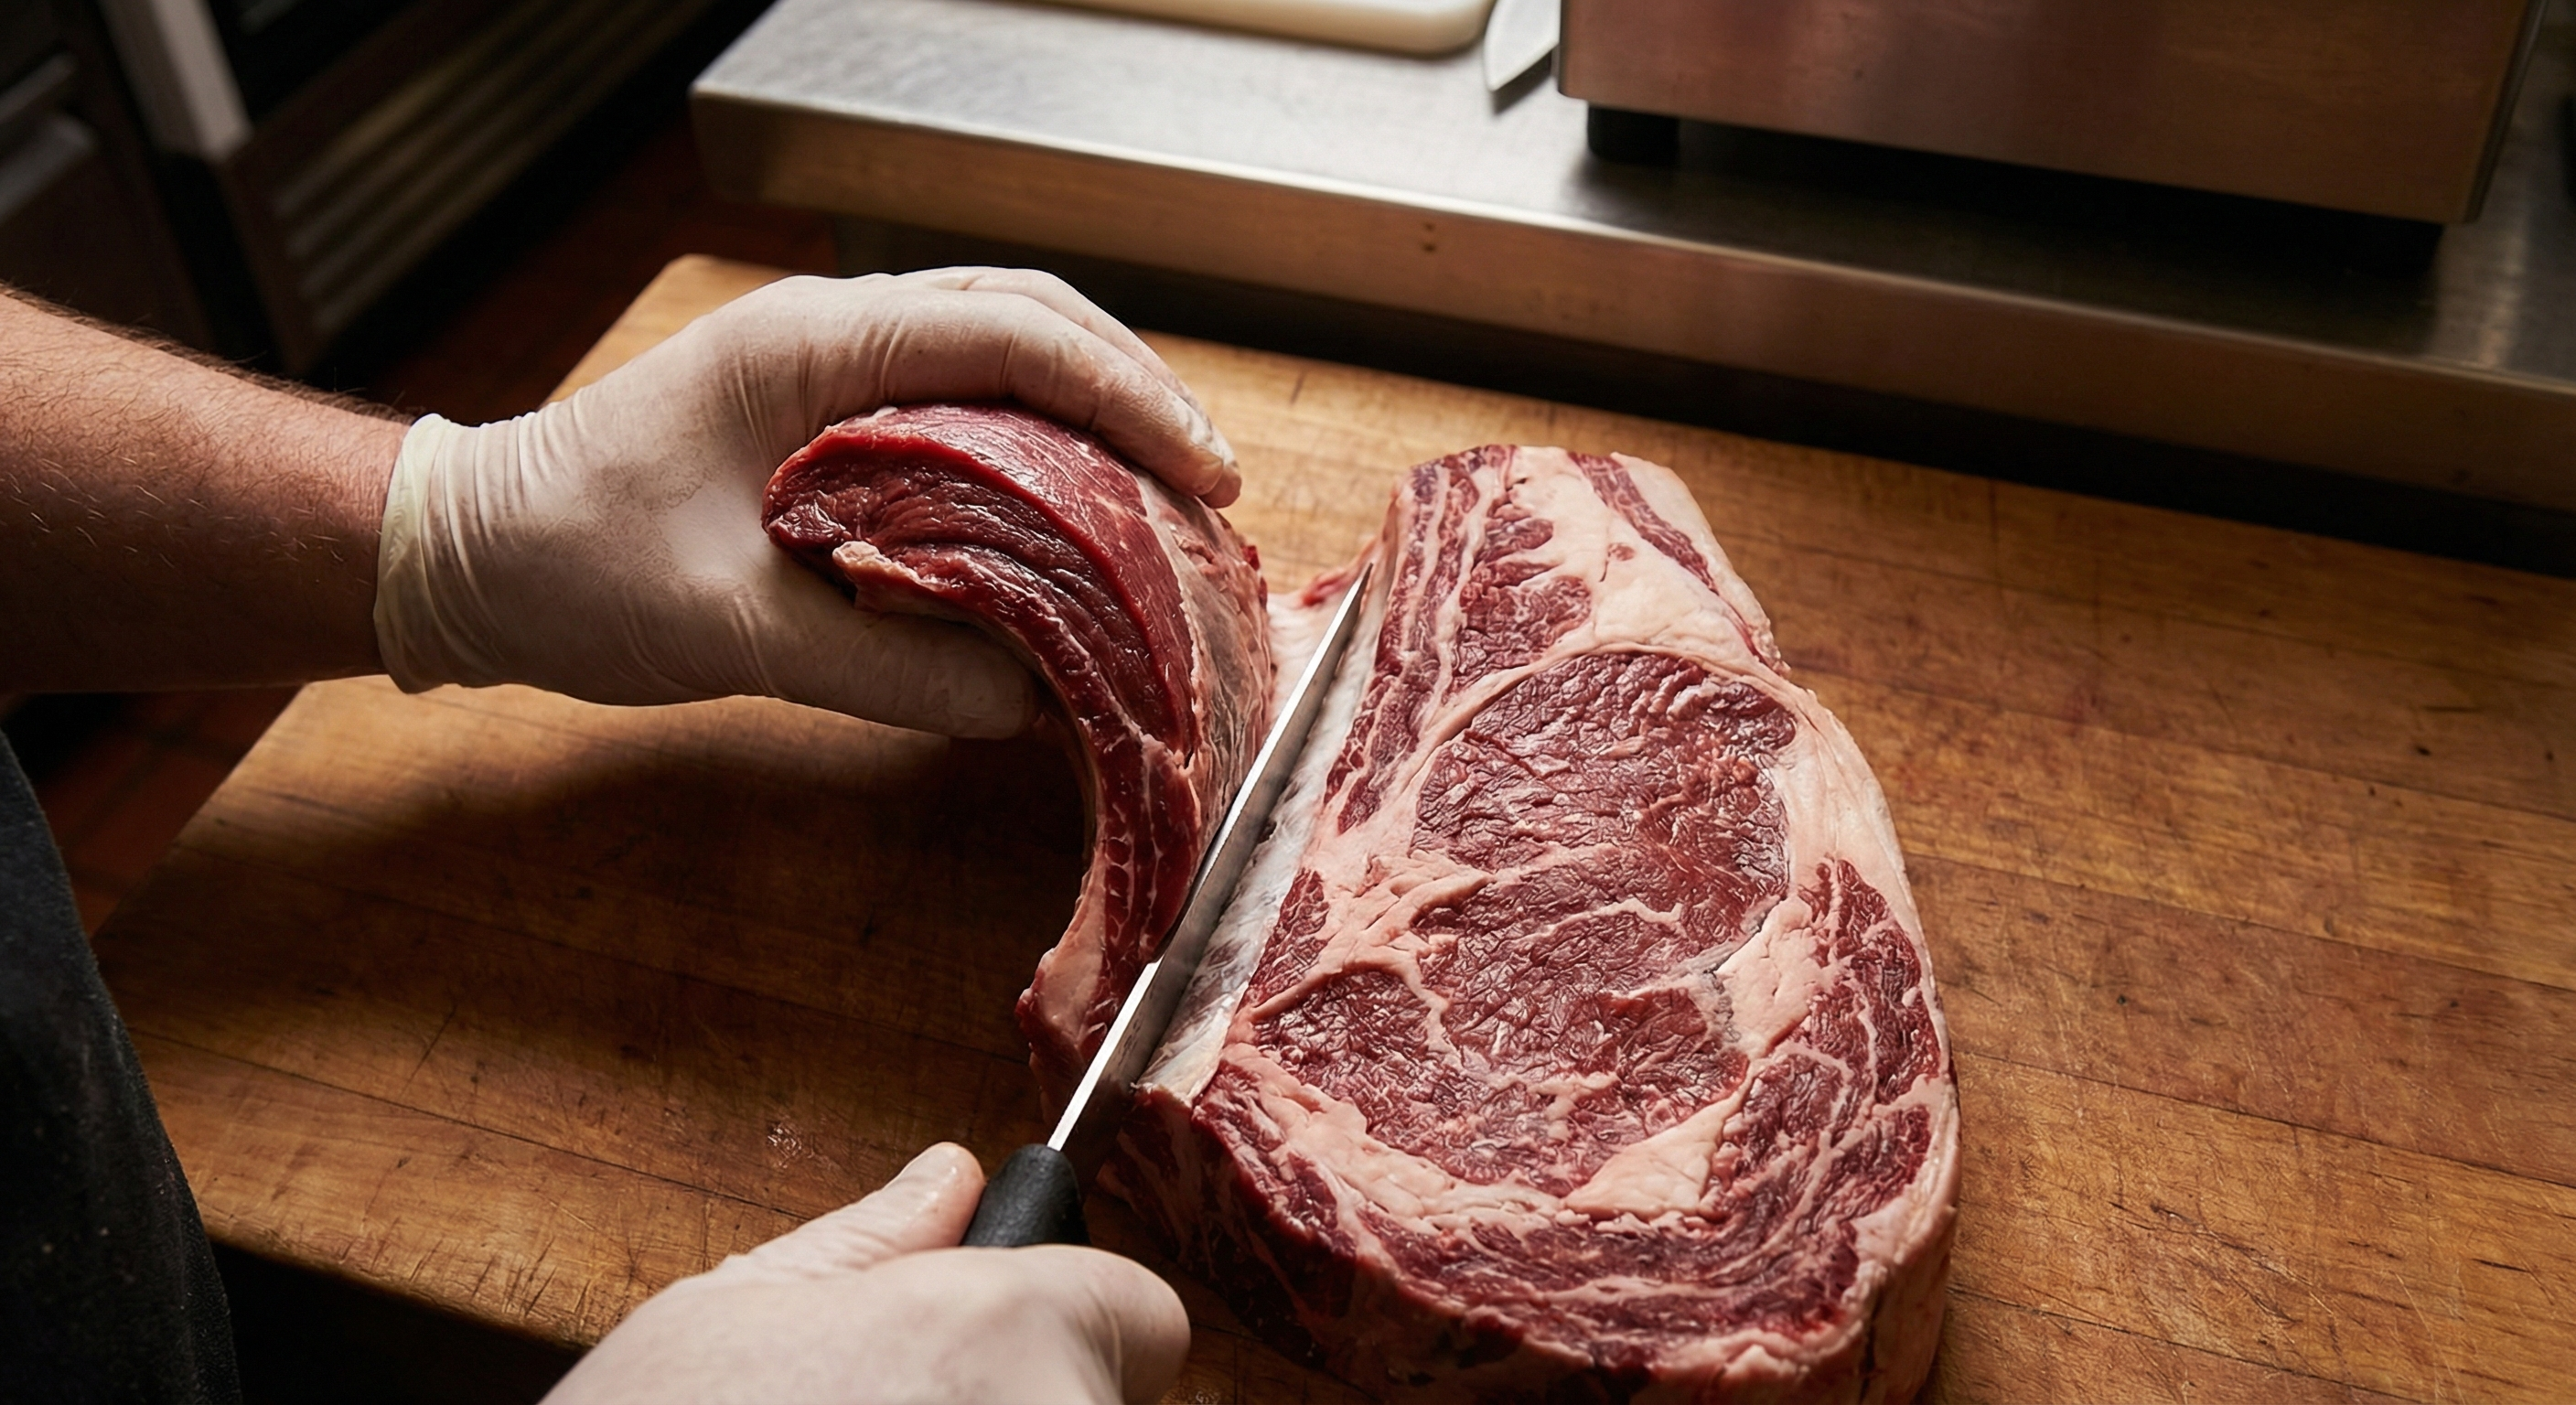
The spinalis dorsi — the rib cap — is the crown jewel of beef. Some prefer to leave it attached to the ribeye steaks, where it forms that buttery, intensely marbled outer ring. Others prefer to separate it entirely and prepare it as its own cut.
To separate the rib cap:
- Identify the natural seam between the spinalis and the longissimus (ribeye eye). This seam runs the length of the primal as a visible line of connective tissue and fat.
- Using your boning knife, make an initial cut into the seam at one end of the primal
- Follow the natural separation, keeping your knife angled slightly toward the eye muscle — you want to give the spinalis all the benefit of the doubt
- Work slowly, using the tip of your knife to find and follow the fascia that separates the muscles
- Continue until the entire rib cap separates as one long piece
The separated rib cap can be:
- Rolled and tied for roasting (Spinalis Roast)
- Cut into individual rib cap steaks
- Grilled whole as a long, flat steak and sliced against the grain
For most home butchers keeping the cap attached, this step isn't necessary — but knowing how to separate it opens options for special occasions.
Step 7: Final Trimming and Presentation
With your steaks portioned, give each one a final inspection:
- Trim any hanging pieces of fat or membrane
- Remove any silverskin that became exposed during cutting
- Square up any irregular edges for better presentation
- Verify weights if you're aiming for consistent portions
At this stage, you have restaurant-quality ribeye steaks ready for seasoning and cooking, or for wrapping and freezing.
Storage and Aging Options
For immediate use (within 3-5 days), wrap steaks tightly in butcher paper and refrigerate. For longer storage, vacuum sealing and freezing preserves quality for 6-12 months.
Dry Aging at Home: If you have the equipment, individual steaks can be dry-aged on a rack in the refrigerator for 3-7 days for intensified flavor. Cover loosely with cheesecloth to allow airflow while preventing contamination. For longer dry aging, consider aging the whole primal before portioning.
Yield Expectations
From a 15-pound whole ribeye primal, expect:
- Usable Steak Meat: 11-13 pounds (73-87% yield)
- Fat Trim: 1.5-2.5 pounds (for rendering or grinding)
- End Pieces and Trimmings: 1-2 pounds (for stir-fry, cubes, or grinding)
USDA Prime ribeyes with heavy marbling may have slightly lower yields due to more intermuscular fat, but the eating quality more than compensates. Well-marbled ribeyes from The Meatery's premium collection showcase what exceptional beef marbling looks like — it's worth experiencing the difference quality makes.
Troubleshooting Common Issues
Steaks Are Uneven Thickness
This usually indicates the knife angle changed during the cut. Focus on keeping the blade perfectly perpendicular to the cutting board, and use a single smooth stroke rather than sawing.
Meat Is Tearing Instead of Cutting
Your knife needs sharpening. Stop immediately and hone the blade. A sharp knife slices through; a dull knife tears and crushes fibers.
Difficulty Following the Rib Cap Seam
The seam isn't always perfectly obvious. Look for the change in grain direction and the visible fat line. When in doubt, cut slightly into the eye muscle rather than the cap — the eye is larger and can spare a few grams.
Cooking Your Home-Butchered Ribeyes
Now that you've mastered the butchery, don't undersell the cooking. For thick-cut ribeyes:
- Reverse Sear: Slow-roast at 225°F until internal temp reaches 115°F, then sear in a ripping hot cast iron pan with butter and aromatics
- Cast Iron: For 1-inch steaks, sear 3-4 minutes per side in a screaming hot pan with high-smoke-point oil
- Grill: Direct heat for searing, indirect heat for finishing thicker cuts
Season simply — quality ribeye needs only coarse salt and fresh black pepper. Let the beef speak for itself.
Breaking down a whole ribeye connects you to the craft of butchery in a way that buying pre-cut steaks never can. You understand the muscle structure, you control the portions, and you transform a primal cut into exactly what you want on your plate. That's the satisfaction of the carnicería — the marriage of knowledge, skill, and beautiful beef.
Frequently Asked Questions
How much money do I save by butchering a whole ribeye myself?
Typically 30-40% compared to buying individual ribeye steaks. A whole Choice ribeye primal costs roughly $8-12/lb while individual steaks run $15-22/lb. On a 15-pound primal, you might save $75-150 depending on your market.
How thick should I cut ribeye steaks?
For grilling or pan-searing, 1-1.5 inches is ideal. For reverse searing or special occasions, 1.5-2 inches provides a better crust-to-interior ratio. Thinner than 1 inch risks overcooking before developing a good crust.
Should I leave the rib cap attached or remove it?
For traditional ribeye steaks, leave it attached — the spinalis adds incredible flavor and texture contrast. Remove it only if you specifically want to prepare it as a separate cut (spinalis roast, rib cap steaks) for a special occasion.
How long can I store butchered ribeye steaks?
Refrigerated and tightly wrapped: 3-5 days. Vacuum-sealed and frozen: 6-12 months with minimal quality loss. For the best results, bring frozen steaks to refrigerator temperature overnight before cooking.
What is the difference between bone-in and boneless ribeye primals?
Bone-in primals include the rib bones (ribs 6-12) and can be cut into bone-in ribeye steaks or standing rib roasts. Boneless primals have the bones removed, making steak portioning simpler but eliminating the bone-in option. Both yield excellent steaks.
More Expert Guides
How to Trim a Brisket: The Complete Butcher's Guide
Proper brisket trimming is the difference between a backyard experiment and competition-quality results. Here is the professional technique for shaping a whole packer brisket before it ever touches the smoker.
14 min readHow to Butcher a Whole Chicken: Step-by-Step Guide
Breaking down a whole chicken yourself saves 40-50% compared to buying individual parts. Here is the professional technique for turning one bird into perfectly portioned pieces.
14 min readHome Butchering Safety Guide: Essential Protocols for Safe Meat Processing
Learn professional butchering safety protocols from a master butcher with 25+ years of experience. Essential guidance for anyone processing meat at home.