How to Cure Meat at Home: The Complete Butcher's Guide
Curing meat is one of the oldest and most transformative techniques in the butcher's repertoire. Long before refrigeration existed, salt was the only thing standing between a freshly slaughtered pig and spoilage. Today, curing is less about survival and more about flavor — but the science behind it remains exactly the same. Salt draws moisture out of meat, creating an environment where harmful bacteria cannot thrive while beneficial enzymes break down proteins into deeply savory compounds.
The difference between store-bought bacon and a slab you cured yourself in the refrigerator is staggering. Commercial processors pump meat full of water, liquid smoke, and sodium phosphates to speed up production. Home curing takes longer, but the result is denser, more flavorful, and made with ingredients you can actually pronounce. Once you understand the fundamentals — salt ratios, curing times, and safety thresholds — you will never look at a pork belly the same way again.
Understanding Meat Curing: The Science
At its core, curing is a controlled dehydration process. Salt penetrates meat tissue through osmosis, drawing water out of cells while simultaneously moving into them. This reduces the water activity (aw) inside the meat — the measurement of available moisture that bacteria need to grow. Fresh meat has a water activity around 0.99. Most dangerous pathogens, including Clostridium botulinum, cannot grow below 0.94. Properly cured meat typically reaches 0.85-0.91, well below the danger threshold.
But salt alone does not account for everything happening during curing. Enzymes naturally present in the meat — particularly cathepsins and calpains — continue breaking down proteins into amino acids and peptides. This enzymatic activity is responsible for the complex, savory flavor that develops over days and weeks of curing. It is the same basic process that makes dry-aged beef taste so much richer than fresh cuts, just accelerated and directed by salt concentration.
The Role of Nitrates and Nitrites
Curing salt — specifically sodium nitrite (often sold as Prague Powder #1 or Instacure #1) — serves two critical functions that regular salt cannot. First, it prevents the growth of Clostridium botulinum, the bacterium that produces botulism toxin. This is not optional for any cure where meat will be held at temperatures between 40°F and 140°F for extended periods. Second, nitrite reacts with myoglobin in meat to produce nitrosomyoglobin, which gives cured meat its characteristic pink color. Without it, your bacon would turn an unappetizing grey during cooking.
- Prague Powder #1 (Instacure #1): 6.25% sodium nitrite mixed with 93.75% table salt. Dyed pink to prevent confusion with regular salt. Used for short-term cures — bacon, corned beef, pastrami, any product that will be cooked or smoked after curing.
- Prague Powder #2 (Instacure #2): Contains both sodium nitrite (6.25%) and sodium nitrate (4%). The nitrate slowly converts to nitrite over weeks and months, providing sustained protection during long dry cures. Used for salami, bresaola, coppa, and anything that will be air-dried for extended periods without cooking.
Elena's note: The maximum safe dosage for sodium nitrite is 156 parts per million (ppm) in the finished product. With Prague Powder #1, this works out to approximately 1 teaspoon per 5 pounds of meat. Measure precisely — a kitchen scale accurate to 0.1 grams is not optional here, it is a safety tool.
Three Methods of Curing Meat
Every curing method relies on the same principle — salt contact with meat over time — but the delivery mechanism changes the outcome dramatically. Understanding when to use each method is what separates someone following a recipe from someone who actually understands curing.
Method 1: Dry Curing (Salt Box Method)
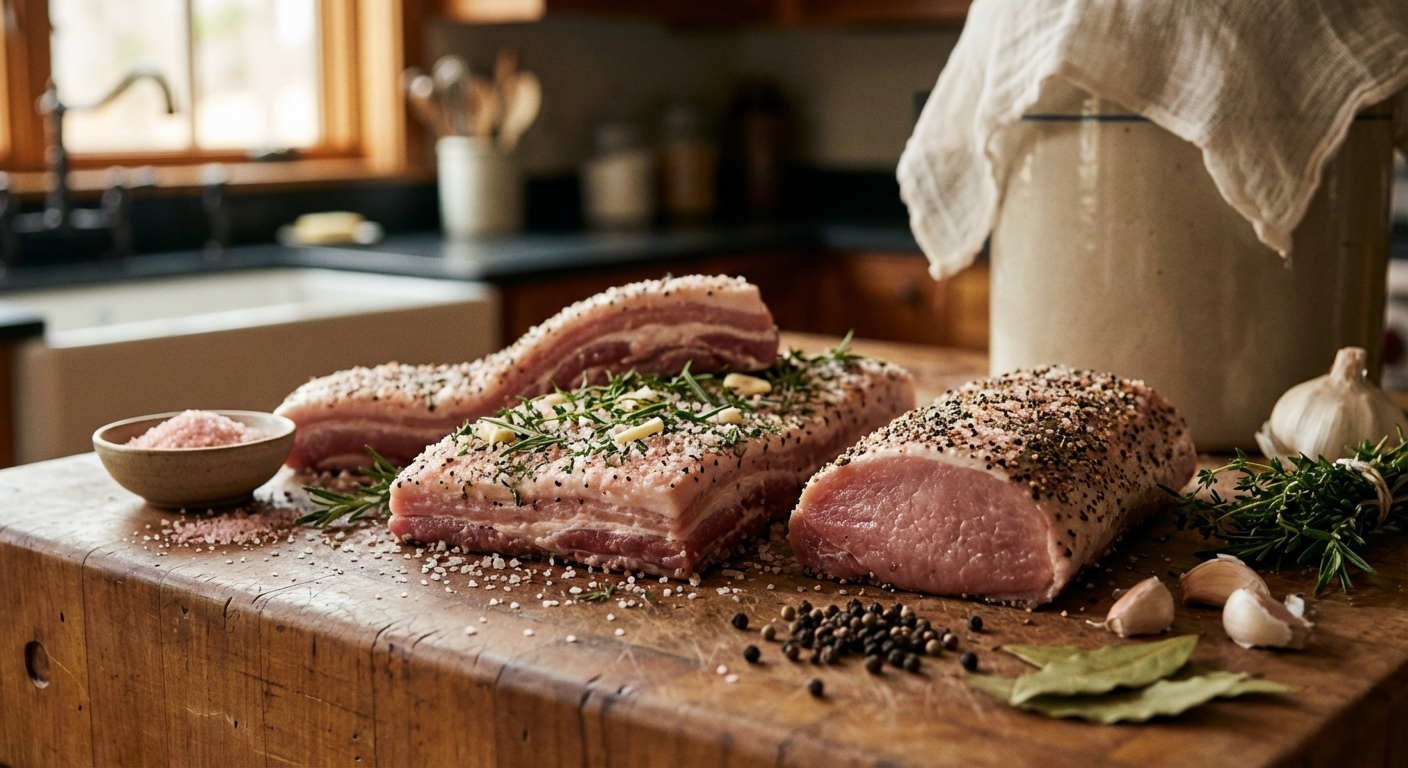
Dry curing is the oldest and simplest approach. You coat the meat in a mixture of salt, curing salt, sugar, and spices, then refrigerate it for a calculated period while the cure penetrates inward. Excess moisture weeps out and collects in the container, concentrating flavor and firming the texture.
The traditional approach uses an excess of cure mixture — more than the meat can absorb — which guarantees full penetration but produces inconsistent salt levels. A two-inch-thick pork belly might end up pleasantly salty, while a thinner piece from the same batch comes out inedible. This is why many professional butchers have moved to equilibrium curing (Method 3), but the dry box method still works well for consistent-thickness cuts.
Best for: Bacon (pork belly), duck breast prosciutto, guanciale, lardo
Basic dry cure ratio (excess method):
- 1 pound (450g) kosher salt
- 8 ounces (225g) sugar (white or brown)
- 2 ounces (56g) Prague Powder #1
- Spices to taste (black pepper, juniper, thyme, bay leaf)
Pack the meat completely in this mixture, place in a non-reactive container, and refrigerate. Flip daily. Cure time depends on thickness — roughly 7 days per inch at the thickest point.
Method 2: Wet Curing (Brining)
Wet curing submerges meat in a salt solution, providing more even penetration than dry curing because the brine maintains constant contact with every surface simultaneously. The trade-off is that wet-cured products retain more moisture, which means less concentrated flavor and a softer texture than their dry-cured equivalents.
This is the traditional method for corned beef, pickled tongue, and many styles of ham. The brine can be flavored with anything — pickling spices, garlic, brown sugar, maple syrup, bay leaves — and those flavors penetrate along with the salt.
Best for: Corned beef, pastrami (before smoking), brined pork chops, Canadian bacon, pickled tongue
Basic brine ratio:
- 1 gallon (3.8L) cold water
- 1 cup (270g) kosher salt
- ½ cup (100g) sugar
- 1 tablespoon (17g) Prague Powder #1
- Aromatics: 2 tablespoons pickling spice, 4 cloves garlic, 2 bay leaves
Dissolve the salt, sugar, and curing salt in 1 quart of hot water, then add the remaining cold water to bring the temperature down. Never submerge meat in warm brine. The meat must stay fully submerged — use a plate or zip-lock bag filled with brine as a weight. Refrigerate for 5-7 days for a standard brisket flat, turning the meat every other day.
Method 3: Equilibrium Curing (The Professional Standard)
Equilibrium curing is the method most professional charcutiers use today because it eliminates the guesswork that plagues both dry and wet curing. Instead of using an excess of salt and hoping for the best, you calculate the exact amount of salt based on the weight of the meat. The cure reaches equilibrium — the salt concentration becomes uniform throughout the meat — and it is physically impossible to over-cure, no matter how long you leave it.
The math is simple: weigh your meat, multiply by your target salt percentage (typically 2.5-3% for most cures), and that is exactly how much salt to use. Add curing salt at 0.25% of meat weight. Mix, vacuum seal or pack tightly, refrigerate, and wait.
Best for: Everything. Especially when you need consistent results across cuts of varying thickness.
Equilibrium cure calculation example (5-pound pork belly):
- Meat weight: 2,268g (5 lbs)
- Salt (2.75%): 62.4g
- Sugar (1.5%): 34g
- Prague Powder #1 (0.25%): 5.7g
- Black pepper (0.5%): 11.3g
Mix the cure, coat the meat evenly, vacuum seal, and refrigerate for a minimum of 7 days. For a thick pork belly, 10-14 days ensures complete penetration. The beauty of equilibrium curing is that leaving it an extra week does not ruin anything — the salt level cannot exceed what you added.
Elena's note: A vacuum sealer is the single most important upgrade for equilibrium curing. It forces the cure into constant contact with the meat and eliminates air pockets where bacteria could potentially grow. If you do not have one, use zip-lock bags with the water displacement method — submerge the bag slowly in water to push air out before sealing.
Your First Project: Homemade Bacon
Bacon is the ideal first curing project. The technique is forgiving, the cure time is short, the results are immediately impressive, and pork belly is widely available. Once you have made your own bacon, you will understand the fundamental process that applies to every other cured product.
Selecting the Pork Belly
Start with a skin-off pork belly, approximately 5 pounds. Look for a piece with even thickness — dramatic taper from one end to the other means uneven curing and uneven slicing later. The meat-to-fat ratio should be roughly 50/50, with distinct layers of lean meat running through the fat cap. Avoid bellies that are mostly fat with thin streaks of meat, or excessively lean bellies from heritage breeds that may dry out during curing.
If your belly still has the skin on, remove it with a sharp knife, working in long horizontal strokes right at the junction between skin and fat. Save the skin for crackling or pork rind.
The Cure
Using the equilibrium method:
- Weigh the trimmed belly precisely. Record this number.
- Calculate: salt at 2.75%, brown sugar at 1.5%, Prague Powder #1 at 0.25% of meat weight.
- Mix the cure with black pepper (coarsely ground) and any aromatics you want — maple sugar, smoked paprika, garlic powder, or crushed red pepper all work well.
- Rub the cure mixture over every surface of the belly, paying extra attention to the meat side.
- Vacuum seal the belly (or use a zip-lock bag with air removed).
- Refrigerate for 7-10 days, flipping the package every other day.
After Curing: Rinse, Dry, and Slice
When the cure time is complete, remove the belly from the bag, rinse it thoroughly under cold water, and pat it completely dry with paper towels. At this point you have a choice: slice and cook it as-is (green bacon), or smoke it first for traditional smoked bacon.
For the best slicing results, place the cured belly in the freezer for 60-90 minutes until it is firm but not frozen solid. A partially frozen belly holds its shape against the knife, allowing you to cut uniform slices. Use a long slicing knife and cut to your preferred thickness — commercial bacon is typically sliced at 1/16 inch (about 1.5mm), but many home curers prefer a thicker 1/8 inch (3mm) slice that develops better texture when cooked.
Beyond Bacon: Intermediate Curing Projects
Once you have successfully made bacon, the entire world of cured meats opens up. Each project builds on the same fundamental skills — weighing, calculating, applying cure, waiting — with variations in cut selection, cure duration, and finishing technique.
Corned Beef
Use a beef brisket flat, 4-6 pounds. Prepare a wet brine with pickling spices (mustard seed, coriander, black peppercorns, bay leaves, allspice, cloves). Submerge in brine and refrigerate for 7-10 days, turning every other day. After curing, rinse well and simmer in fresh water with vegetables until fork-tender — about 3-4 hours for a typical flat.
Duck Breast Prosciutto
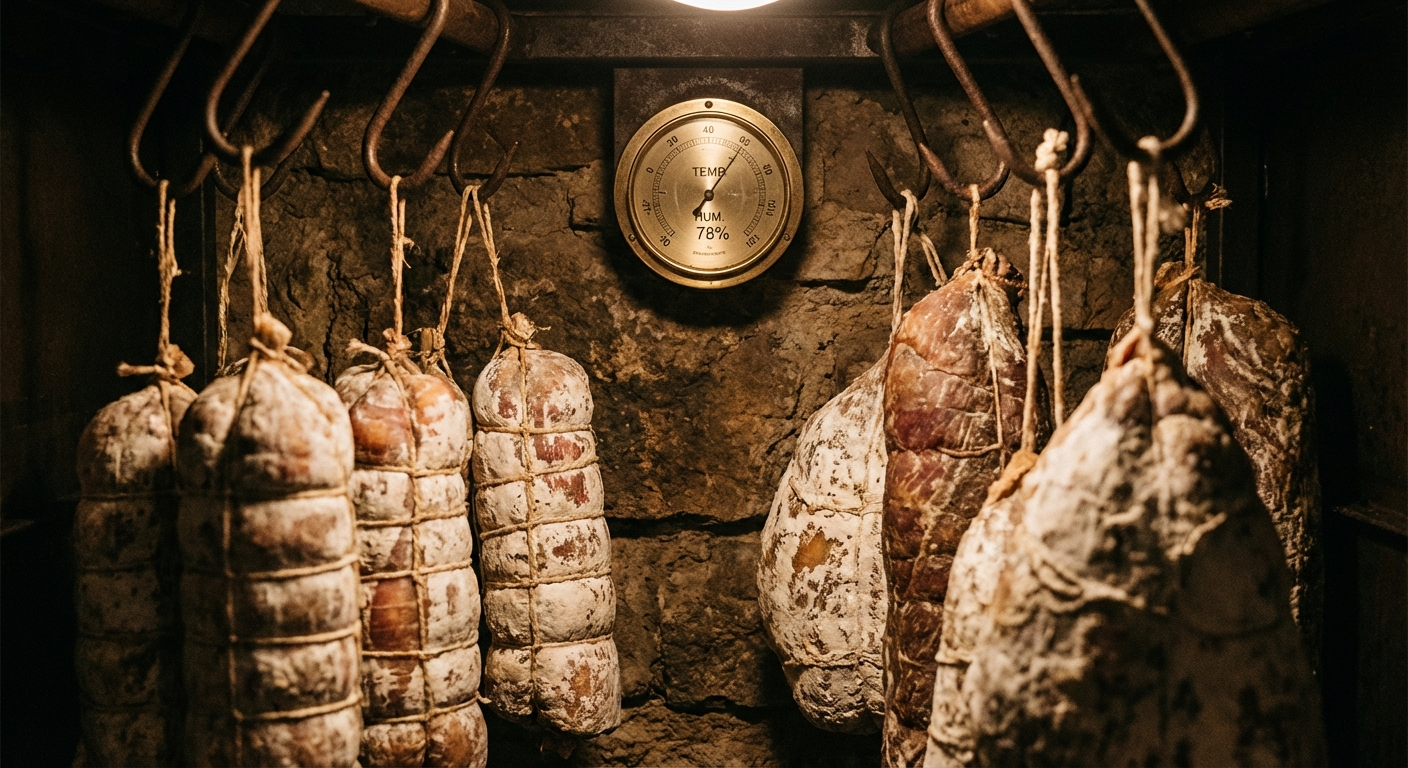
This is the fastest whole-muscle cure you can make. Score the fat cap of a Moulard duck breast in a crosshatch pattern, apply an equilibrium cure (2.5% salt, 0.25% Prague Powder #2, plus herbs), vacuum seal, and cure for 7 days. After curing, rinse, wrap tightly in cheesecloth, and hang in a cool (50-60°F), humid (65-75% RH) environment for 2-3 weeks until the breast has lost 30% of its original weight. Slice paper-thin and serve.
Pancetta
Pancetta is Italian-style cured pork belly, rolled and air-dried rather than smoked. Apply an equilibrium cure with black pepper, juniper berries, garlic, bay leaf, and fresh thyme. After 10-14 days of curing, rinse the belly, coat the meat side liberally with coarsely ground black pepper, roll it tightly into a cylinder, and tie with butcher's twine at 1-inch intervals. Hang in a curing chamber at 55°F and 70% humidity for 3-5 weeks until it loses 30% of its weight.
Safety: The Non-Negotiable Rules
Meat curing is fundamentally a food safety process, and cutting corners here has real consequences. These rules are not suggestions — they are the difference between charcuterie and a hospital visit.
- Always use a digital scale. Volume measurements (teaspoons, cups) are not precise enough for curing salt. A 0.1-gram accurate scale costs under $20 and is your most important safety tool.
- Never exceed 156 ppm sodium nitrite in the finished product. With Prague Powder #1, this is approximately 1 teaspoon (5.7g) per 5 pounds of meat.
- Keep curing temperatures between 36-40°F (2-4°C). Your refrigerator's main compartment is the correct environment. Never cure meat at room temperature unless you are an experienced charcutier working with specific controlled-environment protocols.
- Do not substitute regular salt for curing salt or vice versa. They serve different functions and are not interchangeable.
- Label everything. Date the start of every cure, record the weight, salt percentage, and expected completion date. Professional butchers keep cure logs for exactly this reason.
- When in doubt, throw it out. Off smells, unusual sliminess, or green discoloration (distinct from the normal pink of cured meat) mean something went wrong. Do not taste-test questionable product.
Essential Equipment for Home Curing
You do not need a professional curing chamber to start. Most curing projects require nothing more than your refrigerator and a few inexpensive tools. Here is what you actually need:
- Digital scale (0.1g accuracy): $15-25. Non-negotiable for calculating cure percentages. The American Weigh Scales SC-2KGA is a reliable, affordable option.
- Non-reactive containers: Food-grade plastic, glass, or stainless steel. Never use aluminum or copper, which react with salt and curing compounds.
- Vacuum sealer: $50-150. Essential for equilibrium curing. The FoodSaver V4400 handles pork bellies and briskets without issue.
- Curing salts: Prague Powder #1 and #2. Available from butcher supply shops or online. A 1-pound bag lasts most home curers several years.
- Butcher's twine: Unbleached cotton. Used for tying rolled cures like pancetta and coppa.
- Cheesecloth: For wrapping products that will be air-dried.
- Thermometer/hygrometer: For monitoring curing chamber conditions if you progress to air-dried products.
As you advance, you may want to build or buy a dedicated curing chamber — a converted wine cooler or mini-fridge with temperature and humidity control. But that is a project for after you have mastered refrigerator curing and decided this is a skill you want to develop seriously.
Frequently Asked Questions
Frequently Asked Questions
Is it safe to cure meat at home without nitrites?
For products that will be fully cooked immediately after curing (like bacon you plan to fry), some recipes omit curing salt. However, nitrites provide critical protection against botulism, especially for any product held at temperatures between 40-140°F for extended periods. For air-dried products like bresaola or pancetta, curing salt is mandatory — there is no safe alternative for whole-muscle products that will not be cooked.
How long does homemade cured meat last?
Vacuum-sealed cured bacon lasts 2-3 weeks in the refrigerator and 6 months in the freezer. Fully dry-cured products like pancetta or bresaola, stored properly in the refrigerator, last 3-4 weeks after cutting. Whole uncut pieces last longer because less surface area is exposed to air.
What is the difference between curing and smoking?
Curing is the process of preserving meat with salt (and usually nitrites). Smoking is a separate step that adds flavor and can further preserve the surface through antimicrobial compounds in wood smoke. Many products — like traditional bacon and pastrami — are both cured and smoked, but the processes serve different purposes and are done sequentially, not simultaneously.
Can I use sea salt or Himalayan salt for curing?
You can use any pure salt for the base cure, but avoid salts with added iodine (iodized table salt), which can give cured meat a metallic taste. Kosher salt, sea salt, and Himalayan salt all work. The critical detail is measuring by weight, not volume — different salt crystal sizes mean a cup of kosher salt contains far less sodium chloride than a cup of fine sea salt.
What temperature should my curing chamber be?
For refrigerator curing (bacon, corned beef, wet brines), standard refrigerator temperature of 36-40°F (2-4°C) is correct. For air-drying products like pancetta, bresaola, or salami, the ideal temperature is 50-60°F (10-15°C) with 65-75% relative humidity. A converted wine cooler with a humidity controller is the most common DIY curing chamber setup.
More Expert Guides
How to Trim a Brisket: The Complete Butcher's Guide
Proper brisket trimming is the difference between a backyard experiment and competition-quality results. Here is the professional technique for shaping a whole packer brisket before it ever touches the smoker.
14 min readHow to Butcher a Whole Chicken: Step-by-Step Guide
Breaking down a whole chicken yourself saves 40-50% compared to buying individual parts. Here is the professional technique for turning one bird into perfectly portioned pieces.
14 min readHome Butchering Safety Guide: Essential Protocols for Safe Meat Processing
Learn professional butchering safety protocols from a master butcher with 25+ years of experience. Essential guidance for anyone processing meat at home.