How to Dry Age Beef at Home: The Complete Butcher's Guide
Dry aging transforms ordinary beef into something extraordinary. Over weeks, enzymes break down tough muscle fibers while moisture evaporates, concentrating flavor into a nutty, funky, deeply beefy taste that wet-aged supermarket steaks cannot touch. Restaurants charge forty to sixty dollars extra per steak for it. You can do it at home for the cost of a dedicated refrigerator and some patience.
The process is straightforward but unforgiving. Temperature, humidity, and airflow must stay within specific ranges or you will grow harmful bacteria instead of the beneficial mold that protects the exterior. This guide covers every detail: what equipment you need, which cuts to age, how to monitor conditions, when to pull the meat, and how to trim and portion the finished product.
What Happens During Dry Aging
Three simultaneous processes create the flavor and texture changes that define dry aged beef:
- Moisture loss: Water evaporates from the muscle surface over time. A 28-day age typically loses 15 to 20 percent of original weight. This concentrates the existing beef flavor — the same amount of taste compounds in less water means more intense flavor per bite.
- Enzymatic breakdown: Natural enzymes (calpains and cathepsins) break down the protein structures that make muscle tough. Collagen and myofibrillar proteins are slowly disassembled, resulting in tenderness that cooking alone cannot achieve. This is the same process that makes aged cheese softer than fresh cheese.
- Flavor development: Fats oxidize and amino acids break down into new flavor compounds. After 21 days you get a noticeably nuttier, more complex taste. Past 45 days, funky blue cheese notes develop. Past 60 days, the flavor becomes intensely pungent — an acquired taste that some people love and others find overwhelming.
The hard dark crust that forms on the outside — called the pellicle — is not mold penetrating the meat. It is a dried protective layer that gets trimmed off before cooking. The edible meat underneath is where all the magic happens.
Equipment You Need
You do not need a professional aging chamber, but you need more than an empty shelf in your kitchen fridge. The reason is simple: a standard home refrigerator opens and closes constantly, has inconsistent humidity, and stores other foods that introduce odors and bacteria. Dry aging requires a controlled, dedicated environment.
Dedicated Refrigerator
A standalone fridge that you use only for aging. A used full-size refrigerator works, or you can buy a compact unit if you are only aging one cut at a time. The key requirement is that it holds a consistent temperature between 34 and 38 degrees Fahrenheit (1 to 3 degrees Celsius). Frost-free models work better because they circulate air, which helps form the pellicle evenly.
Wire Rack and Tray
The beef must sit on a wire rack — never directly on a shelf or plate. Air needs to circulate around all sides of the meat. A standard baking cooling rack set inside a sheet pan catches drips while allowing full airflow underneath. Elevate the rack at least half an inch above the tray.
Small Fan
A USB-powered or small clip-on fan inside the fridge keeps air moving constantly. Still air creates moisture pockets where bacteria thrive. The fan does not need to blow directly on the meat — it just needs to keep the air circulating throughout the cabinet. A small computer fan wired to a USB adapter works well and uses almost no power.
Thermometer and Hygrometer
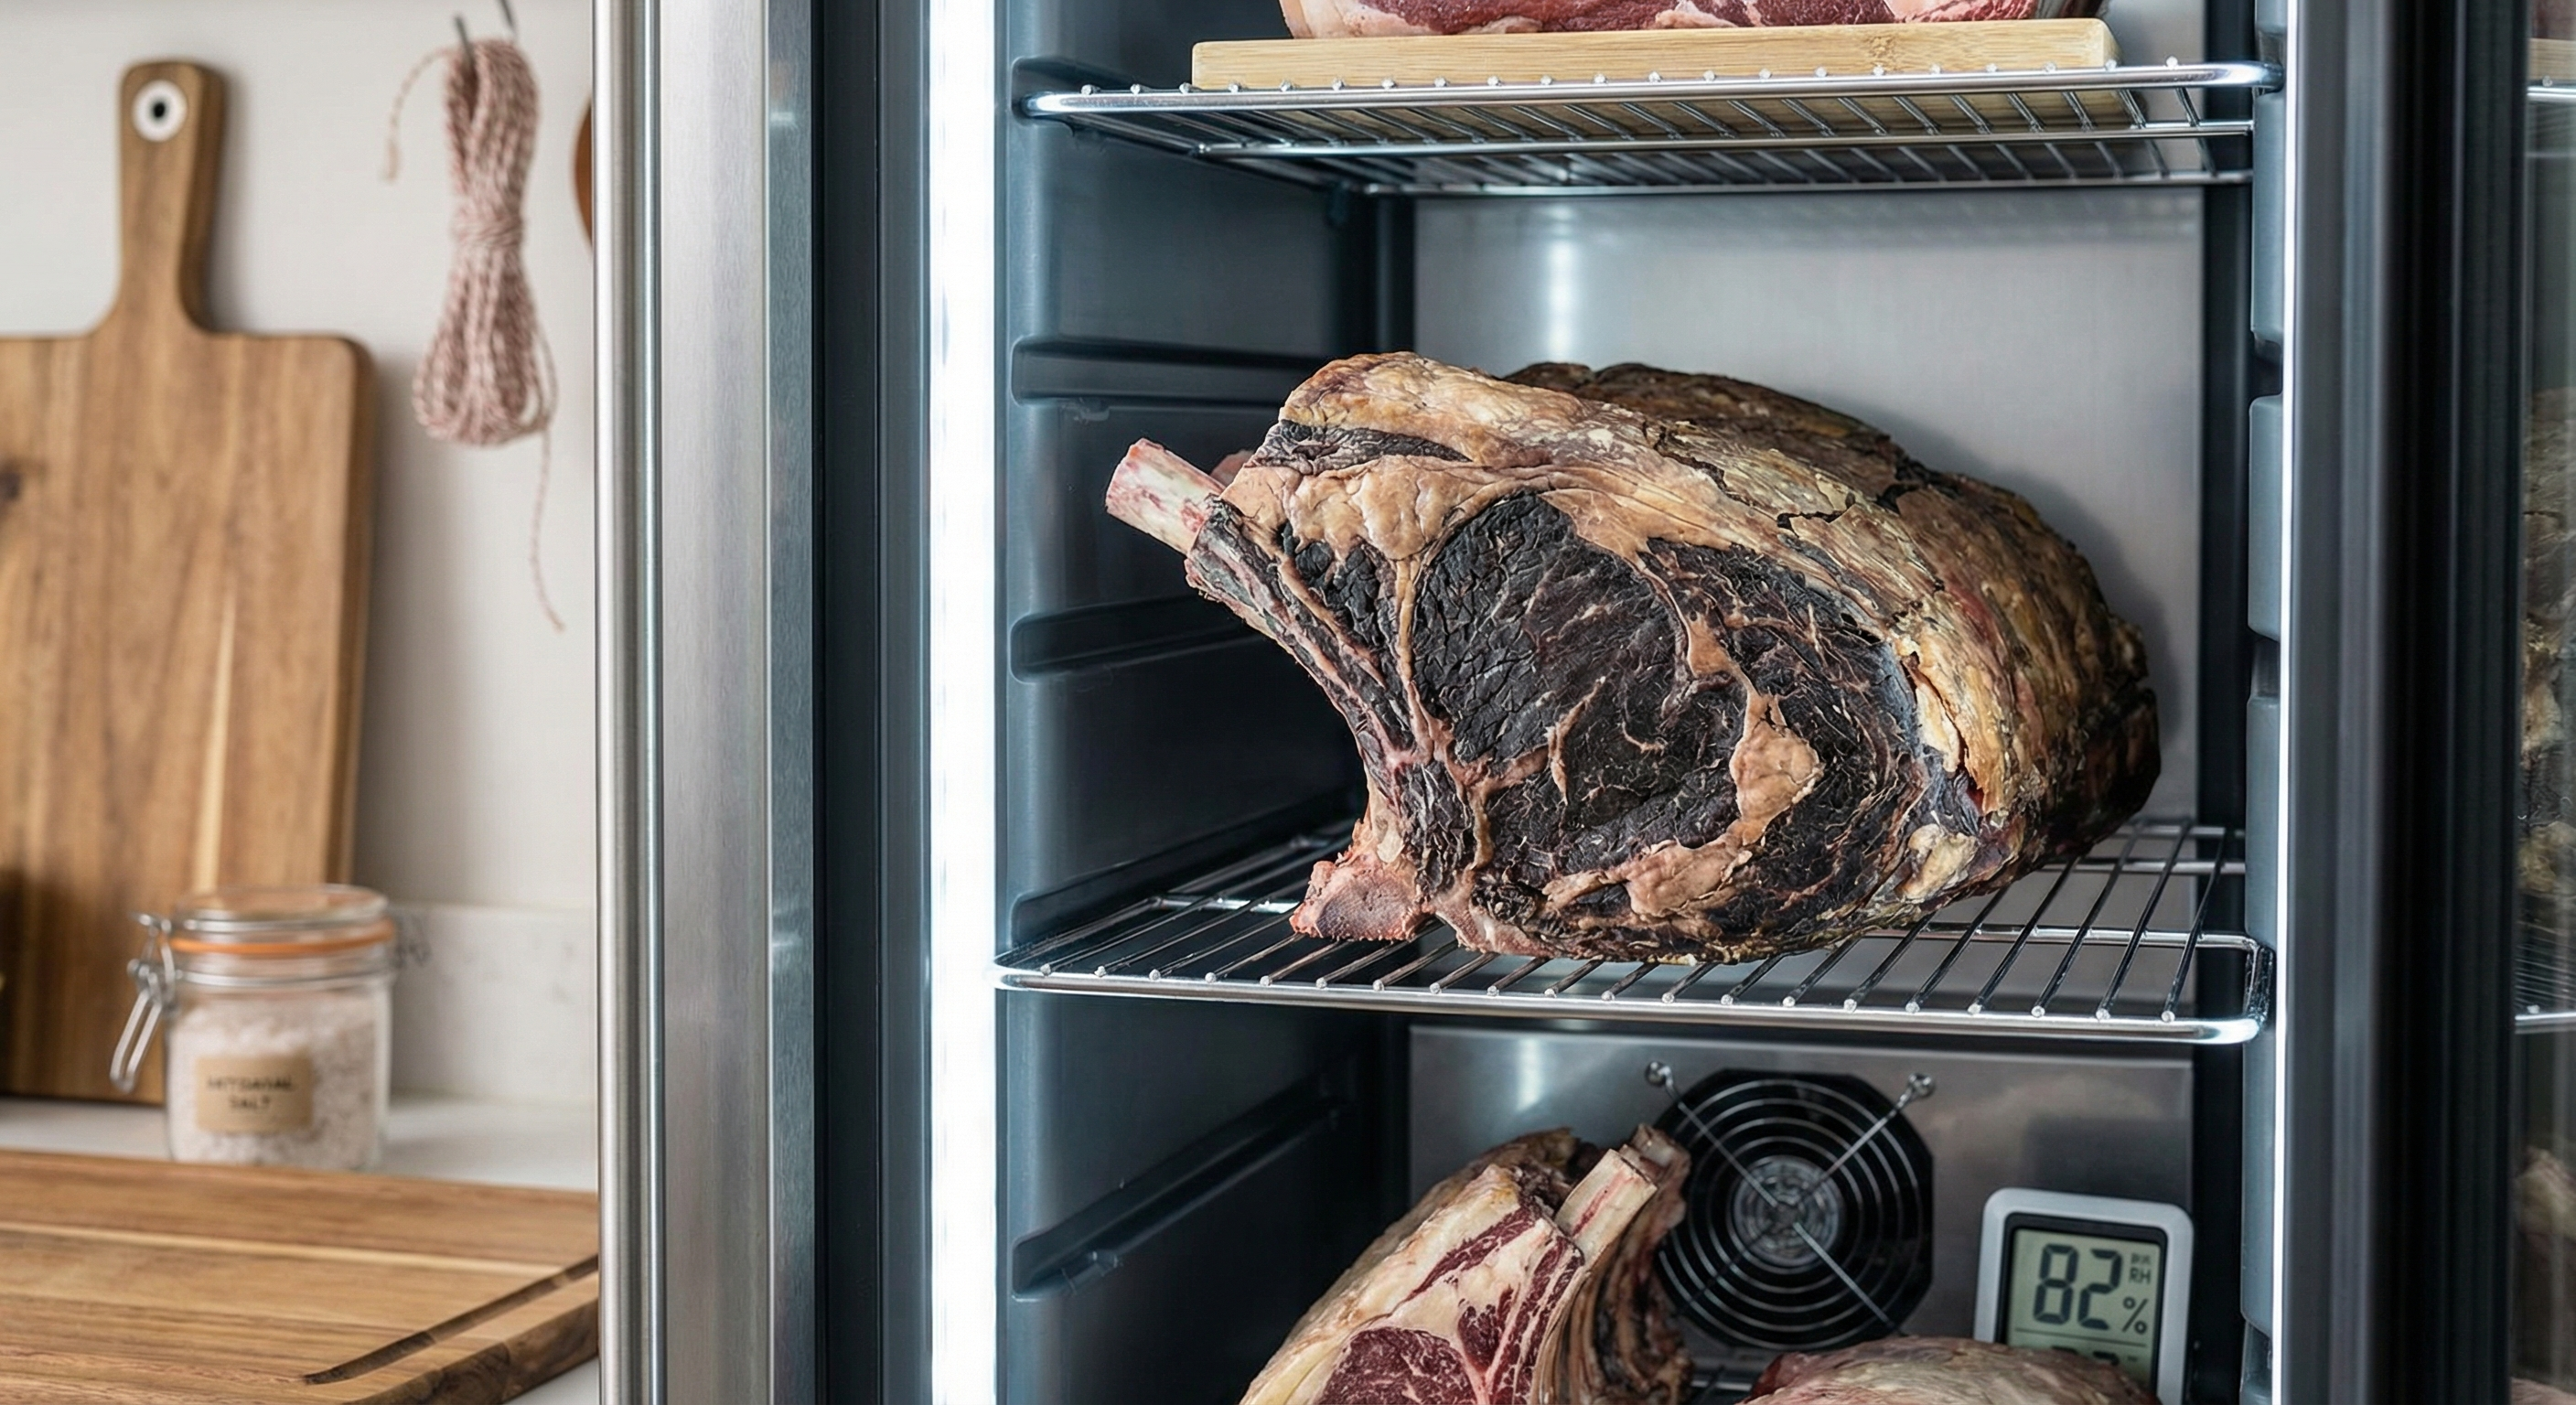
A digital thermometer-hygrometer combo that you can read from outside the fridge without opening the door. Wireless models with an external display are ideal. You need to monitor both temperature (34 to 38 degrees Fahrenheit) and relative humidity (75 to 85 percent). Outside this range, you are either drying the meat too fast or creating conditions for spoilage.
Salt Tray (Optional but Recommended)
A shallow tray of coarse rock salt placed in the fridge acts as a natural humidity regulator. Salt absorbs excess moisture when humidity climbs and releases it when the air gets too dry. It also has mild antimicrobial properties. Replace the salt every two to three aging cycles.
Choosing the Right Cut
Not every cut of beef benefits from dry aging. The process works best on large, well-marbled primals with a good fat cap. Small individual steaks will lose too much weight to trimming — you need a large piece so the interior stays protected while the exterior dries.
Best Cuts for Dry Aging
- Bone-in ribeye primal (IMPS 109): The gold standard. The bone and fat cap protect the meat, marbling keeps it juicy despite moisture loss, and the ribeye flavor profile is enhanced dramatically by aging. Buy a full 7-rib section or a 3-to-4-rib piece at minimum.
- Bone-in strip loin (IMPS 175): A full bone-in New York strip loin is excellent for aging. The backbone and fat cap provide natural protection. Expect rich, concentrated steak flavor with slightly less marbling than ribeye.
- Whole tenderloin: Can be aged but loses significant weight due to its small diameter and lack of fat cap. Only worth it with USDA Prime grade that has enough marbling to stay moist.
Cuts to Avoid
- Boneless subprimals: Without bone protection, too much surface area is exposed and trim loss becomes excessive. You can lose 35 to 40 percent of a boneless cut to pellicle trimming.
- Lean cuts (eye of round, sirloin): Low fat content means the meat dries out instead of concentrating flavor. You end up with tough, leathery beef.
- Individual steaks: Far too thin. By the time you trim the pellicle, there is barely any meat left.
Grade Matters
Start with USDA Choice at minimum, but USDA Prime is strongly recommended. The intramuscular fat (marbling) acts as an internal moisture reserve. Well-marbled beef stays juicy even after losing 15 to 20 percent of its water weight. Select grade beef will taste dry and metallic after aging.
Ask your butcher for a whole bone-in ribeye primal, USDA Prime if available, with the fat cap intact. Do not let them trim it — you want all that external fat as protection during the aging process. Expect to pay six to eight dollars per pound for Choice and twelve to eighteen dollars per pound for Prime, depending on your area.
Setting Up Your Aging Environment
Before placing any meat inside, run your dedicated fridge for 48 hours with the fan running and monitor temperature and humidity. You want stable readings within the target ranges before committing expensive beef to the process.
- Clean the fridge thoroughly. Wipe down every surface with a mild bleach solution (one tablespoon per gallon of water), then rinse with clean water and dry completely. You are creating a controlled microbiome — start clean.
- Place the wire rack on a sheet tray. Position it in the center of the fridge where airflow is best. Leave space around all sides.
- Install the fan. Mount it on a shelf or clip it to a rack so it circulates air without blowing directly on where the meat will sit. A gentle indirect breeze across the meat is ideal.
- Add the salt tray. Place it on a lower shelf away from the meat. A standard 9-by-13-inch baking pan with an inch of coarse rock salt works well.
- Place the thermometer-hygrometer sensor. Position it near where the meat will rest, not next to the fan or the walls. You want to measure the conditions the beef actually experiences.
- Close the door and wait 48 hours. Check readings every 12 hours. Temperature should stabilize between 34 and 38 degrees Fahrenheit. Humidity should settle between 75 and 85 percent. If humidity is too high, crack the door for 30 seconds twice daily. If too low, place a small open container of water inside.
The Aging Process: Day by Day
Once your environment is stable, pat the beef primal dry with paper towels and place it fat-cap-up on the wire rack. Do not wrap it, cover it, or season it. The entire point is exposing it to controlled air circulation.
Days 1 Through 7
The exterior begins to dry and darken. By day 3 or 4 you will notice the surface feels tacky rather than wet. This is the pellicle forming — a good sign. The meat may develop a slightly funky smell that is different from the fresh-beef smell. This is normal enzymatic activity. If you smell anything sour, ammonia-like, or rotten, something is wrong — check your temperature and humidity immediately.
Days 7 Through 14
The pellicle is now clearly visible as a dark, leathery crust. Some white fuzzy mold may appear on the surface. White mold is normal and beneficial — it is the same type of mold found on aged salami and brie cheese. It protects the interior meat from harmful bacteria. Do not wipe it off. Green, black, or fuzzy colored mold that is not white indicates contamination. If you see this, discard the meat and sanitize your setup before trying again.
Days 14 Through 21
Noticeable weight loss is happening. The beef is concentrating in flavor and tenderizing. At 21 days you have a classic dry-aged result: noticeably more tender than fresh, with a clean nutty flavor enhancement. This is the sweet spot for first-timers. If you are unsure how far to go, pull at 21 days.
Days 21 Through 35
This is the range most high-end steakhouses target. The flavor becomes distinctly dry-aged — nutty, buttery, with a depth that fresh beef simply does not have. Tenderness is significantly improved. Trim loss increases to 20 to 25 percent. Most home dry agers settle on 28 to 35 days as their preferred range after experimenting.
Days 35 Through 60 and Beyond
Extended aging produces polarizing results. Blue cheese and funky fermented notes become dominant. The meat is incredibly tender but the flavor is intense and not for everyone. Trim loss can reach 30 to 35 percent. Only attempt extended aging once you have several successful 28-to-35-day ages under your belt and know your setup is reliably stable.
Monitoring and Troubleshooting
Check your thermometer-hygrometer readings daily. You do not need to open the fridge — that is why you use a wireless unit. The goal is to catch problems early before they ruin an expensive cut of beef.
Temperature Too High (Above 40°F)
Dangerous. Above 40 degrees Fahrenheit, harmful bacteria multiply rapidly. Check that the fridge is plugged in and the thermostat is set correctly. If the compressor is running but temperature is climbing, the door seal may be failing or the unit may be overstuffed. Fix the issue within hours or discard the meat if it has been above 40 degrees for more than two hours.
Temperature Too Low (Below 32°F)
The meat will freeze, which damages cell structure and causes excessive moisture loss when it thaws. Ice crystals puncture cell walls, resulting in mushy texture. Turn the thermostat up slightly and monitor.
Humidity Too Low (Below 70%)
The meat dries too quickly. The pellicle forms too thick and too fast, potentially case-hardening the exterior while the interior stays unchanged. Add a small open container of water to the fridge or reduce fan speed.
Humidity Too High (Above 85%)
Excess moisture encourages harmful bacterial growth and prevents proper pellicle formation. Increase fan speed, add more salt to the tray, or crack the door briefly to let moisture escape. If the fridge is in a humid room, consider a small dehumidifier nearby.
Off Smells
Dry aging beef smells funky. That is expected. The smell should be earthy, nutty, slightly mushroom-like. What it should NOT smell like: sour milk, ammonia, sulfur, or rotting garbage. If you detect any of those, inspect the meat closely. A small spot of contamination can sometimes be trimmed off if caught early, but widespread off-odors mean the aging conditions failed and the meat should be discarded.
Trimming the Finished Product
When your aging period is complete, remove the beef from the fridge. It will look alarming — a dark, crusty, possibly moldy exterior that does not resemble anything you would want to eat. That is exactly right. All the magic is underneath.
- Set up your cutting board and a sharp knife. A stiff boning knife or a carving knife with a rigid blade works best. You need to cut through the hardened pellicle cleanly.
- Remove the pellicle. Slice off the dark outer crust from all surfaces. Cut just deep enough to reach fresh red meat underneath. The pellicle is typically a quarter to half inch thick. On fat cap surfaces, you may only need to trim off the very outer layer — the fat underneath is fine to keep.
- Trim any discolored fat. Fat that has turned yellow or grey should be removed. Clean white or cream-colored fat is fine to leave on.
- Remove any dried-out edges. Pay special attention to corners and thin edges that may have dried through completely. If meat feels hard and leathery all the way through, trim it off.
- Cut into steaks. Slice your steaks at one and a quarter to one and a half inches thick. Thinner steaks do not allow you to develop a good crust while keeping the center medium-rare. Dry aged beef cooks faster than fresh beef due to lower moisture content, so slightly thicker cuts give you more margin.
Expect to lose 20 to 30 percent of the original weight to trimming and moisture loss combined. A 20-pound bone-in ribeye primal aged for 30 days will yield roughly 14 to 16 pounds of finished steaks. This is why dry aged beef costs more — the yield is significantly lower than fresh or wet-aged beef.
Cooking Dry Aged Steaks
Dry aged steaks require slight adjustments to your normal cooking technique because they contain less moisture than fresh steaks.
- Salt earlier: Season with kosher salt 45 to 60 minutes before cooking. The dry surface sears better and the salt has time to penetrate without drawing out moisture you cannot afford to lose.
- Higher heat, shorter time: Use the hottest surface you can manage — a ripping hot cast iron pan or a 700-degree grill. The lower moisture content means dry aged steaks sear faster and cook through faster. Expect 20 to 30 percent less cooking time compared to fresh steaks of the same thickness.
- Pull earlier: Remove steaks 5 degrees Fahrenheit below your target doneness. Carryover cooking still applies, and the concentrated proteins conduct heat efficiently. A dry aged steak pulled at 125 degrees will coast to a perfect 130 degrees medium-rare.
- Rest shorter: Five minutes is enough. The lower moisture content means less juice redistribution is needed compared to fresh beef. Resting too long cools the steak unnecessarily.
- Minimal seasoning: You spent 30 days developing complex flavor. Do not drown it in sauce or heavy seasoning. Salt, pepper, and maybe a finish of good butter is all you need. Let the aging speak.
Safety Considerations
Dry aging is a controlled decomposition process. Treated casually, it can produce unsafe food. Follow these rules without exception:
- Never age in a shared refrigerator. Other foods introduce bacteria, and opening the door constantly destabilizes temperature and humidity.
- Never age below USDA Choice grade. Lean meat does not have enough fat to stay safe and palatable through the aging process.
- Never age previously frozen meat. Freezing damages cell structure, and the thawed meat releases too much moisture too quickly, creating bacterial breeding grounds.
- Discard meat with green, black, or pink mold. White mold is safe. Everything else indicates contamination.
- Do not eat the pellicle. Always trim it completely. The dried exterior is not harmful in small amounts but contains concentrated bacterial colonies that should not be consumed.
- Keep a temperature log. If your fridge loses power or malfunctions and the meat sits above 40 degrees Fahrenheit for more than two hours, discard it. There is no way to tell by looking or smelling whether dangerous bacteria have multiplied.
Cost Breakdown
Dry aging at home is significantly cheaper than buying dry aged steaks from a butcher shop or restaurant, but it is not free. Here is a realistic cost breakdown for a 28-day age of a bone-in USDA Prime ribeye primal:
- Beef: 18 to 22 pounds at $14 to $18 per pound = $250 to $400
- Dedicated fridge (one-time): $150 to $300 used, $300 to $500 new
- Fan, thermometer-hygrometer, rack (one-time): $40 to $80
- Electricity for 28 days: $8 to $15
- Yield after trimming: 14 to 17 pounds of finished steak
- Effective cost per pound (meat only): $15 to $28 per pound for Prime dry aged steak
Compare that to retail dry aged Prime ribeye steaks at $45 to $70 per pound, and the savings are obvious. The fridge and accessories pay for themselves after the first or second aging cycle. After that, your only recurring cost is the beef itself.
Frequently Asked Questions
How long should I dry age beef at home?
21 to 35 days is the ideal range for most people. At 21 days you get noticeable tenderness improvement and a clean nutty flavor. At 28 to 35 days the classic dry-aged flavor fully develops. Beyond 45 days produces intense funky flavors that are an acquired taste.
Can I dry age beef in my regular kitchen fridge?
No. A shared kitchen refrigerator opens too frequently, has inconsistent temperature and humidity, and contains other foods that introduce bacteria and odors. You need a dedicated refrigerator used only for aging.
What does white mold on dry aged beef mean?
White mold on dry aged beef is normal and beneficial. It is the same type of mold found on aged salami and brie cheese, and it helps protect the meat from harmful bacteria. Do not wipe it off. Only green, black, or colored mold indicates a problem.
How much weight does beef lose during dry aging?
Expect 15 to 20 percent moisture loss during aging, plus additional trim loss when removing the pellicle. Total yield loss from a 28-day age is typically 20 to 30 percent of the original weight.
Is dry aged beef safe to eat?
Yes, when done correctly. Maintain temperature between 34 and 38 degrees Fahrenheit, humidity between 75 and 85 percent, and constant airflow. Always trim the pellicle completely before cooking. Discard meat if temperature exceeds 40 degrees Fahrenheit for more than two hours.
More Expert Guides
How to Trim a Brisket: The Complete Butcher's Guide
Proper brisket trimming is the difference between a backyard experiment and competition-quality results. Here is the professional technique for shaping a whole packer brisket before it ever touches the smoker.
14 min readHow to Butcher a Whole Chicken: Step-by-Step Guide
Breaking down a whole chicken yourself saves 40-50% compared to buying individual parts. Here is the professional technique for turning one bird into perfectly portioned pieces.
14 min readHome Butchering Safety Guide: Essential Protocols for Safe Meat Processing
Learn professional butchering safety protocols from a master butcher with 25+ years of experience. Essential guidance for anyone processing meat at home.