How to Grind Meat at Home: The Complete Butcher's Guide
Grinding your own meat at home is one of the simplest ways to dramatically improve your cooking. Store-bought ground beef comes from a mix of trimmings from multiple animals, ground hours or days before you buy it, with a fat ratio you have to trust the label on. When you grind at home, you know exactly what went in, when it was ground, and how much fat is in the mix.
The difference shows up immediately. Home-ground burgers have a coarser, more interesting texture. The flavor is cleaner and more beefy. And you can create custom blends — short rib mixed with chuck, or brisket blended with sirloin — that no grocery store offers. Once you start grinding your own meat, the pre-packaged stuff tastes like a compromise.
Why Grind Your Own Meat
Before getting into technique, it is worth understanding why professional butchers and serious cooks grind their own. The reasons go beyond flavor preference — they touch on food safety, economy, and creative control.
Freshness and safety. Commercial ground beef can contain meat from dozens of animals processed at different times. Each source is a potential contamination point. When you grind a single piece of chuck at home, you have one animal, one cut, ground moments before cooking. The bacterial surface area created by grinding has minimal time to develop problems.
Fat control. Labels like "80/20" or "90/10" at the grocery store are averages across a batch. Your actual package might vary by several percentage points. When you grind at home, you weigh your lean meat and your fat separately. You get exactly the ratio you want, every time.
Texture control. Commercial grinders run at high speed and generate heat, which partially emulsifies the fat and creates that dense, uniform paste texture in store-bought ground beef. Home grinding with cold meat and a sharp plate produces a coarser grind with distinct meat and fat particles. That texture difference is what makes a great smash burger or a hand-formed meatball.
Cost savings. A whole beef chuck primal runs $4–6 per pound at wholesale or from a local butcher. Ground chuck at the grocery store costs $6–9 per pound. The math works fast, especially when you are grinding 10+ pounds at a time for meal prep or a cookout.
Custom blends. This is where home grinding gets genuinely exciting. A blend of 50% chuck, 30% short rib, and 20% brisket creates a burger with deep beefy flavor, rich fat, and complex texture that no single-cut grind can match. You can also grind pork, lamb, venison, or any combination for sausage, meatloaf, or ethnic dishes that call for specific blends.
Essential Equipment
You need surprisingly little to start grinding meat at home. A dedicated grinder, a sharp knife, a cutting board, and a sheet pan are the essentials. Everything else is a nice-to-have.
Choosing a Meat Grinder
The grinder is the one piece of equipment you cannot skip. You have three main options:
Stand mixer attachment ($50–80): KitchenAid and other stand mixers offer grinding attachments. These work for occasional small batches under 5 pounds. The motor is not designed for continuous grinding, and the feed tube is narrow, which slows you down. Acceptable for beginners, but you will outgrow it.
Dedicated electric grinder ($80–300): This is what most serious home grinders use. A #8 grinder handles batches up to 10 pounds comfortably. A #12 grinder is the sweet spot — fast enough for 20+ pound batches, affordable, and widely available. LEM, STX Turboforce, and Weston all make reliable models in this range.
Hand-crank grinder ($30–60): Manual grinders are slow but give you excellent control over speed and temperature. They are also quieter, easier to clean, and never overheat. For small batches or if you enjoy the hands-on process, a quality hand-crank grinder is a legitimate choice. Bolt-on models from LEM or Victoria are built to last decades.
Grinding Plates and Blades
Every grinder uses a rotating blade that pushes meat against a stationary plate with holes. The plate size determines your grind texture:
- Coarse plate (3/8 inch / 10mm): Produces chunky, textured ground meat. Best for burgers, chili, and Bolognese where you want visible meat pieces.
- Medium plate (1/4 inch / 6mm): The all-purpose grind. Works for burgers, meatloaf, meatballs, tacos, and most general cooking. This is what most store-bought ground beef approximates.
- Fine plate (3/16 inch / 4.5mm): Produces a smooth, dense grind. Best for sausage, hot dogs, pâté, and emulsified products where you want a uniform texture.
Elena's tip: Buy at least two plates — coarse and fine. Most recipes fall into one of those categories, and you can always double-grind through the fine plate if you need something smoother. Keep the blade sharp. A dull blade tears and smears meat instead of cutting it cleanly, which raises the temperature and damages texture.
Best Cuts for Grinding
Not all cuts grind equally well. The ideal grinding cut has a good balance of lean meat and intramuscular fat, comes from a well-worked muscle with deep flavor, and is economical enough to justify grinding rather than cooking whole.
Beef
- Chuck (shoulder): The gold standard for ground beef. Naturally around 80/20 lean-to-fat, deeply flavored from the well-worked shoulder muscles, and inexpensive. If you only grind one cut, make it chuck.
- Short rib (plate): Rich, beefy, and generously marbled. Adds luxurious fat and intense flavor to blends. Usually too fatty to grind alone (closer to 70/30), but incredible when blended with leaner cuts at 20–30% of the mix.
- Brisket: Deep, mineral-rich beef flavor with a distinctive texture. The flat is leaner, the point is fattier. Brisket adds complexity to any blend. Use at 20–40% of the mix.
- Sirloin: Lean and clean-tasting. Good when you want a less fatty grind (for meatballs or lean burgers) or as a lean component in a blend. Around 90/10 on its own.
- Round: Very lean (95/5). Too dry on its own for most applications, but useful when you need to dilute a fatty blend or want extremely lean ground beef for specific recipes.
Pork
- Pork shoulder (Boston butt): The best all-purpose cut for grinding pork. Good fat ratio (around 75/25), excellent flavor, and very affordable. The go-to for sausage, meatballs, dumplings, and pork burgers.
- Pork belly: Almost pure fat with streaks of meat. Do not grind this alone. Add small amounts (10–15%) to lean blends when you need more fat and pork flavor.
- Back fat: Pure fat, no meat. Essential for sausage-making when you need precise fat percentages. Ask your butcher — they usually sell it cheap or give it away.
Lamb and Game
- Lamb shoulder: Similar role to beef chuck — well-marbled, flavorful, and economical. Great for kofta, lamb burgers, moussaka, and shepherd's pie.
- Venison (leg or shoulder): Extremely lean. Always blend with pork fat or beef fat at 20–30% to prevent dry, crumbly results. The gamey flavor intensifies when ground, so consider mixing with pork shoulder for milder applications.
The Pre-Freeze Method (Do Not Skip This)
Temperature is the single most important variable in grinding meat. Cold meat grinds cleanly. Warm meat smears, clogs the plate, and turns into a greasy paste. Professional butchers grind in refrigerated cutting rooms for a reason — and at home, you need to compensate.
The pre-freeze method is simple:
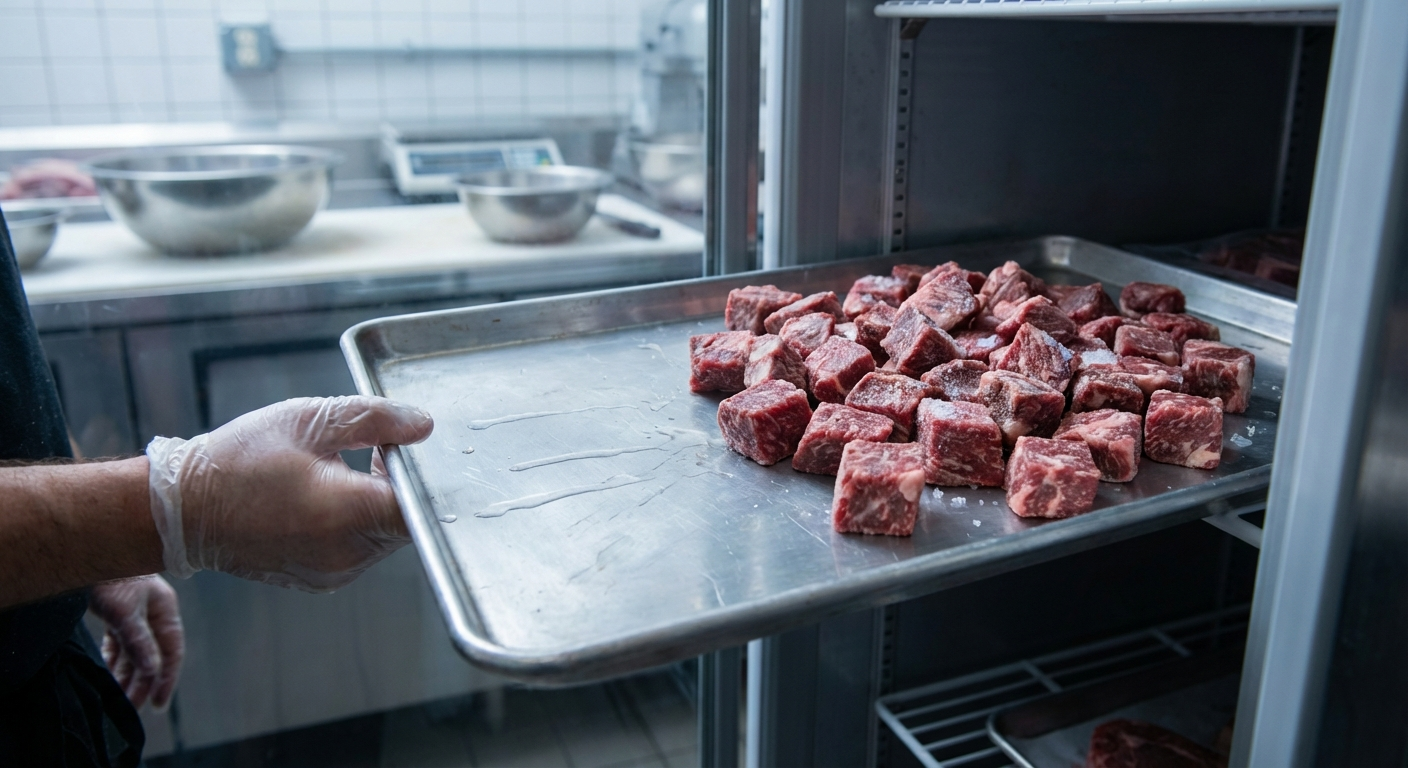
- Cut your meat into 1 to 1.5 inch cubes. Remove any sinew, silverskin, or glands as you go. Leave the fat — that is intentional.
- Spread the cubes in a single layer on a sheet pan. Do not pile them up. You want maximum surface area exposed to cold air.
- Freeze for 30 to 45 minutes. You want the outside of each cube firm and slightly icy, but the interior still pliable. If you can push a finger into the center with moderate pressure, you are in the right range. If the cubes are rock-hard, you went too long — let them sit at room temp for 10 minutes.
- Freeze your grinder parts too. Put the blade, plate, and feed tube in the freezer alongside the meat. Cold metal stays cold longer and keeps everything at safe temperatures during grinding.
Why this matters: Fat melts at relatively low temperatures. Friction from the grinder generates heat. If your meat starts at refrigerator temperature (38°F / 3°C), the fat will begin softening and smearing within the first minute of grinding. Starting partially frozen (28–30°F / -2 to -1°C) gives you a buffer. The meat stays cold through the entire grinding process, and the fat stays in distinct pieces rather than coating everything in a greasy film.
Step-by-Step Grinding Process
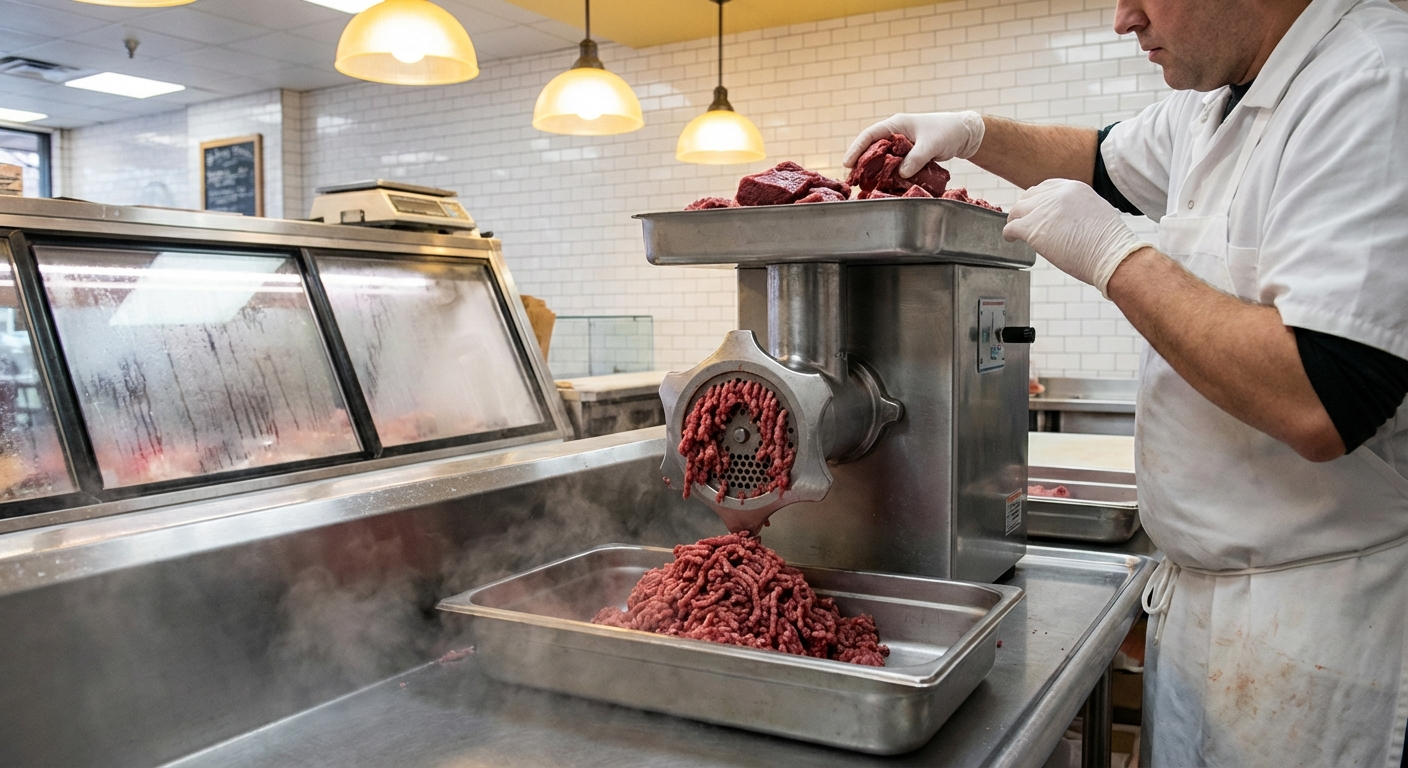
With your meat cubed and pre-frozen and your grinder assembled with cold parts, you are ready to grind. The process is straightforward, but each step has a reason.
Step 1: Set Up Your Station
Place a large bowl under the grinder output. Set that bowl inside a larger bowl filled with ice to keep the ground meat cold as it accumulates. Have your sheet pan of cubed meat within arm's reach. If you are grinding multiple cuts for a blend, keep them separated until after grinding — blend after, not before.
Step 2: Feed the Grinder Steadily
Turn on the grinder and feed cubes into the hopper at a steady pace. Use the pusher tool — never your fingers. Do not overload the hopper. Feed 4–6 cubes at a time, letting each batch clear before adding more. Rushing creates jams, generates heat, and produces uneven grinding.
If the grinder bogs down, slows noticeably, or starts making a strained sound, stop immediately. The plate or blade is probably clogged with sinew. Disassemble, clear the obstruction, and continue. Pushing through a clog generates enormous heat and ruins the grind.
Step 3: First Grind (Coarse)
For most applications, start with the coarse plate (3/8 inch). This first pass breaks the meat down into manageable pieces while maintaining distinct texture. For burgers, chili, or Bolognese, a single coarse grind is often all you need.
Step 4: Second Grind (Optional)
For sausage, meatballs, or a finer texture, swap to the fine plate and run the coarsely ground meat through a second time. Re-chill the meat for 15 minutes between grinds if it has warmed up. The second grind creates a more cohesive bind — important for sausage that needs to hold together in a casing, or meatballs that should not fall apart in sauce.
Step 5: Mix Your Blend
If you ground multiple cuts separately, now is the time to combine them. Spread the ground meat on a sheet pan, distribute the different cuts evenly, and fold the mixture together with your hands or a large spatula. Do not overwork it — you want to distribute the cuts evenly, not develop the proteins into a dense mass. Thirty seconds of gentle folding is plenty.
Fat Ratios: A Practical Guide
The fat ratio in your grind determines everything about how it cooks, tastes, and holds together. Here is what different ratios actually mean in practice:
- 70/30 (70% lean, 30% fat): Very rich and juicy. Best for smash burgers, meatloaf, and dishes where the excess fat can drain or be absorbed. This is the ratio many high-end burger restaurants use.
- 75/25: Rich but not excessive. Excellent for thick pub-style burgers, Bolognese, and sausage. The sweet spot for most people.
- 80/20: The classic all-purpose ratio. What most "ground chuck" approximates. Good for burgers, tacos, meatballs, chili — anything. Reliably juicy without being greasy.
- 85/15: Leaner but still moist. Good for meatballs in sauce (where the sauce adds moisture), lettuce wraps, and dishes where you do not want excess grease.
- 90/10: Lean. Best for dishes with added moisture — meatballs braised in sauce, stuffed peppers, meat sauce. Burgers at this ratio will be dry unless you compensate with a panade (milk-soaked bread) or other binder.
How to calculate: Weigh your lean meat and your fat separately. For an 80/20 blend from lean sirloin, add 4 ounces of fat trim or back fat for every pound of lean meat (16 oz lean + 4 oz fat = 20 oz total, 80% lean). For chuck, which is naturally around 80/20, just grind it straight — no additions needed.
Food Safety: The Non-Negotiable Rules
Grinding meat dramatically increases its surface area, which means bacteria that lived only on the outside of a whole muscle are now distributed throughout the grind. This is why a rare steak is safe (the exterior is seared) but a rare burger carries more risk (bacteria are mixed into the interior).
Follow these rules without exception:
- Start clean. Wash hands, sanitize all equipment and surfaces before grinding. Hot soapy water for the grinder parts, a sanitizing spray for the cutting board and work surface.
- Keep it cold. Meat should stay below 40°F (4°C) at all times except during the brief grinding process. The pre-freeze method handles this. If your ground meat sits at room temperature for more than 20 minutes, get it back into the fridge or freezer immediately.
- Grind and use quickly. Ground meat is at its best and safest within 24 hours of grinding. If you are not cooking it same-day, portion and freeze immediately. Ground meat frozen at peak freshness tastes dramatically better than ground meat that sat in the fridge for three days before freezing.
- Cook to safe temperatures. The USDA recommends 160°F (71°C) internal temperature for ground beef. If you want to eat your home-ground burgers at medium (145°F / 63°C), understand the risk and mitigate it: use fresh, high-quality meat from a trusted source, keep everything cold, and grind immediately before cooking.
- Never re-grind warm meat. If meat warms up during grinding, chill it before the second pass. Warm meat through the grinder is both a food safety risk and a texture disaster.
Troubleshooting Common Problems
Most grinding problems trace back to one of three causes: temperature, blade sharpness, or technique. Here is how to diagnose and fix the most common issues.
Smearing and Mushy Texture
The meat comes out looking smeared and paste-like rather than in distinct strands. Cause: Meat and/or equipment too warm. Fat is melting during grinding instead of being cut cleanly. Fix: Pre-freeze more aggressively. Freeze the grinder parts. Work in smaller batches so the grinder does not heat up from continuous use.
Grinder Clogging
The grinder jams, slows down, or stops feeding. Cause: Sinew wrapping around the blade, or meat is too frozen (ice crystals jamming the plate holes). Fix: Trim sinew more aggressively before cubing. If frozen too hard, let cubes temper for 10 minutes. Disassemble and clear the clog — do not force it.
Inconsistent Grind
Some pieces come out fine, others are barely cut. Cause: Dull blade, or the blade is not seated flush against the plate. Fix: Sharpen or replace the blade. When assembling, make sure the flat side of the blade sits tight against the plate. A gap of even 1/16 inch dramatically reduces cutting efficiency.
Hollow or Dry Burgers
Burgers shrink excessively and turn out dry. Cause: Fat ratio too low, or meat overworked when forming patties. Fix: Increase fat to at least 75/25 for burgers. When forming patties, handle as little as possible. Gently press into shape — do not knead or compress. The coarse texture from grinding should be visible in the formed patty.
Signature Blends Worth Trying
Once you are comfortable with the basic grinding process, custom blends are where home grinding really shines. Here are four tested blends that consistently produce exceptional results.
The Classic Burger Blend
50% chuck, 30% short rib, 20% brisket point. This is the benchmark blend used by many acclaimed burger restaurants. Chuck provides the beefy backbone, short rib adds rich marbling and fat, and brisket contributes deep flavor with a slightly different texture. Grind through the coarse plate once. Target ratio: approximately 75/25.
The Smash Burger Blend
70% chuck, 30% boneless short rib. Fattier than the classic blend — around 70/30. The extra fat is essential for smash burgers because the thin patty cooks fast and the fat renders into crispy edges on the flat top. Grind coarse. Season only with salt and pepper.
The Meatball Blend
40% beef chuck, 40% pork shoulder, 20% veal shoulder. The traditional Italian three-meat blend. Beef for flavor, pork for fat and sweetness, veal for tenderness and a lighter texture. Grind through the fine plate for a cohesive bind that holds together in sauce.
The Lamb Kofta Blend
80% lamb shoulder, 20% lamb fat (from around the kidneys). Grind through the fine plate twice for the smooth, almost paste-like texture that proper kofta requires. Season with cumin, coriander, garlic, and parsley before the second grind so the spices distribute evenly throughout.
Storage and Shelf Life
Ground meat degrades faster than whole cuts because of the increased surface area. Here is how long your home-ground meat stays safe and tasty:
- Refrigerator (34–38°F / 1–3°C): Use within 1–2 days. One day is ideal. The flavor and color start declining after 24 hours.
- Freezer (0°F / -18°C): Good for 3–4 months at peak quality. Still safe beyond that, but texture and flavor slowly degrade. Vacuum-sealed ground meat holds quality for 6+ months.
- Portioning for freezer: Divide into recipe-sized portions before freezing. Flatten into thin slabs in zip-top bags — they freeze faster, thaw faster, and stack efficiently. Label with the date, cut, and fat ratio.
Thawing: Always thaw in the refrigerator overnight. Never thaw ground meat at room temperature — the exterior reaches the danger zone (40–140°F / 4–60°C) long before the center thaws. In a pinch, seal the bag and submerge in cold running water for 30–60 minutes.
Frequently Asked Questions
Frequently Asked Questions
Can I grind meat in a food processor instead of a meat grinder?
You can, but the results are inconsistent. A food processor chops rather than grinds, producing an uneven mix of powder-fine pieces and large chunks. If you use one, work in very small batches (1/2 pound at a time), pulse in short bursts, and make sure the meat is partially frozen. A dedicated grinder produces better results every time.
How do I know if my grinder blade is sharp enough?
Sharp blades produce clean strands of ground meat that fall freely from the plate. Dull blades produce smeared, mushy output with visible fat coating on the strands. If your ground meat looks wet and pasty rather than textured and defined, the blade needs sharpening or replacing. Most grinder blades should be replaced annually with regular use.
What is the best fat ratio for burgers?
For most burgers, 75/25 to 80/20 produces the best balance of flavor, juiciness, and structural integrity. Smash burgers benefit from fattier blends around 70/30 because the thin patty cooks fast. Thick pub-style burgers work well at 80/20. Going leaner than 85/15 for burgers usually results in dry, crumbly patties.
Is it safe to eat home-ground burgers at medium-rare?
There is inherent risk in eating any ground meat below 160°F (71°C). However, home-ground meat from a single, fresh, high-quality cut that was handled properly and ground immediately before cooking carries significantly less risk than commercial ground beef. Many chefs and butchers do eat home-ground burgers at medium-rare, but the decision is yours.
How much meat should I buy for a grinding session?
For a first attempt, start with 3–5 pounds. That is enough to learn the process without being overwhelming. For regular grinding, 10–15 pounds at a time is efficient — you spend the same time setting up and cleaning, but get multiple meals worth of ground meat to portion and freeze.
More Expert Guides
How to Trim a Brisket: The Complete Butcher's Guide
Proper brisket trimming is the difference between a backyard experiment and competition-quality results. Here is the professional technique for shaping a whole packer brisket before it ever touches the smoker.
14 min readHow to Butcher a Whole Chicken: Step-by-Step Guide
Breaking down a whole chicken yourself saves 40-50% compared to buying individual parts. Here is the professional technique for turning one bird into perfectly portioned pieces.
14 min readHome Butchering Safety Guide: Essential Protocols for Safe Meat Processing
Learn professional butchering safety protocols from a master butcher with 25+ years of experience. Essential guidance for anyone processing meat at home.