How to Sharpen Butcher Knives: The Professional Method
My father taught me to sharpen knives before he taught me to cut meat. "You can't do good work with bad tools," he'd say, running his thumb along the edge of a freshly honed breaking knife. Thirty years later, I still sharpen my knives before every shift—and I still think it's the single most important skill a butcher can master.
A dull knife doesn't just slow you down. It forces you to apply more pressure, which means less control, more ragged cuts, and more wasted product. In a commercial shop, that lost product adds up to thousands of dollars a year. At home, it means torn meat, mangled silverskin, and frustration. Worse, dull blades are genuinely dangerous—they slip unpredictably instead of biting cleanly into the cut.
This guide covers everything from basic honing maintenance to full whetstone sharpening, with specific techniques for every type of butcher knife. Whether you're maintaining a single boning knife at home or running an entire shop's worth of blades, these methods will keep your edges performing at their best.
Sharpening vs. Honing: Know the Difference
Before we get into technique, let's clear up the most common confusion in knife maintenance. Sharpening and honing are two completely different processes, and understanding when to use each is half the battle.
Honing (Daily Maintenance)
What it does: Realigns the microscopic edge of the blade without removing metal. Think of the cutting edge as a row of tiny teeth—after use, these teeth bend and fold over. A honing steel straightens them back into alignment.
When to do it: Every time you pick up a knife. Professional butchers steel their knives every 15-20 minutes during active cutting. At home, hone before each use.
Tools: Honing steel (smooth or fine-grooved), ceramic rod
Sharpening (Periodic Restoration)
What it does: Removes metal to create a new edge. Over time, even regular honing can't restore an edge that's been worn down through use. Sharpening grinds away steel to form a fresh, acute cutting edge.
When to do it: When honing no longer restores the bite. For a busy professional, that's every 1-2 weeks. For home use, every 2-3 months depending on how often you cut.
Tools: Whetstones, belt sharpeners, electric sharpeners, professional sharpening services
The Honing Steel: Your Daily Essential
A honing steel should be the first tool you reach for every time you start cutting. Here's the proper technique that most home cooks get wrong:
Proper Honing Technique
- Hold the steel vertically with the tip resting firmly on a cutting board or folded towel. Your non-dominant hand grips the handle with the steel pointing straight down.
- Place the knife heel against the top of the steel at a 15-20 degree angle. For most butcher knives, 18 degrees is ideal. A simple trick: imagine the angle between the blade and steel as roughly the width of two stacked coins.
- Draw the blade down and across the steel in a smooth arc, moving from heel to tip. The motion should feel like you're trying to shave a thin layer off the steel.
- Alternate sides with each stroke—right side, then left side. Apply light, consistent pressure. You're realigning the edge, not grinding metal.
- Repeat 4-6 strokes per side. That's it. If you need more than 10 strokes per side, the knife needs actual sharpening, not honing.
Common mistakes:
- Using too steep an angle (30+ degrees) which rolls the edge further instead of straightening it
- Applying heavy pressure—let the weight of the knife do the work
- Chopping the knife against the steel like you see on cooking shows (this damages the edge)
- Not maintaining a consistent angle throughout the stroke
Choosing the Right Steel
Smooth steel (traditional): Best for regular maintenance on softer European-style blades (most butcher knives). Realigns without removing material.
Fine-grooved steel: Slightly more aggressive—realigns and lightly abrades. Good for knives that see heavy daily use.
Ceramic rod: Harder than steel, works on both European and harder Japanese-style blades. Removes a tiny amount of metal while honing. My recommendation for home butchers who want one tool that does double duty.
Diamond steel: The most aggressive "honing" tool—this actually sharpens rather than hones. Useful in commercial settings for quick touch-ups, but too aggressive for daily maintenance.
Whetstone Sharpening: The Professional Standard
Whetstones (also called sharpening stones or water stones) are the gold standard for knife sharpening. They give you complete control over the angle, pressure, and grit, producing an edge that outperforms any electric sharpener. Every serious butcher should know how to use them.
Understanding Grit Numbers
Whetstones are rated by grit—the number of abrasive particles per square inch. Lower numbers are coarser (remove more metal), higher numbers are finer (polish the edge):
- 220-400 grit (coarse): For repairing damaged edges, chips, or re-profiling a blade to a new angle. You shouldn't need this often.
- 800-1000 grit (medium): The workhorse grit for regular sharpening. This is where you establish the edge geometry.
- 3000-6000 grit (fine): Refining and polishing the edge. Creates a smoother, longer-lasting cutting surface.
- 8000+ grit (ultra-fine): Mirror polish. Beautiful but unnecessary for butcher knives—this level of refinement is for sushi knives and straight razors.
My recommendation for butcher knives: A combination 1000/6000 stone handles 90% of sharpening needs. Add a 400 grit stone for the occasional repair job.
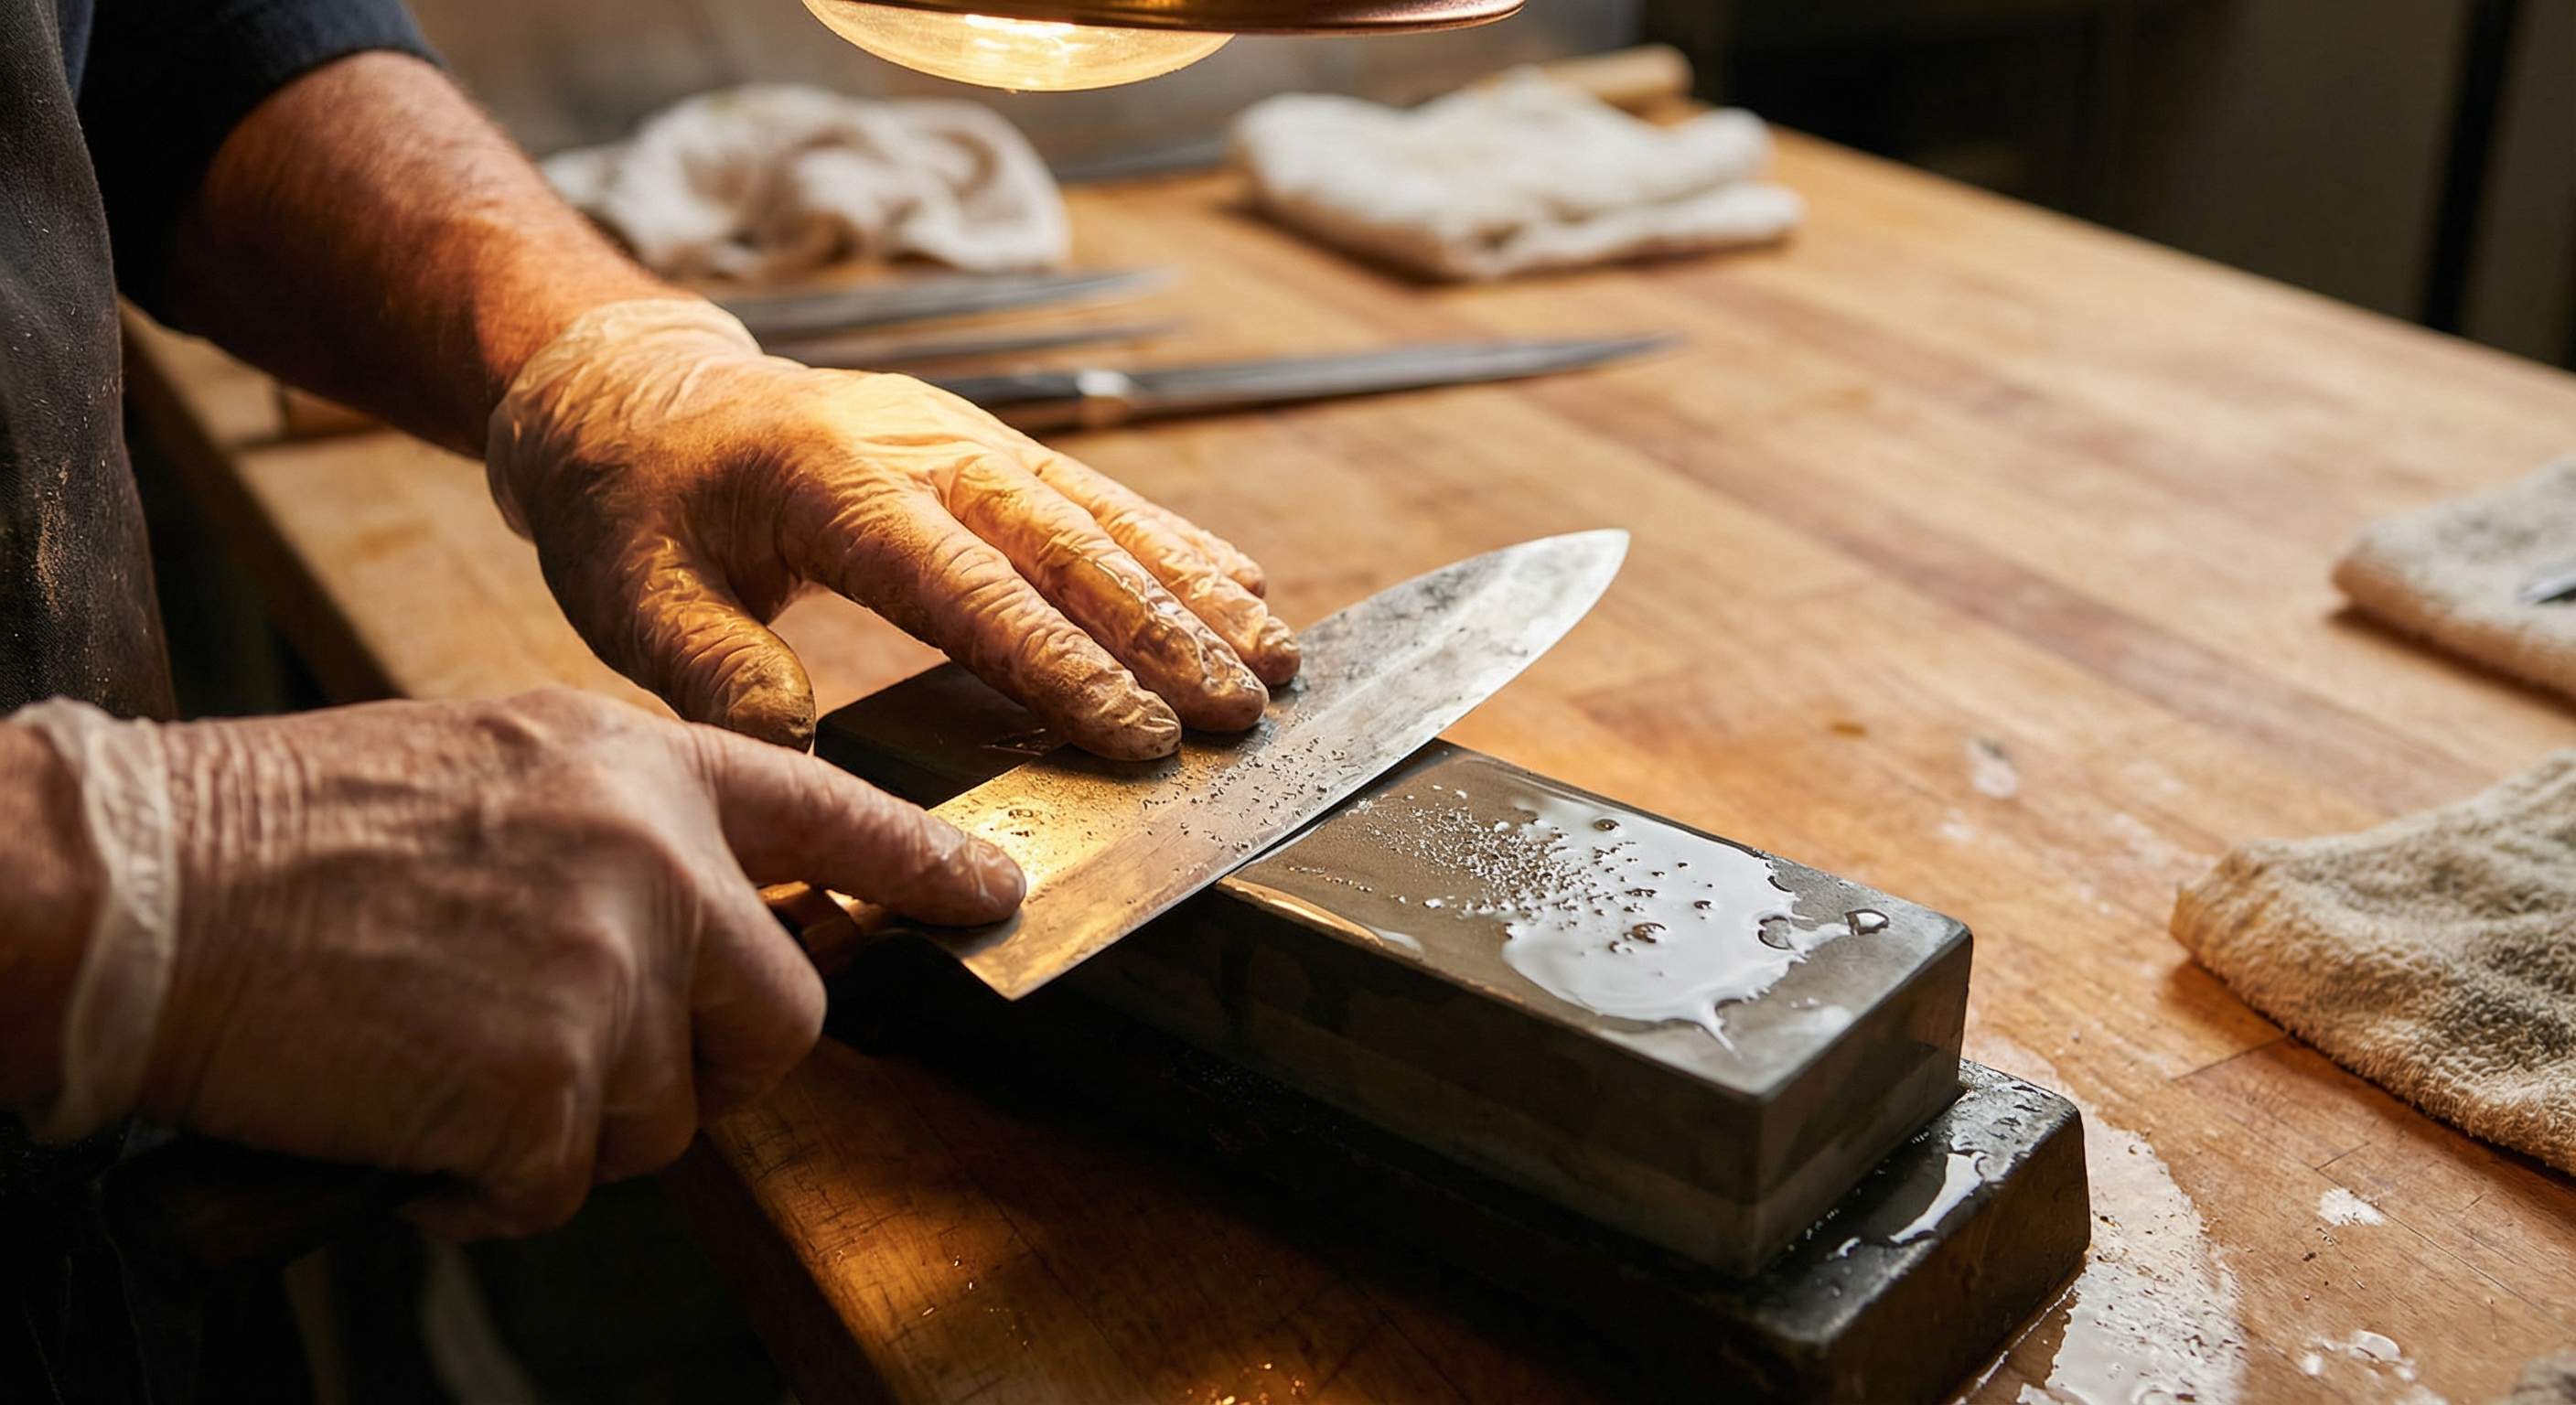
Step-by-Step Whetstone Sharpening
Setup
- Soak the stone in water for 10-15 minutes until bubbles stop rising. Keep a spray bottle nearby to re-wet the surface during sharpening.
- Place the stone on a stable base. A damp towel underneath prevents sliding. Many stones come with a holder—use it.
- Start with the coarser grit (1000 if doing routine sharpening, 400 if repairing damage).
The Sharpening Process
- Find your angle. For butcher knives, you want 15-20 degrees per side (30-40 degrees total inclusive angle). Most Western butcher knives perform best at 18 degrees. Place the blade flat on the stone, then raise the spine until a thin gap of light disappears between the edge and the stone—that's approximately the right angle.
- Place your fingers on the blade. Your dominant hand holds the handle. Place the index and middle fingers of your other hand on the flat of the blade, near the edge, to apply even pressure. Move your fingers to sharpen different sections.
- Push forward with pressure, pull back lightly. The cutting stroke is the push—away from your body, edge-first across the stone. Apply moderate pressure on the push stroke, then release pressure on the return. Move the blade slightly sideways as you push so the entire edge contacts the stone.
- Work in sections. On longer blades (breaking knives, cimeters), sharpen the heel third, middle third, and tip third separately, spending 10-15 strokes per section.
- Check for a burr. After sharpening one side, gently run your thumb across the opposite side of the edge (perpendicular to the blade, never along it). You should feel a slight rough ridge—the burr. This means you've sharpened enough to create a new edge on that side.
- Flip and repeat. Sharpen the other side until you raise a burr there.
- Move to finer grit. Switch to the 6000 stone and repeat with lighter pressure. This removes the burr and polishes the edge. 5-8 strokes per side is typically enough.
- Strop to finish. Draw the blade across a leather strop or even a piece of cardboard, edge trailing, to remove any remaining burr. Alternating sides, 10 strokes each.
Sharpening Angles by Knife Type
Not every butcher knife should be sharpened to the same angle. The right angle depends on the blade's purpose—harder cutting tasks need more obtuse (wider) angles for durability, while precision work benefits from acute (narrower) angles for sharpness:
- Breaking knife / cimeter (18-20°): These workhorses cut through large muscle groups and connective tissue. The slightly wider angle provides edge durability for the heavy, sweeping cuts these knives perform.
- Boning knife (15-18°): Needs to be sharp enough to follow bone contours and separate joints. A more acute angle provides the precision needed for close work around bones.
- Skinning knife (15-17°): Ultra-sharp for separating hide from meat without scoring the surface. These benefit from the keenest edge you can maintain.
- Cleaver (25-30°): The widest angle in the kit. Cleavers chop through bone and cartilage—they need a thick, durable edge that won't chip on impact. Think of it as a controlled wedge rather than a cutting edge.
- Fillet knife (12-15°): The most acute angle for the thinnest, most flexible blades. These knives need extreme sharpness for delicate fish and poultry work.
- Chef's knife / utility (17-20°): General-purpose angles that balance sharpness with durability for mixed cutting tasks.
Electric and Belt Sharpeners: When They Make Sense
I'll be honest—whetstones aren't practical for everyone. If you're processing deer during hunting season and need to sharpen three knives quickly between animals, a belt sharpener saves time. Here's when each option makes sense:
Belt Sharpeners (Recommended Alternative)
Commercial belt sharpeners like the Work Sharp Ken Onion Edition use abrasive belts at adjustable angles. They're fast, consistent, and produce a good working edge. Many commercial butcher shops use belt sharpeners for daily maintenance and reserve whetstones for precision work.
Pros: Fast (30 seconds per knife), consistent angle, easy to learn
Cons: Removes more metal than necessary, can overheat the edge if you're not careful, belts need regular replacement
Pull-Through Sharpeners (Not Recommended)
Those V-shaped pull-through gadgets from kitchen stores? They work in a pinch for a chef's knife, but they're terrible for butcher knives. They set a fixed angle that may not match your blade, they remove too much metal unevenly, and they can't handle curved blades like cimeters. Avoid them.
Professional Sharpening Services
If you don't want to sharpen yourself, many cities have professional knife sharpening services. A good sharpener will restore your edges for a few dollars per blade and can repair damaged knives you might think are ruined. Ask your local butcher shop who they use—many are happy to share their sharpener's contact info.
Maintaining Your Edge Between Sharpenings
Proper knife care extends the time between sharpenings dramatically. These habits separate professionals from amateurs:
Storage
- Magnetic strips or knife guards: Never toss butcher knives into a drawer. The edges bang against each other and dull instantly. A magnetic wall strip or individual blade guards protect the edge.
- Knife rolls: For transport, use a proper knife roll with individual slots. Most professional butchers carry their personal knives in a roll.
Cutting Surfaces
- Use end-grain wood or quality plastic boards. Glass, ceramic, marble, and metal cutting surfaces destroy edges faster than anything else. End-grain wood is the professional standard—the wood fibers absorb the blade rather than resisting it.
- Replace worn boards. Deep grooves in plastic boards harbor bacteria and catch blade edges, causing uneven wear.
Cleaning
- Hand wash only. Dishwashers are knife killers. The high heat affects blade temper, the detergent corrodes the edge, and the rattling dulls it. Wash by hand with soap and water, dry immediately.
- Never soak knives. Prolonged water exposure damages handles and can cause rust on carbon steel blades.
The Paper Test
Want to know if your knife is sharp enough? Hold a sheet of newspaper or printer paper by one edge and try to slice down through it. A sharp knife will cut cleanly with minimal pressure. If it catches, tears, or requires sawing, it's time to hone. If honing doesn't fix it, it's time to sharpen.
Carbon Steel vs. Stainless: Sharpening Differences
The steel type in your knives affects how you sharpen them:
High-carbon steel (traditional butcher knives): Softer, easier to sharpen, takes a keen edge quickly. Needs sharpening more frequently because the edge wears faster. Most forgiving for beginners learning on whetstones.
Stainless steel (modern commercial knives): Harder, more resistant to wear and corrosion. Takes longer to sharpen and requires more consistent technique. The edge lasts longer between sharpenings.
High-carbon stainless (premium knives): The best of both worlds—easier to sharpen than pure stainless but with better edge retention than carbon steel. Most professional-grade butcher knives today use this alloy.
Regardless of steel type, the technique is the same. Carbon steel just requires fewer strokes to reach the same result, while stainless demands patience and consistent angle control.
Building a Sharpening Station
If you're serious about maintaining your knives, dedicate a small area for sharpening. Here's what a complete setup looks like:
- Combination whetstone (1000/6000 grit): Your primary sharpening tool. Budget $30-60 for a quality stone.
- Coarse stone (400 grit): For repairs and re-profiling. $20-30.
- Stone holder or base: Keeps the stone stable and elevated for comfortable sharpening. $15-25.
- Honing steel (12-inch smooth): For daily maintenance. Match the steel length to your longest knife. $25-40.
- Leather strop: For finishing edges after sharpening. A simple paddle strop works fine. $15-25.
- Angle guide (optional): Clip-on angle guides help beginners maintain consistent angles while learning. $10-15.
- Flattening stone: Whetstones dish (develop a concave surface) with use. A flattening stone or diamond plate keeps your stones true. $20-40.
Total investment: $135-225 for a complete professional-quality sharpening station that will last years. Compare that to the cost of replacing dull knives or paying for professional sharpening every month.
Common Sharpening Mistakes
After teaching dozens of apprentices to sharpen, I see the same errors repeatedly:
- Inconsistent angle: The number one mistake. Your angle drifts during the stroke, creating a rounded edge instead of a keen one. Focus on locking your wrists and moving from your shoulders.
- Too much pressure: Heavy pressure removes metal faster but creates a rougher, less durable edge. Let the abrasive do the work—moderate, even pressure produces better results.
- Skipping grits: Jumping from 400 grit directly to 6000 doesn't work. Each grit level removes the scratch pattern from the previous one. Skipping grits leaves deep scratches under a polished surface, and the edge breaks down quickly.
- Forgetting to flatten the stone: A dished whetstone creates a convex edge (stronger but less sharp) or uneven edges. Flatten your stones every 3-4 sharpening sessions.
- Sharpening when you should be honing: If the knife was sharp yesterday, it probably just needs a few strokes on the steel. Unnecessary sharpening removes metal and shortens the life of your blade.
- Not checking for a burr: The burr tells you when one side is done. Without checking, you either waste time over-sharpening or flip too early and get an uneven edge.
Frequently Asked Questions
How often should you sharpen butcher knives?
Professional butchers sharpen every 1-2 weeks with heavy daily use. Home butchers typically need to sharpen every 2-3 months. Honing on a steel should happen before every cutting session—that maintains the edge between true sharpenings.
What angle should butcher knives be sharpened at?
Most butcher knives perform best at 15-20 degrees per side. Breaking knives and cimeters work well at 18-20°, boning knives at 15-18°, and cleavers at 25-30°. The right angle depends on the knife's purpose—precision work needs sharper angles, while heavy cutting needs more durable, wider angles.
Can you sharpen butcher knives with an electric sharpener?
Belt-style electric sharpeners (like the Work Sharp) produce acceptable results and are much faster than whetstones. Avoid pull-through V-shaped sharpeners—they set fixed angles that may not suit your blade and remove metal unevenly. For the best edge quality, whetstones remain the professional standard.
What is the difference between honing and sharpening a knife?
Honing realigns the existing edge without removing metal—it straightens microscopic teeth that bend during use. Sharpening removes metal to create an entirely new edge. Honing is daily maintenance (using a steel rod), while sharpening is periodic restoration (using whetstones or abrasive sharpeners).
What grit whetstone is best for butcher knives?
A combination 1000/6000 grit stone handles 90% of butcher knife sharpening. The 1000 grit side establishes the edge, and the 6000 grit side refines it. Add a 400 grit stone for repairing damaged edges or chips.
More Expert Guides
How to Trim a Brisket: The Complete Butcher's Guide
Proper brisket trimming is the difference between a backyard experiment and competition-quality results. Here is the professional technique for shaping a whole packer brisket before it ever touches the smoker.
14 min readHow to Butcher a Whole Chicken: Step-by-Step Guide
Breaking down a whole chicken yourself saves 40-50% compared to buying individual parts. Here is the professional technique for turning one bird into perfectly portioned pieces.
14 min readHome Butchering Safety Guide: Essential Protocols for Safe Meat Processing
Learn professional butchering safety protocols from a master butcher with 25+ years of experience. Essential guidance for anyone processing meat at home.