How to Wrap and Package Meat Like a Professional Butcher
How to Wrap and Package Meat Like a Professional Butcher
You have just broken down a whole pork shoulder into chops, roasts, and stew meat. You spent an hour trimming, portioning, and organizing. Then you grab plastic wrap from the kitchen drawer, loosely wrap everything, toss it in the freezer, and three months later you are cutting away thick layers of freezer burn. All that butchering work—wasted because of poor wrapping.
Proper meat packaging is not glamorous. It does not involve sharp knives or precise knife work. But if you are serious about home butchering—whether you are buying primals in bulk, processing wild game, or splitting a cow with neighbors—learning to wrap meat correctly will save you hundreds of dollars and prevent good meat from turning into freezer-burned garbage.
I have wrapped meat professionally for thirty years. I have seen every packaging mistake, tested every material, and learned which shortcuts work and which ones fail. This guide covers the techniques that actually matter: the butcher's wrap, vacuum sealing, labeling systems, and freezer storage strategies that keep meat fresh for 6-12 months.
Why Proper Meat Wrapping Matters
Meat packaging has one primary goal: prevent freezer burn. Freezer burn happens when air reaches the meat surface, causing ice crystals to form and moisture to evaporate. The result is dry, discolored, oxidized meat with off-flavors and tough texture. Freezer burn does not make meat unsafe—it just makes it unappetizing.
Good wrapping creates an airtight barrier between the meat and the freezer environment. The less air exposure, the longer the meat stays fresh. A properly wrapped steak can last 9-12 months in the freezer and taste nearly as good as fresh. A poorly wrapped steak starts degrading in 4-6 weeks.
What proper wrapping protects against:
- Freezer burn — Moisture loss and ice crystal formation on the surface
- Oxidation — Exposure to oxygen causes fat to go rancid over time
- Flavor transfer — Prevents your steaks from tasting like last month's fish or garlic
- Moisture loss — Keeps meat juicy instead of desiccated
- Contamination — Protects meat from contact with other freezer contents
The investment in proper materials and technique pays for itself after one bulk meat purchase. Would you rather eat 12-month-old vacuum-sealed ribeye that tastes fresh, or throw away 30% of a poorly wrapped quarter cow? The choice is obvious.
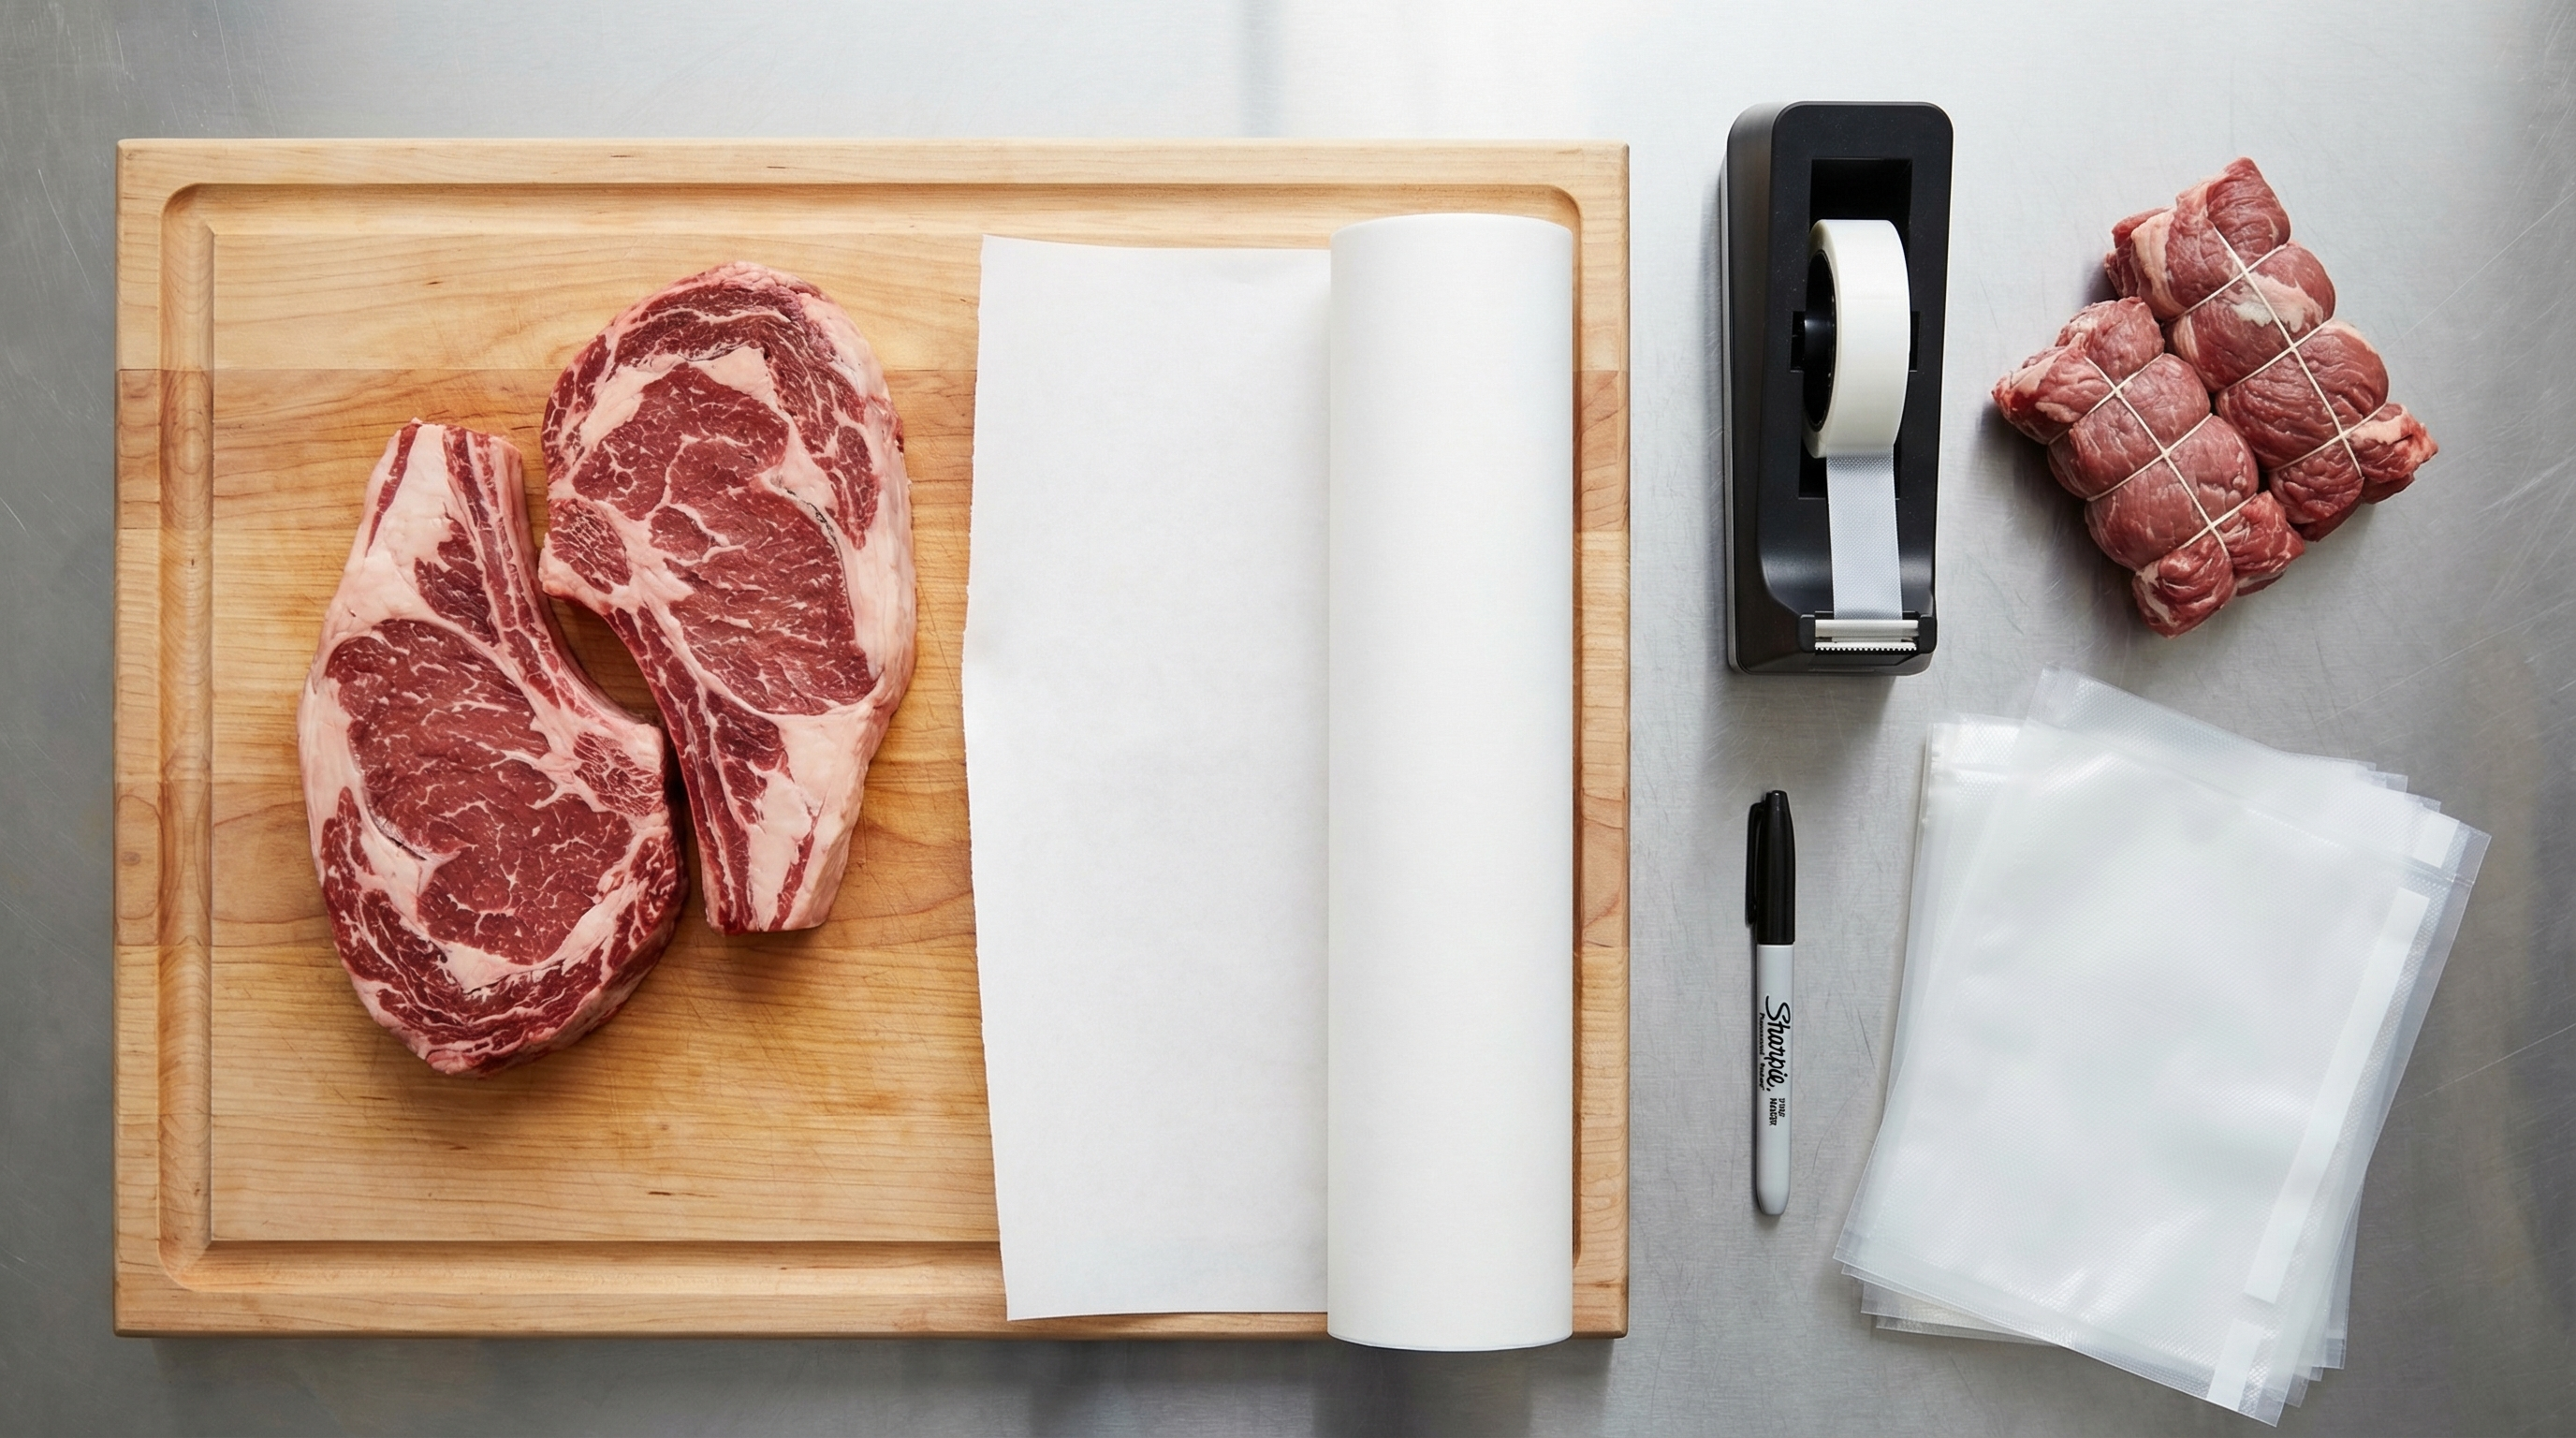
Materials: What Professional Butchers Use
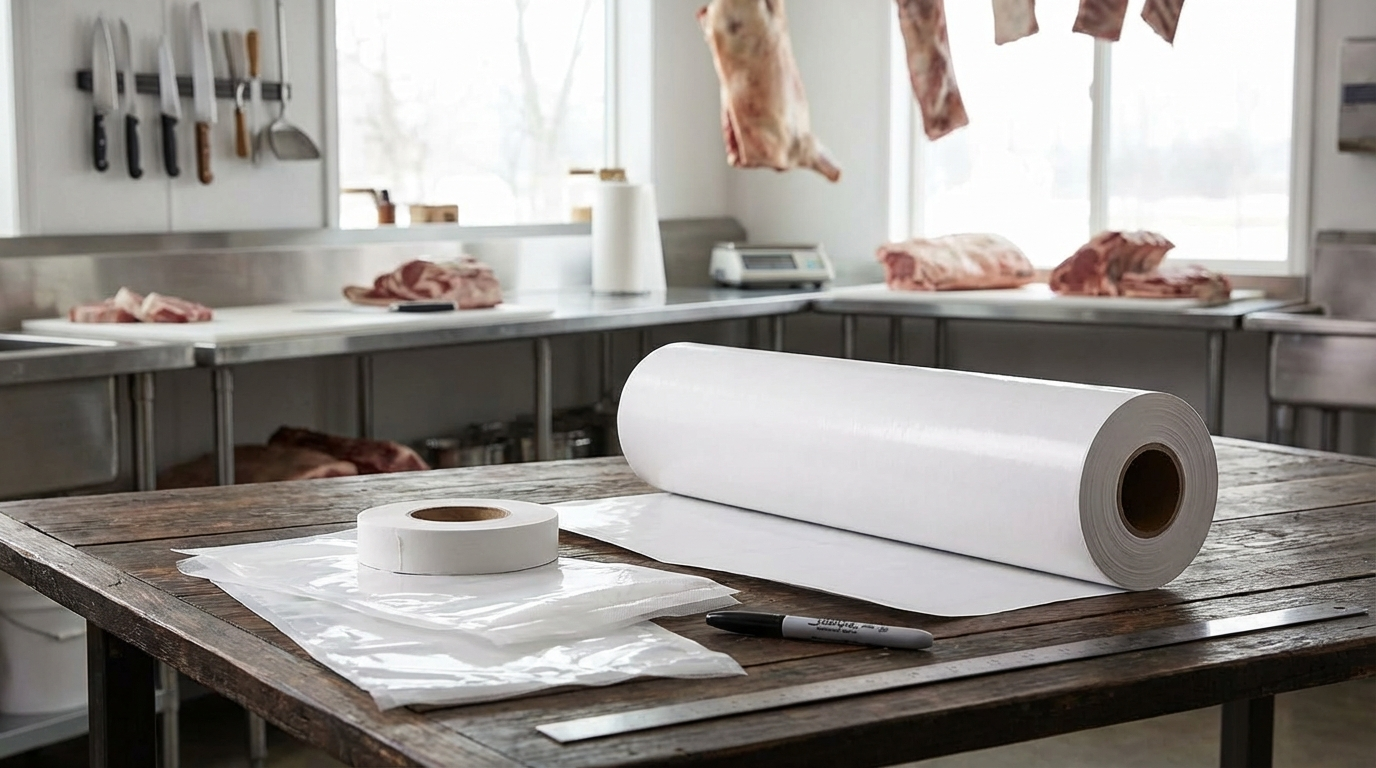
Butcher Paper (Freezer Paper)
This is the gold standard for wrapping individual cuts. Butcher paper has a polyethylene coating on one side (the shiny side) that creates a moisture barrier. The paper side allows you to write labels with a permanent marker. It is strong, tears cleanly, and conforms well to irregular shapes.
Specifications to look for:
- Weight: 40-50 lb basis weight (thickness measure)
- Poly-coated on one side (white paper, shiny coating)
- Width: 18 inches is standard for home use; 24-30 inches for larger cuts
- Roll length: 1000 feet is the most economical
Cost: $40-60 for a 1000-foot roll. Wraps approximately 400-500 individual steaks or chops.
Best for: Steaks, chops, roasts, poultry, and any bone-in cuts. The industry standard for retail meat counters.
Vacuum Sealer and Bags
Vacuum sealing removes nearly 100% of air from the package, providing the longest freezer life. Chamber vacuum sealers are what commercial operations use, but external suction sealers (FoodSaver style) work well for home use.
Vacuum sealer types:
- External/suction sealers — $100-200; seal the bag opening from outside. Work well for solid cuts but struggle with liquids or marinades.
- Chamber vacuum sealers — $400-2000+; the bag goes inside a chamber where air is evacuated from both bag and chamber. Can seal liquids, marinades, and delicate items. Professional grade.
Bag specifications:
- Thickness: 3-4 mil (thicker = more puncture-resistant)
- Embossed/textured on one or both sides (allows air channels for suction sealers)
- BPA-free food-grade plastic
- Available in rolls or pre-cut bags
Cost: External sealer $100-150; bags approximately $0.15-0.40 per bag depending on size.
Best for: Boneless cuts, ground meat, marinated meats, and long-term storage (9-12 months). Excellent for wild game.
Freezer Tape
Regular tape fails in the freezer—it peels off within days. Freezer tape is specifically formulated to stick to cold, slightly moist surfaces and stay stuck at sub-zero temperatures. It is essential for butcher paper wrapping.
Specifications:
- Width: 2-3 inches
- Material: Paper-backed with cold-resistant adhesive
- Color: White or tan (writable surface)
Cost: $8-12 per roll. One roll lasts months for home use.
Pro tip: Get tape with a writable surface so you can label directly on the tape instead of using separate stickers.
Materials That Do Not Work Well
Standard plastic wrap (Saran Wrap): Too thin, does not seal well, allows significant air penetration. Good for short-term refrigerator storage (2-3 days) but terrible for freezing. Maximum freezer life: 4-6 weeks before noticeable freezer burn.
Aluminum foil: Punctures easily, does not conform tightly to irregular shapes, allows air pockets. Can work as a secondary layer over plastic wrap for very short-term freezing (2-3 months max).
Zipper-lock freezer bags: Better than nothing but still allows some air exposure. The zip closure is not airtight. Acceptable for ground meat, stew meat, or anything you will use within 3-4 months. Not suitable for premium cuts you want to store long-term.
Regular packing tape: Adhesive fails in the freezer. Use freezer tape only.
The Butcher's Wrap Technique (Step-by-Step)
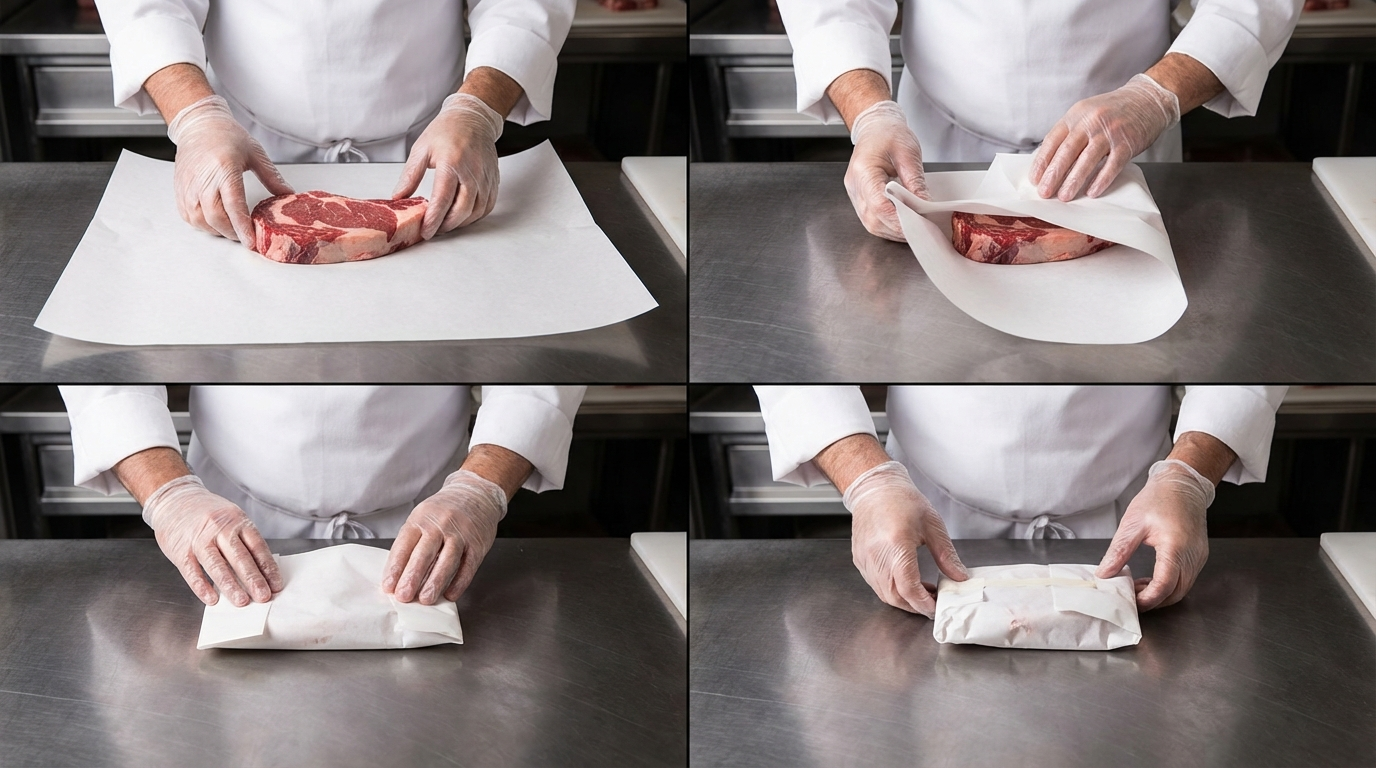
The butcher's wrap—also called the drugstore wrap—is the standard retail meat counter technique. It creates a tight, air-excluding package that looks professional and stacks well in the freezer. Once you learn it, you can wrap a steak in 15 seconds.
Materials needed:
- Butcher paper (poly-coated freezer paper)
- Freezer tape
- Permanent marker
- Clean work surface
Step 1: Cut Paper to Size
Tear or cut a piece of butcher paper approximately 2.5 times the width of the meat cut. For a standard ribeye steak, this is about 18-20 inches of paper. For a pork shoulder roast, you may need 30+ inches.
Paper orientation: Place the paper shiny-side-down (poly coating toward the work surface). The coating will be against the meat.
Step 2: Center the Meat
Place the meat in the center of the paper, parallel to the long edge. Leave equal amounts of paper extending on both sides.
If wrapping multiple items together (like two pork chops), stack them neatly with the best presentation side facing up. This will be the visible side when you unwrap.
Step 3: First Fold — Bring Paper Over
Bring the bottom edge of the paper up and over the meat. Pull it snug—you want the paper conforming to the meat shape with minimal air space. The paper should wrap completely over the meat and extend past the top edge.
Step 4: Make the Drugstore Fold
This is the signature move. Fold the top edge of paper down to meet the bottom edge, creating a clean, flat seam along the top of the package. Make a series of tight, crisp folds (usually 2-3) to create a completely flat top surface with the seam running lengthwise.
Key technique: Each fold should be tight against the meat. Press firmly to remove air pockets as you fold. The goal is a package tight enough that you cannot easily slide your hand between paper and meat.
Step 5: Fold the Ends (Hospital Corners)
Now the ends. Fold each end like you are wrapping a present:
- Press the side edges in toward the center, creating triangular flaps
- Fold the triangular flaps down flat against the package
- Fold the remaining end up and over the package
- Pull tight to eliminate air pockets
The end result should look like a tightly wrapped rectangular package with hospital-corner ends.
Step 6: Tape and Label
Secure the package with 2-3 pieces of freezer tape:
- One long strip along the lengthwise seam
- One piece on each end fold
Press the tape firmly—it should stick immediately. If it does not, your hands or the paper may be too wet.
Labeling (critical step): Use a permanent marker to write directly on the paper or tape:
- Cut name (Ribeye, Pork Chop, Brisket)
- Date wrapped (MM/DD/YYYY)
- Weight or portion count (1.2 lb, 2 chops)
- Optional: source or animal (Quarter Cow 2026, Buck #3)
Example label: "Ribeye Steak / 1.4 lb / 03/21/26 / Quarter Beef"
Do this immediately after wrapping—not "later." If you wrap 50 packages and label them later, you will forget what half of them are. Trust me.
Common Butcher's Wrap Mistakes
Using paper that is too small: You need enough paper to wrap completely with overlap. Skimping on paper creates incomplete coverage and air pockets.
Loose wrapping: The paper should be snug. If you can slide your hand between meat and paper, it is too loose. Air pockets = freezer burn.
Shiny side out: Poly coating goes against the meat (shiny side in). Otherwise you cannot write labels and the moisture barrier is on the wrong side.
Wet hands or meat surface: Pat meat dry with paper towels before wrapping. Excess moisture makes tape adhesion poor and can cause ice buildup between meat and paper.
No labels or poor labels: "Steak / 2026" is not enough information. Six months from now, is that ribeye or sirloin? 1 pound or 3? Date tells you when to use it by.
Vacuum Sealing Technique
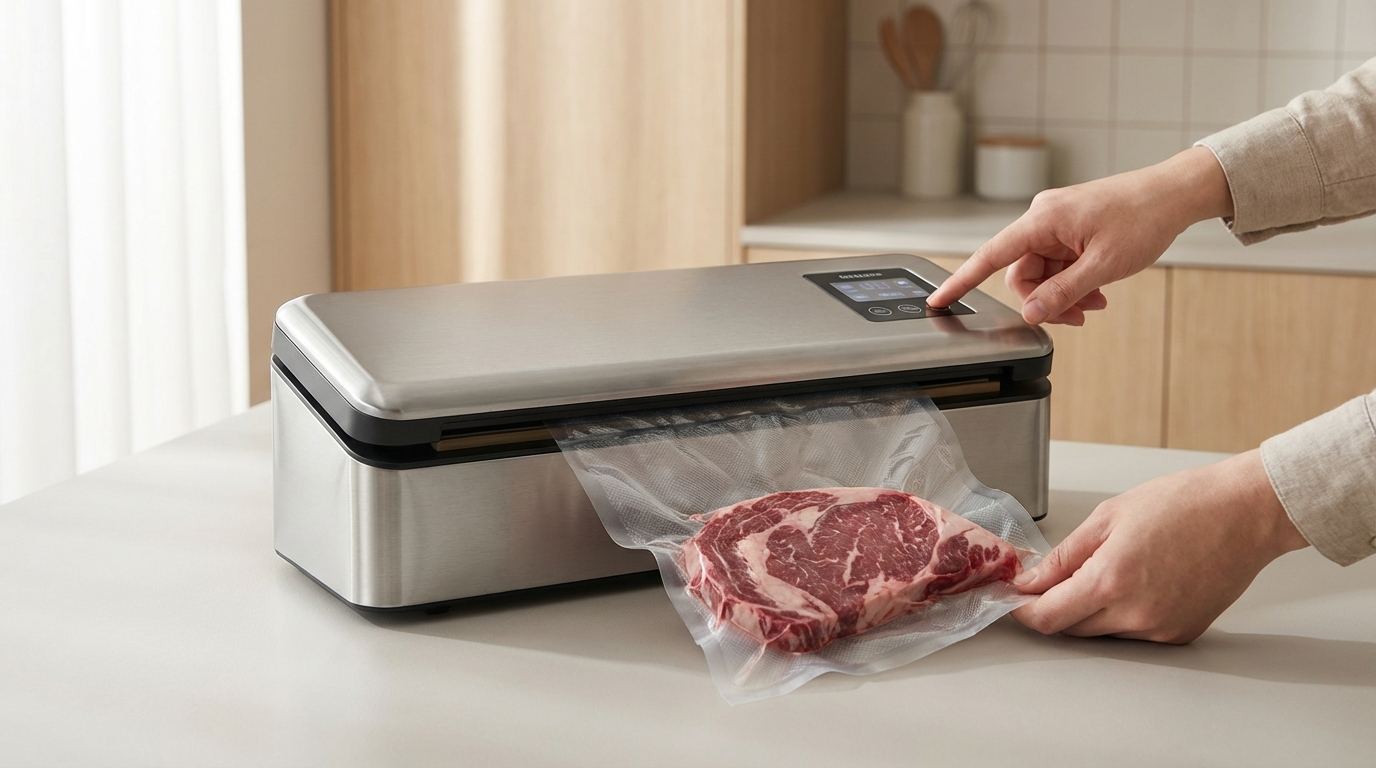
Vacuum sealing removes nearly all air from the package, giving you 9-12 months of freezer storage with minimal quality loss. It is the best method for boneless cuts, ground meat, and anything you plan to store long-term.
Step 1: Prepare the Meat
Pat dry thoroughly: Excess moisture interferes with the sealing process and can get sucked into the vacuum chamber. Use paper towels to dry the meat surface completely.
Pre-freeze if very moist: For items that release a lot of liquid (marinated meats, fresh fish), consider freezing the item for 1-2 hours before vacuum sealing. This prevents liquids from being sucked into the machine.
Protect sharp edges: Bones and sharp edges can puncture the bag during sealing or storage. Either:
- Wrap protruding bones in a small piece of paper towel
- Use heavy-duty 4-mil bags for bone-in cuts
- Consider butcher paper wrapping for heavily splintered bones (poultry backs, soup bones)
Step 2: Select Bag Size
Use a bag large enough to accommodate the meat plus 3-4 inches of extra length beyond the cut. You need room for the seal and enough material to re-seal if you open and re-vacuum later.
Bag sizing guide:
- Individual steaks/chops: 8x12 inches
- Larger steaks, chicken breasts: 10x13 inches
- Roasts, whole chickens: 11x16 inches
- Ground meat (2-3 lb portions): 10x13 inches
Step 3: Load and Position
Place meat in the bag toward the bottom, leaving the top 3-4 inches empty. Keep the opening area clean and dry—any moisture or meat particles in the seal zone will prevent proper sealing.
For even freezing: Flatten ground meat into a uniform thickness (about 1 inch) instead of leaving it in a ball. This allows faster freezing and easier thawing.
Step 4: Vacuum and Seal
External suction sealers:
- Place the open end of the bag in the vacuum channel
- Close the lid
- Press "Vacuum & Seal" or "Automatic"
- Machine will vacuum air out, then heat-seal the bag
- Wait for the seal cycle to complete (5-10 seconds) before opening
Manual seal option: Most machines have a "Seal Only" function for delicate items or liquids where you do not want full vacuum. Press the bag manually to remove most air, then seal without vacuuming.
Chamber vacuum sealers:
- Place bagged item in chamber with open end draped over seal bar
- Close lid
- Machine evacuates air from entire chamber (and bag), then seals
- Chamber re-pressurizes and lid opens
Chamber sealers can handle liquids, marinades, and soups because the pressure equalizes—liquid is not sucked out of the bag.
Step 5: Label
Write directly on the bag with permanent marker or use adhesive freezer labels:
- Cut name
- Date sealed
- Weight
- Any relevant notes (marinade, source, special handling)
Pro tip: Place a small piece of masking tape on the bag before writing. Permanent marker adheres better to tape than to slick vacuum bag material.
Vacuum Sealing Troubleshooting
Bag will not seal (liquid gets sucked in): Meat is too wet. Pat dry better or pre-freeze. Alternatively, use "Manual Seal" mode and just seal without full vacuum.
Seal leaks after a few days: Moisture or fat in the seal zone. Keep the top 2-3 inches of bag completely clean. Wipe with paper towel if needed.
Bag punctures during storage: Sharp bone or edge. Wrap protruding bones in paper towel or use thicker bags (4 mil).
Machine loses suction power: Check gaskets for wear, clean the vacuum channel, and empty the drip tray (if equipped). Most machines need gasket replacement every 12-18 months with heavy use.
Freezer Storage and Organization
Proper wrapping gets you halfway there. The other half is freezer management. A well-organized freezer prevents forgotten packages, ensures proper rotation, and makes meal planning easier.
Freezer Temperature
Set your freezer to 0°F (-18°C) or below. Use an appliance thermometer to verify—the built-in dial is often inaccurate. Temperatures above 0°F accelerate freezer burn and reduce storage life.
Fast freezing matters: The faster meat freezes, the smaller the ice crystals and the better the texture when thawed. Strategies for fast freezing:
- Set freezer to its coldest setting 2-3 hours before adding meat
- Spread packages in a single layer (not stacked) for the first 24 hours
- Place new packages toward the back or bottom where the freezer is coldest
- Avoid overloading—do not add more than 2-3 pounds of meat per cubic foot of freezer space at once
Organization Systems
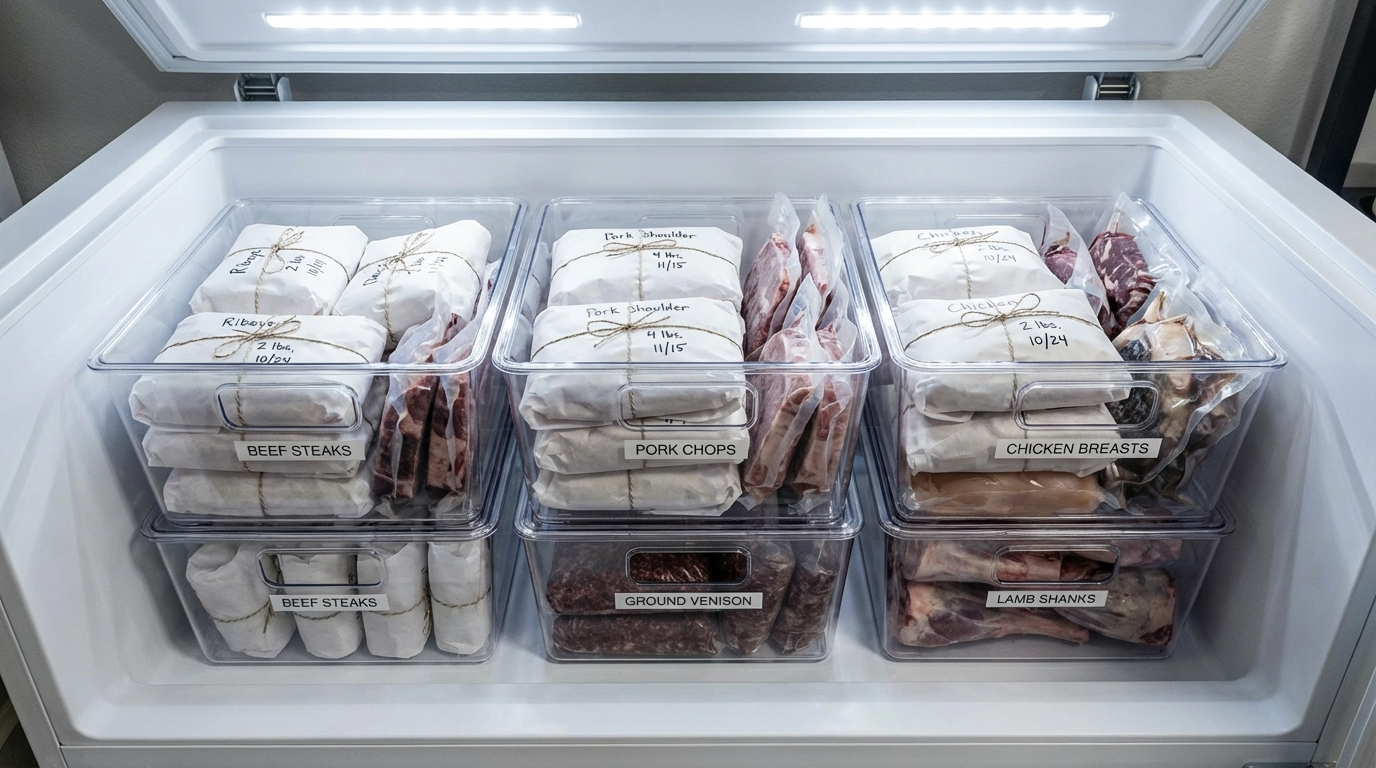
By cut type: Group similar items together—all steaks in one section, ground meat in another, roasts in another. Use plastic bins or cardboard boxes as dividers in chest freezers.
Upright freezer: Organize by shelf—steaks on top shelf, ground meat on second, roasts on third, specialty cuts on bottom. The top shelf is easiest to access, so put the items you use most often there.
Chest freezer: Use stackable plastic bins or cardboard boxes to create zones. Label each bin: "Beef Steaks," "Ground Meat," "Pork," "Poultry," "Wild Game." This prevents the "frozen archaeology" problem where 2-year-old venison ends up buried under six months of groceries.
Rotation strategy (FIFO - First In, First Out): Place new packages at the back or bottom of each section. Pull from the front or top when cooking. Mark older packages with a bright sticker or marker to use them first.
Inventory Tracking
For bulk purchases (quarter cow, whole pig, deer processing), keep a simple inventory list:
Freezer Inventory — Quarter Beef (Wrapped 03/21/26)

Steaks:
- Ribeye: 12 packages (1.2-1.5 lb each)
- NY Strip: 10 packages (1.0-1.3 lb each)
- Sirloin: 8 packages (1.5 lb each)

Roasts:
- Chuck roast: 4 packages (3-4 lb each)
- Rump roast: 2 packages (3 lb each)

Ground beef:
- 20 packages (1.5 lb each)

Specialty:
- Short ribs: 3 packages (2 lb each)
- Stew meat: 6 packages (1.5 lb each)
- Soup bones: 4 packages
Update this list as you use packages. After six months, review what is left and plan meals around the remaining inventory before it hits the 12-month mark.
Freezer Storage Times
These are maximum quality storage times, not safety limits. Frozen meat stays safe indefinitely at 0°F, but quality degrades over time even with perfect wrapping.
| Meat Type | Butcher Paper | Vacuum Sealed |
|---|---|---|
| Beef steaks, roasts | 6-9 months | 10-12 months |
| Ground beef | 3-4 months | 6-8 months |
| Pork chops, roasts | 4-6 months | 8-10 months |
| Ground pork | 3-4 months | 6-8 months |
| Whole poultry | 6-9 months | 10-12 months |
| Poultry parts | 4-6 months | 8-10 months |
| Wild game | 6-8 months | 10-12 months |
| Sausage (cooked) | 2-3 months | 4-6 months |
| Bacon | 1 month | 2-3 months |
Why ground meat has shorter storage: Grinding increases surface area and exposes more fat to oxygen, accelerating oxidation. Ground meat also has more handling (bacterial introduction) before packaging. Use ground products within 3-6 months for best quality.
Thawing Safely
Proper thawing is the final step in the freezer-to-table chain. Poor thawing undermines all your careful wrapping and storage work.
Refrigerator Thawing (Best Method)
How: Place frozen package on a plate or in a shallow pan in the refrigerator. Allow 24 hours per 5 pounds of meat.
Timing guide:
- Individual steaks/chops: 12-24 hours
- Roasts (3-5 lb): 24-48 hours
- Whole chicken: 24-36 hours
- Large roasts (8+ lb): 2-3 days
Advantages: Safest method, most even thawing, best texture retention. Thawed meat stays safe in the refrigerator for an additional 1-2 days before cooking.
Planning tip: Move your Saturday dinner roast to the fridge Thursday evening. Set a phone reminder.
Cold Water Thawing (Faster)
How: Submerge sealed package in cold tap water. Change water every 30 minutes to maintain cold temperature. Allow 30 minutes per pound.
Timing: 1-inch steaks thaw in 30-60 minutes; 3-pound roast in 1.5-2 hours.
Critical: Water must stay cold (below 70°F). Meat must be in leakproof packaging (vacuum seal or zip-lock bag). Cook immediately after thawing—do not refrigerate.
Methods to Avoid
Counter/room temperature thawing: Dangerous. The outer surface reaches the temperature danger zone (40-140°F) long before the center thaws, allowing bacterial growth. Never thaw large cuts at room temperature.
Hot water thawing: Cooks the outer layer while the inside stays frozen. Ruins texture. Promotes bacterial growth.
Microwave thawing: Uneven heating creates cooked edges and frozen centers. Degrades texture. Only acceptable for immediate cooking in a recipe where texture is not critical (stew meat, ground meat for sauce).
Cooking from frozen: Technically safe but difficult to cook evenly. Best reserved for thin cuts (under 1 inch) or items designed to cook from frozen (some burger patties, pre-formed meatballs). Thick steaks and roasts need thawing for even cooking.
Special Cases: Whole Animals and Bulk Processing
If you are buying a quarter cow, whole pig, or processing wild game, you will be wrapping 100-300+ pounds of meat. This requires planning and efficiency.
Pre-Processing Setup
Dedicate workspace: Clear a large table or counter. You need room for unwrapped meat on one side, wrapping materials in the center, and wrapped packages on the other side. Assembly-line flow.
Pre-cut paper: Estimate how many packages you will wrap and pre-cut 80% of your butcher paper. Standard steaks need 18-20 inches; roasts need 30+ inches. Stack by size.
Pre-cut tape: Tear 30-40 pieces of freezer tape and stick them lightly to the edge of the table for quick access. You do not want to wrestle with the tape dispenser 200 times.
Label as you go: Have permanent markers ready and write cut name, date, and weight on every package immediately. After wrapping 100 packages, they all look identical.
Efficiency Tips
Batch by cut type: Wrap all steaks first, then all roasts, then ground meat. You get faster as you repeat the same motion.
Use a scale: Portion ground meat and stew meat into consistent weights (1.5 lb, 2 lb, 3 lb portions). Consistent portions mean predictable meal planning.
Two-person system: One person cuts/portions, the other wraps and labels. This doubles efficiency.
Take breaks: Wrapping 150 packages in one session is mentally and physically exhausting. Plan for a 5-10 minute break every hour.
Cost Analysis: Is Bulk Worth It?
Processing a quarter beef yourself (buying hanging weight and cutting at home or paying a butcher for minimal processing) can save 30-50% compared to retail prices—but only if you wrap and store properly. Poor wrapping that leads to 20-30% waste from freezer burn erases those savings.
Example: Quarter beef (150 lb hanging weight)
- Cost at $5.50/lb hanging weight: $825
- Take-home after cutting/trimming: ~100 lb retail cuts
- Effective cost per pound: $8.25/lb
- Retail equivalent (mixed cuts): $12-15/lb
- Savings: $375-675 per quarter
Materials cost for wrapping 100 lb (approximately 80-100 packages):
- Butcher paper: $8-10 (from bulk roll)
- Freezer tape: $2-3
- Total materials: $10-13
Or vacuum sealing (100 bags at $0.25/bag): $25
Either way, materials are a tiny fraction of total cost. Proper wrapping ensures you actually eat what you paid for.
Final Wrapping Wisdom
Wrapping meat is not complicated. It just requires attention to detail and consistency. Do it right every time and you will never throw away freezer-burned meat again.
The three rules I tell every apprentice:
- Tight wrapping beats expensive materials. A $20 roll of butcher paper properly applied outperforms $200 worth of loose vacuum bags.
- Label everything immediately. Memory fails. Sharpie does not.
- First in, first out. Use the old stuff before adding new. Freezers are not time capsules.
You have already invested time learning to break down primals and trim cuts. Invest ten more minutes per batch to wrap properly, and that meat will taste as good in month ten as it did on day one. That is the difference between butchering as a hobby and butchering as a legitimate way to feed your family high-quality meat year-round.
Now go wrap something. And for premium cuts worth wrapping carefully, check out The Meatery's selection of whole sub-primals—perfect for practicing your new skills.
Frequently Asked Questions
What is the best way to wrap meat for freezing?
The best method is vacuum sealing for maximum freezer life (9-12 months) or the butcher's wrap with freezer paper for excellent protection (6-9 months). Both methods prevent freezer burn by eliminating air exposure. Standard plastic wrap and zip-lock bags provide only 4-6 weeks of quality storage.
How long does properly wrapped meat last in the freezer?
Vacuum-sealed beef and pork last 10-12 months, butcher paper-wrapped beef lasts 6-9 months, and ground meat lasts 6-8 months (vacuum sealed) or 3-4 months (butcher paper). Poultry lasts 10-12 months vacuum sealed, 6-9 months in butcher paper. These are quality timelines—frozen meat remains safe indefinitely at 0°F.
Can I reuse vacuum seal bags?
You can reuse vacuum bags that held dry, raw items if you wash them thoroughly in hot soapy water, sanitize with dilute bleach solution, and dry completely. However, bags that held raw meat carry contamination risk—the cost savings (about $0.25 per bag) is not worth the food safety risk. Use fresh bags for meat.
Do I need a vacuum sealer or is butcher paper enough?
Butcher paper works very well and is the industry standard for retail meat counters. Vacuum sealing extends storage life by 30-40% and is ideal for long-term storage (9+ months), boneless cuts, and ground meat. For most home butchers, butcher paper is sufficient and more economical. Invest in a vacuum sealer if you process large quantities or wild game.
What is freezer burn and how do I prevent it?
Freezer burn is moisture loss and ice crystal formation caused by air exposure. It appears as grayish-brown dry spots on meat surface with papery texture. Prevent it by using airtight wrapping (butcher paper with tight folds, or vacuum sealing), maintaining freezer temperature at 0°F or below, and using meat within recommended storage times.
Should the shiny side of butcher paper face in or out?
The shiny side (polyethylene coating) faces IN toward the meat. This creates a moisture barrier against the meat surface. The paper side faces out so you can write labels. Wrapping shiny-side-out defeats the purpose of the moisture barrier and makes labeling difficult.
More Expert Guides
How to Choose a Meat Cleaver: Weight, Steel, and What Actually Matters
Buying your first meat cleaver shouldn't be complicated, but the market is full of confusing options. After three decades using every type of cleaver imaginable, I can tell you what actually matters—and what's just marketing. This guide will save you from expensive mistakes.
12 min readThe Butcher's Cleaver: Complete Guide to the Heavy Rectangular Knife
The butcher's cleaver—that heavy, rectangular blade—is one of the most misunderstood tools in meat cutting. After decades in the trade, I've learned it's not a crude hacking tool, but a precision instrument for controlled bone cutting. This guide covers everything from cleaver anatomy to advanced techniques.
15 min readHow to Trim a Brisket: The Complete Butcher's Guide
Proper brisket trimming is the difference between a backyard experiment and competition-quality results. Here is the professional technique for shaping a whole packer brisket before it ever touches the smoker.