Knife Sharpening: From Whetstones to Steels
In my training in Spain, my master had a saying: "Una cuchilla bien afilada es el alma del carnicero" — a well-sharpened blade is the soul of the butcher. For years, I watched him work, mesmerized by how effortlessly his knives moved through meat. It wasn't until I learned to sharpen properly that I understood — the difference between a good butcher and a master lies not in the knife, but in the edge.
Sharpening is not a quick chore to be rushed. It is a meditation, a dialogue between craftsman and tool. Each stone tells you about the blade's condition. Each pass refines the edge. This is where the craft begins.
Understanding Edge Geometry
Before sharpening, understand what you're creating. A properly sharpened knife edge has specific geometry:
- Primary Bevel: The main angled surface from spine to edge, typically 15-20 degrees per side
- Micro-bevel: A slightly steeper angle (additional 5 degrees) at the very edge for strength
- Edge Thickness: Ideally 0.1-0.2mm at the apex for most butcher knives
- Edge Continuity: Consistent angle along the entire blade length
The edge is a wedge that displaces material as it cuts. A sharper wedge (smaller angle) cuts more efficiently but is more fragile. A steeper wedge is stronger but requires more force.
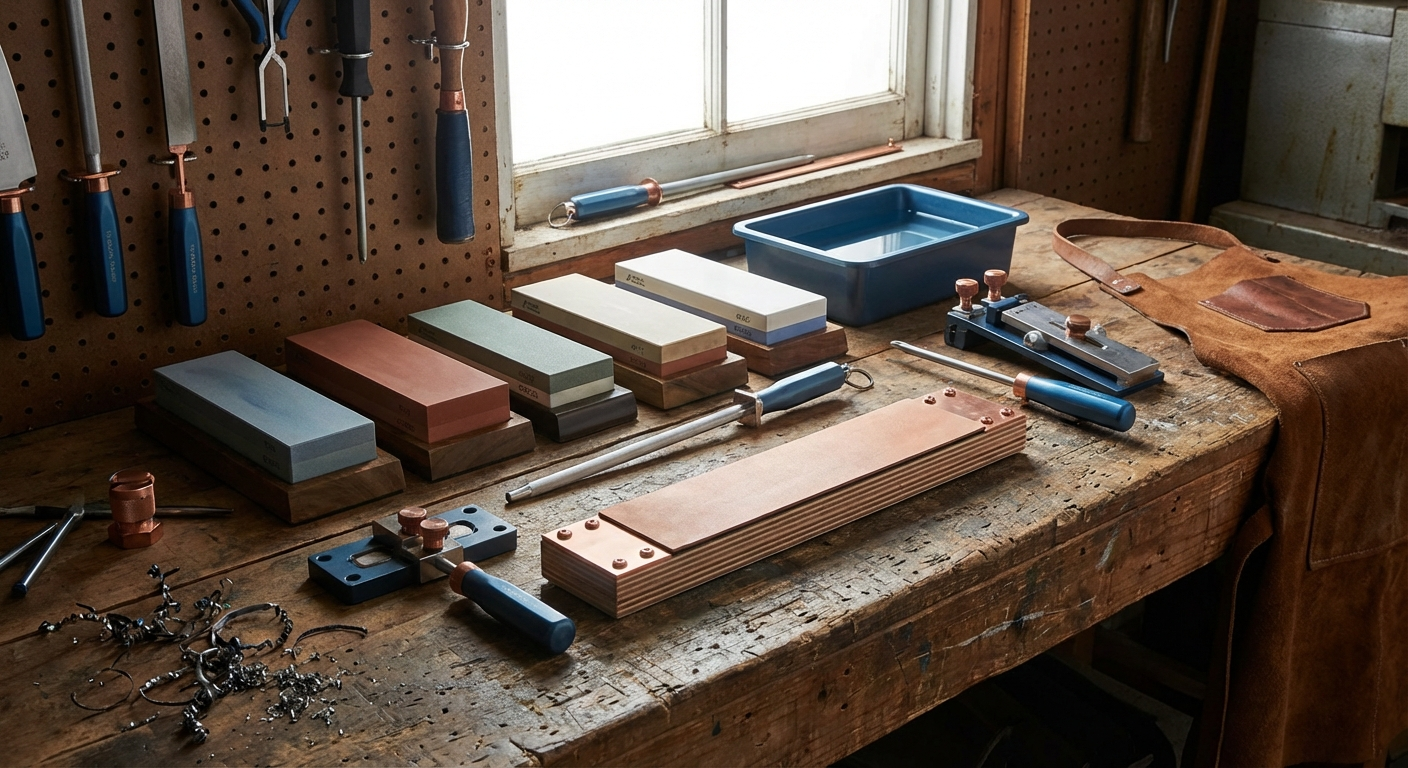
Whetstone Fundamentals
Whetstones remain the gold standard for edge creation and refinement. Understanding grit progression is essential:
Grit Classification System
- Coarse (200-800): For damaged edges, reshaping, and major grinding
- Medium (1000-2000):strong> For regular maintenance and edge refinement
- Fine (3000-8000): For polishing and edge refinement
- Ultra-fine (8000+): For mirror polishing and the finest edge refinement
For most butcher knife maintenance, a 1000/3000 grit combination stone provides optimal versatility.
Water vs. Oil Stones
Water Stones: Softer, faster cutting, require soaking. Excellent for fine edges. Examples: Shapton, Naniwa, King.
Oil Stones: Harder, slower cutting, use mineral oil. Very durable. Examples: Norton, Arkansas.
Diamond Stones: Hardest, fastest cutting, use water or oil. Excellent for reshaping. Examples: EZE-LAP, DMT.
Proper Sharpening Technique
Angle Consistency
The most critical aspect of sharpening is maintaining consistent angle. Variations create an uneven edge:
- Place the blade against the stone at your target angle
- Rest your non-knife hand on the blade for stability
- Apply light, even pressure while maintaining the angle
- Move the blade in a circular or figure-8 motion
- Count strokes to ensure even sharpening on both sides
Use a sharpening guide initially if you struggle with angle consistency. As skill develops, freehand sharpening provides better feel and control.
The Progression Method
Follow this systematic approach:
- Assessment: Examine the edge with magnification to identify damage or wear patterns
- Coarse Grit (if needed): Address chips or severely damaged edges
- Medium Grit: Establish the primary bevel and refine the edge
- Fine Grit: Polish the edge and remove scratches from previous grit
- Stropping: Align the edge and remove microscopic burr
Using Different Stone Types
Water Stones (Japanese Style)
Preparation: Soak in water for 10-15 minutes before use. Place on damp towel to prevent slipping.
Technique: Use light pressure with circular motions. The slurry created helps with cutting and cooling. Clean the stone periodically to remove debris.
Maintenance: Flatten regularly using a flattening stone to maintain even wear.
Oil Stones (Western Style)
Preparation: Apply light coat of mineral oil to the surface.
Technique: Use slightly more pressure than with water stones. The oil provides lubrication and helps carry away particles.
Maintenance: Clean with solvent periodically to remove built-up particles.
Diamond Stones
Preparation: Add water for lubrication (water washes away particles better than oil).
Technique: Use minimal pressure — the diamonds do the work. Very aggressive cutting action.
Maintenance: Self-flattening to some degree, but may need flattening over time.
Steel Usage and Maintenance
A steel doesn't sharpen but maintains the edge between sharpening sessions by straightening the microscopic burr that develops during use.
Proper Steel Technique
- Hold the steel vertically with tip resting on a stable surface
- Position the knife blade at the same angle used for sharpening
- Draw the blade across the steel, moving from heel to tip
- Apply minimal pressure — let the steel do the work
- Alternate sides with each stroke
- Use 5-10 strokes per side, daily if using frequently
Strops (leather or canvas) can also maintain edges and provide final polish. Charge leather strops with honing compound for additional abrasion.
Electric Sharpeners
While I prefer traditional methods, electric sharpeners have their place:
- Consistency: Maintain precise angles automatically
- Speed: Much faster than manual methods
- Convenience: Minimal skill required for acceptable results
- Limitations: Less control over the process, potential for overheating
If using electric sharpeners, choose models with variable speeds and multiple stages for better results.
Edge Testing and Assessment
Proper sharpening requires feedback on edge quality:
Visual Inspection
- Use magnification (10x loupe minimum) to examine the edge
- Look for chips, cracks, or irregularities
- Check for consistent bevel along the entire length
- Ensure no burr remains after sharpening
Performance Testing
- Paper Test: Clean edge should slice through paper cleanly
- Tomato Test: Should cut through tomato skin with minimal pressure
- Arm Hair Test: Safe method to test keenness (don't actually cut hair)
- Actual Use: Test on intended material for real-world assessment
Common Sharpening Mistakes
Avoid these frequent errors:
- Inconsistent Angle: Creates uneven edge and poor performance
- Too Much Pressure: Damages stone and blade, creates heat
- Insufficient Strokes: Doesn't allow proper edge formation
- Skipping Grits: Creates unnecessary work and poor results
- Neglecting Maintenance: Regular stropping extends time between sharpening
Creating Your Sharpening System
Develop a consistent routine:
- Daily: Strop or steel the knife before use
- Weekly: Light sharpening on medium grit if needed
- Monthly: Complete sharpening progression as needed
- As Needed: Address damage with appropriate grit progression
Advanced Techniques
Convex Grinding
Creates a rounded edge profile that's both sharp and durable. Requires more skill but provides excellent results for heavy-duty knives.
Asymmetrical Grinding
Useful for specific applications where different edge characteristics are needed on each side of the blade.
Micro-bevel Refinement
Add a slightly steeper angle to the very edge for increased durability while maintaining cutting performance.
Remember, in traditional carnicería, we say "El borde es sagrado" — the edge is sacred. Respect your tools, maintain them properly, and they will serve you faithfully for decades.
Sharpening is not just about creating an edge — it's about developing the sensitivity to understand when and how your tools need attention. This awareness transforms a cook into a craftsman. A razor-sharp knife on quality wagyu beef — that's where craftsmanship meets its reward.
Frequently Asked Questions
How often should I sharpen my butcher knives?
Hone with a steel before each use. Sharpen with stones when the edge stops cutting cleanly - this could be weekly for frequent users or monthly for occasional use. The key is maintaining the edge before it becomes severely dull.
What is the best grit progression for butcher knives?
For regular maintenance: 1000 grit to establish the edge, 3000 grit to refine and polish. For damaged edges, start with 400-600 grit, then progress through 1000 and 3000. Finishing grits (5000+) provide extra polish if desired.
How do I maintain a consistent sharpening angle?
Use a sharpening guide initially, practice with visual markers on the blade, maintain consistent hand positioning, and consider taking a class for hands-on instruction. Consistency comes with practice and muscle memory.
Should I use water or oil stones?
Water stones are generally preferred for their cutting speed and edge quality. They require soaking but provide excellent results. Oil stones are more durable and don't require soaking, but cut slower. Choose based on your preferences and usage.
More Expert Guides
How to Trim a Brisket: The Complete Butcher's Guide
Proper brisket trimming is the difference between a backyard experiment and competition-quality results. Here is the professional technique for shaping a whole packer brisket before it ever touches the smoker.
14 min readHow to Butcher a Whole Chicken: Step-by-Step Guide
Breaking down a whole chicken yourself saves 40-50% compared to buying individual parts. Here is the professional technique for turning one bird into perfectly portioned pieces.
14 min readHome Butchering Safety Guide: Essential Protocols for Safe Meat Processing
Learn professional butchering safety protocols from a master butcher with 25+ years of experience. Essential guidance for anyone processing meat at home.