How to Debone a Chicken Breast: A Butcher's Step-by-Step Guide
How to Debone a Chicken Breast: A Butcher’s Step-by-Step Guide
Boneless, skinless chicken breast is the single most purchased cut of poultry in America. But here is something most home cooks do not realize: you are paying a premium for someone else to remove a bone that takes about 90 seconds to remove yourself. Bone-in, skin-on chicken breasts cost 30 to 50 percent less per pound than their boneless counterparts, and the meat tastes better because it was stored on the bone until the moment you needed it.
I have deboned thousands of chicken breasts over my career, and the technique is straightforward once you understand the anatomy. You are not cutting through anything hard. The breastbone is mostly cartilage, the ribs are thin and flexible, and the meat separates from bone with gentle knife strokes rather than brute force.
This guide covers the full process: removing the breast from a whole carcass, taking out the keel bone and ribs, and trimming the finished fillet. Whether you are working with a whole chicken or a split breast you bought bone-in, these techniques apply.
Why Debone Chicken Breasts Yourself
There are four good reasons to debone your own chicken breasts instead of buying them pre-packaged.
Cost savings. Bone-in, skin-on chicken breasts typically run $2.50 to $3.50 per pound. Boneless, skinless breasts cost $4.00 to $6.00 per pound. Even accounting for the weight of the bones you remove (roughly 20 percent of total weight), you save meaningfully per serving. Over a year of weekly chicken dinners, that adds up to $150 or more.
Better flavor and texture. Meat stored on the bone stays juicier. The bone acts as an insulator during refrigeration, slowing moisture loss. When you debone right before cooking, the breast has retained more of its natural moisture than a fillet that was deboned at the processing plant days ago.
You get the bones. Chicken bones and carcasses make outstanding stock. A gallon of homemade chicken stock costs you essentially nothing if you are already buying the chicken. Freeze the bones in a bag until you have enough for a batch.
Portion control. Pre-packaged boneless breasts are often uneven — one fillet weighs 6 ounces, the next weighs 12. When you debone yourself, you can select breasts of uniform size or butterfly thick ones to even out the cooking.
Understanding Chicken Breast Anatomy
Before you start cutting, you need to know what you are cutting around. A chicken breast is simpler than most people think.
The keel bone runs down the center of the breast. It is the long, blade-shaped bone that divides the two breast halves. In a young chicken, the keel is partially cartilage — soft and flexible at the tip, harder at the base near the neck. This is the primary structure you are removing.
The rib bones curve away from the keel on each side, forming the cage that protects the organs. They are thin, flat, and easy to cut along. Your knife will follow the curve of the ribs rather than cutting through them.
The wishbone (furcula) sits at the front of the breast near the neck opening. It is a V-shaped bone embedded in the meat. Removing it first makes the rest of the deboning much easier because it eliminates the point where the breast meat anchors at the front.
The tenderloin is the small, narrow strip of meat on the underside of each breast half. It is loosely attached and often separates during deboning. Save it — tenderloins are perfect for stir-fries, chicken fingers, or quick sautés.
Tools You Need
Deboning chicken breasts requires minimal equipment. You likely already own everything on this list.
Boning Knife
A 5 to 6-inch boning knife with a semi-flexible blade is the ideal tool. The narrow blade follows bone contours precisely, and the slight flex lets you bend around curves without gouging the meat. If you do not own a boning knife, a sharp paring knife works for chicken breasts — the bones are small enough that a smaller blade can handle them.
The key requirement is sharpness. A dull knife is dangerous because you will compensate with pressure, and a slip under pressure means a cut hand. Sharpen your knife before you start.
Cutting Board
Use a large cutting board — at least 12 by 18 inches. Chicken deboning gets messy, and you need room to work without raw meat hanging over the edges. Plastic boards are easier to sanitize than wood for raw poultry, though both are safe if properly cleaned.
Paper Towels
Keep a stack nearby. Chicken is slippery, and wet hands or a wet cutting board make the work harder and more dangerous. Pat the chicken dry before you begin and wipe your hands frequently.
How to Debone a Chicken Breast: Step by Step
These instructions assume you are starting with a whole chicken breast (both halves attached, bone-in, skin-on). If you are working with a split breast (one half, bone-in), skip to Step 3.
Step 1: Remove the Wishbone
Place the breast skin-side down on the cutting board. At the wider end (the neck end), you will see the two prongs of the wishbone embedded in the meat, forming an inverted V shape.
Use the tip of your boning knife to trace along both sides of the wishbone, making shallow cuts that follow the bone. You are not cutting deep — the wishbone sits just below the surface. Once both sides are free, hook your finger under the point of the V and pull upward. The wishbone snaps free cleanly.
Removing the wishbone first is what separates professionals from home cooks who struggle with deboning. It takes 15 seconds and makes everything that follows easier.
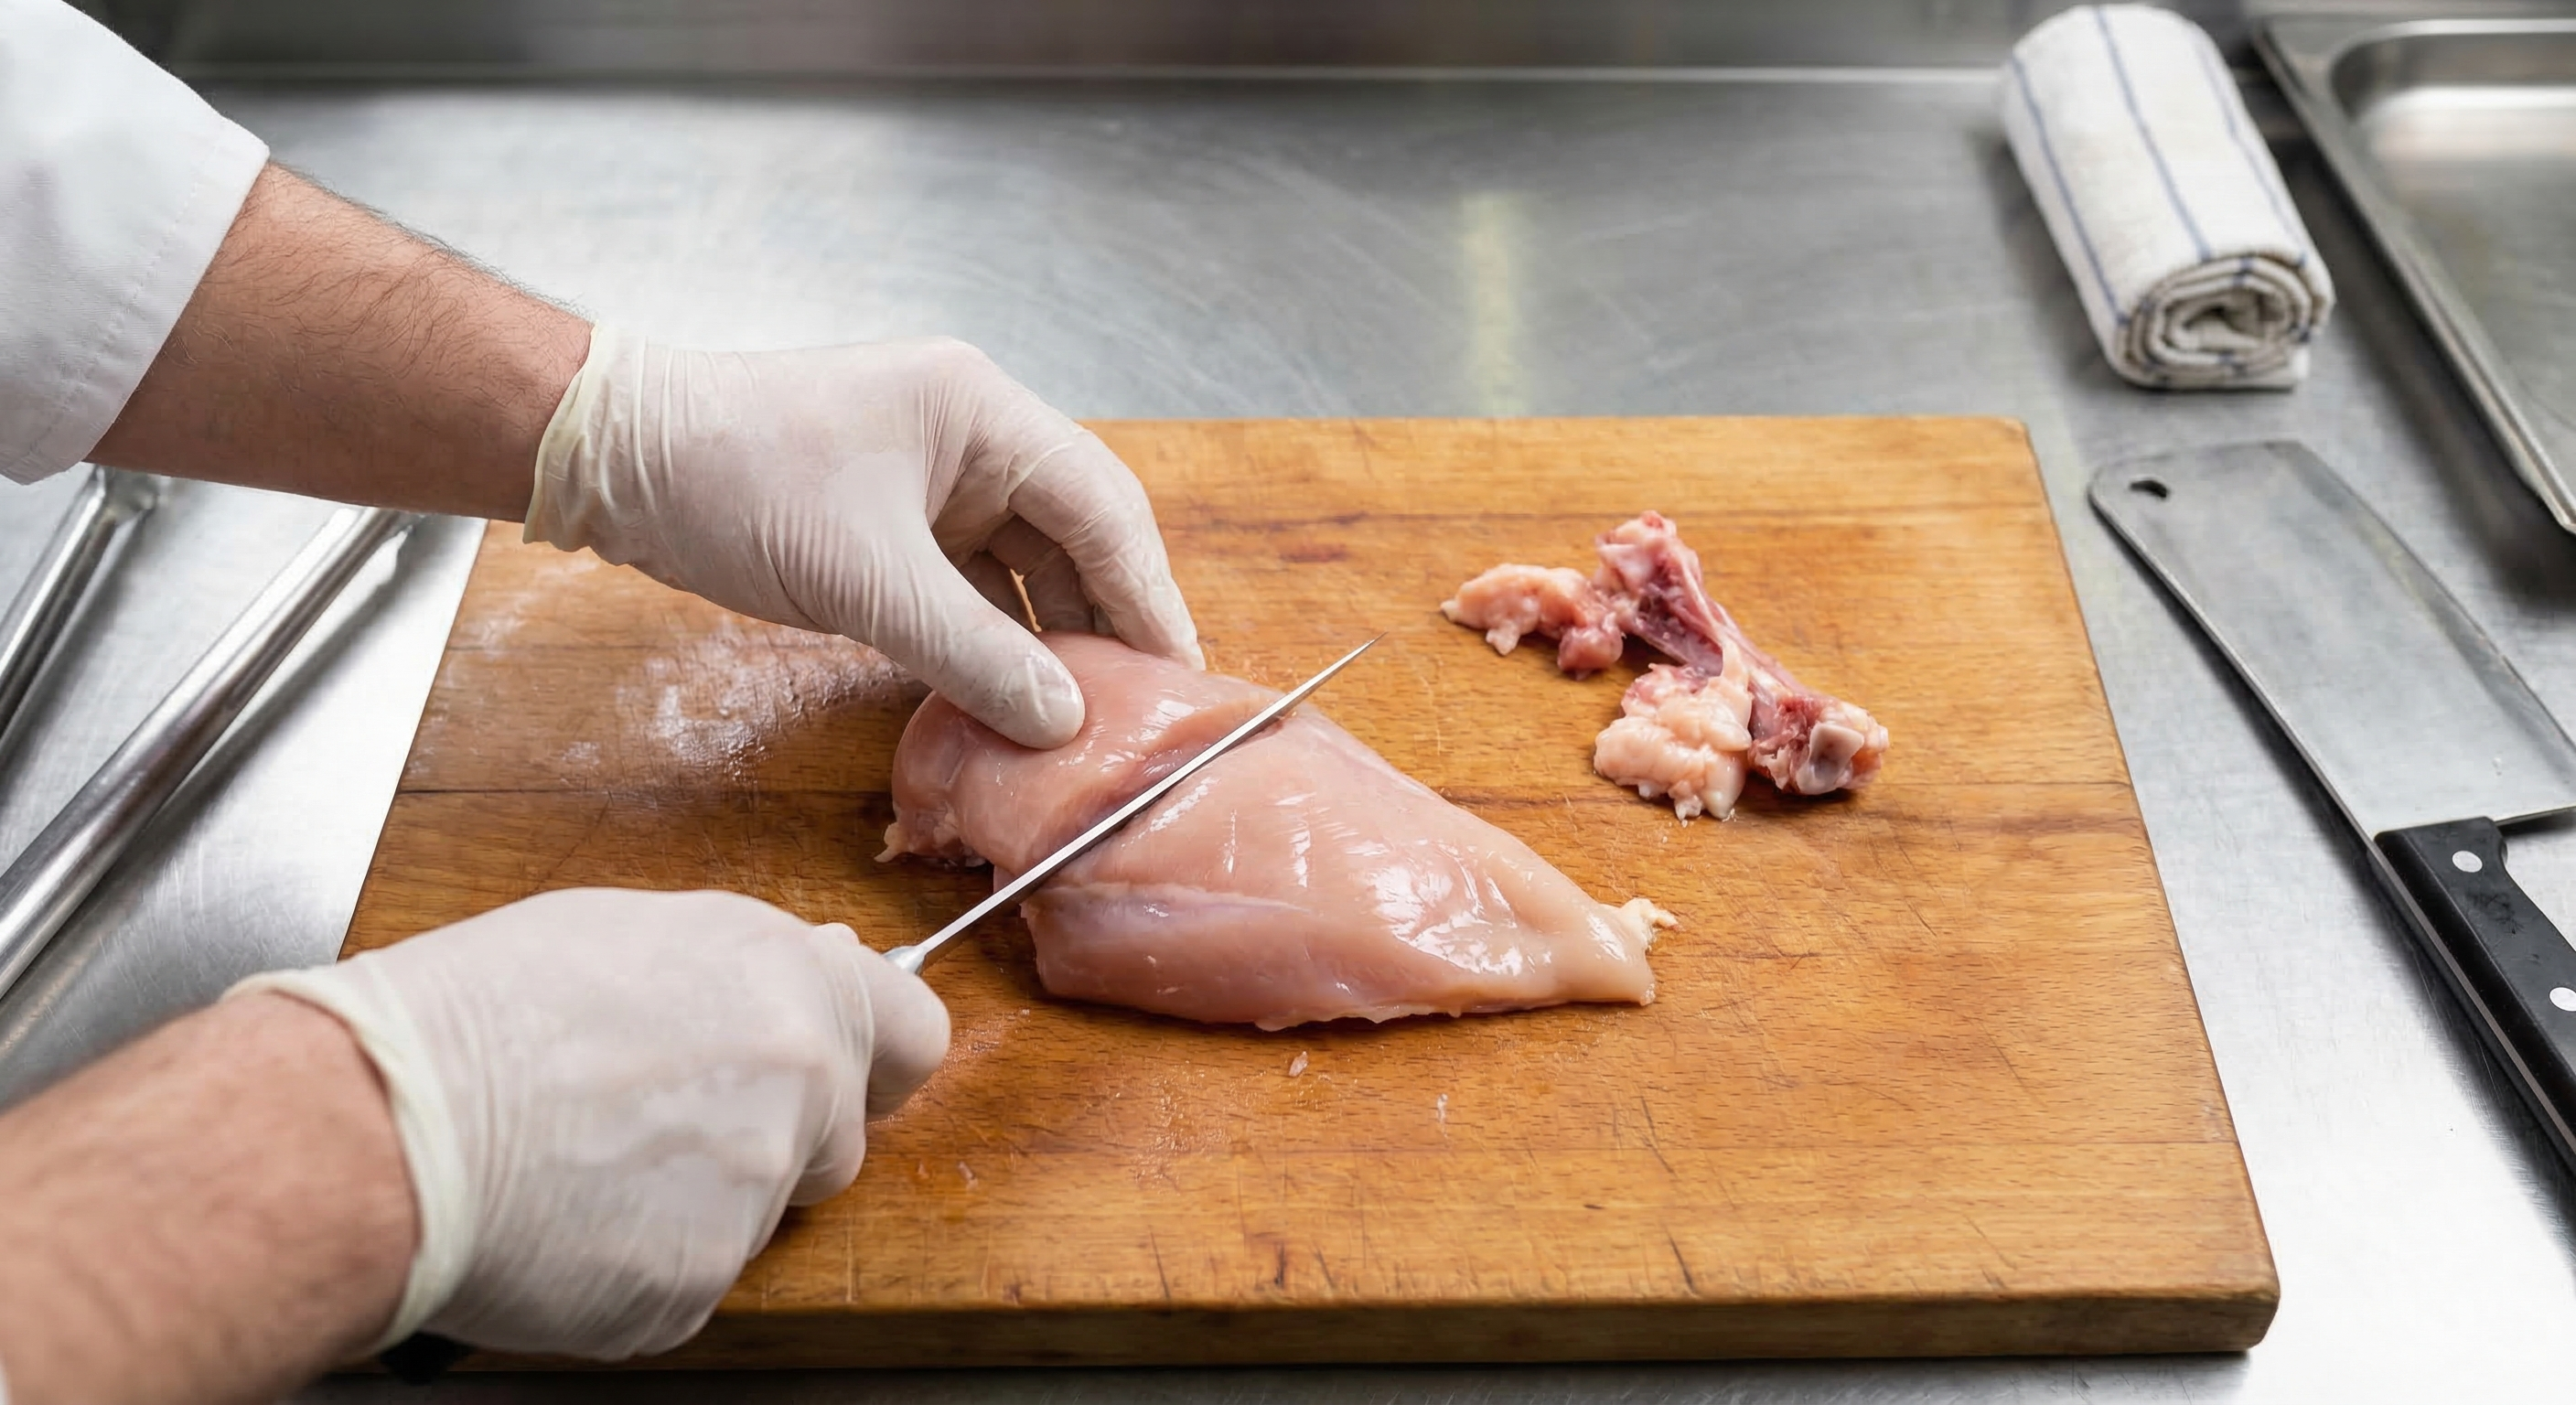
Step 2: Score Along the Keel Bone
Flip the breast skin-side up. Run your finger along the center to feel the ridge of the keel bone. Using the tip of your knife, make a shallow cut along one side of the keel bone from end to end. You are scoring through the thin membrane that attaches the meat to the bone, not cutting deep into the meat.
Now use the flat edge of your knife blade against the keel bone and make short, scraping strokes downward and outward, peeling the breast meat away from the bone. Let the bone guide your blade. The meat separates almost on its own with gentle pressure — if you are forcing it, you are cutting in the wrong spot.
Step 3: Follow the Rib Bones
As you peel the breast meat away from the keel, your knife will encounter the rib bones curving outward. Continue the same technique: short strokes with the blade flat against the bone, letting the curvature of the ribs guide your knife.
Work from the keel bone outward toward the edge of the breast. The meat will peel away in one clean piece if you keep the blade in contact with bone at all times. The most common mistake here is angling the blade into the meat instead of keeping it against the bone, which leaves meat behind on the carcass.
Step 4: Separate at the Joint
When you reach the outer edge of the rib cage, the breast meat is attached only at the shoulder joint where the wing connects. Slice through this connective tissue to free the breast half completely.
Repeat Steps 2 through 4 on the other side to remove the second breast half.
Step 5: Remove the Skin (Optional)
If you want skinless breasts, grip the skin at one corner and pull it away from the meat. It peels off easily in one piece. Use your knife to cut through any stubborn membrane connections. Save the skin for rendering into schmaltz (chicken fat) if you like — it is liquid gold for cooking.
Step 6: Remove the Tenderloin
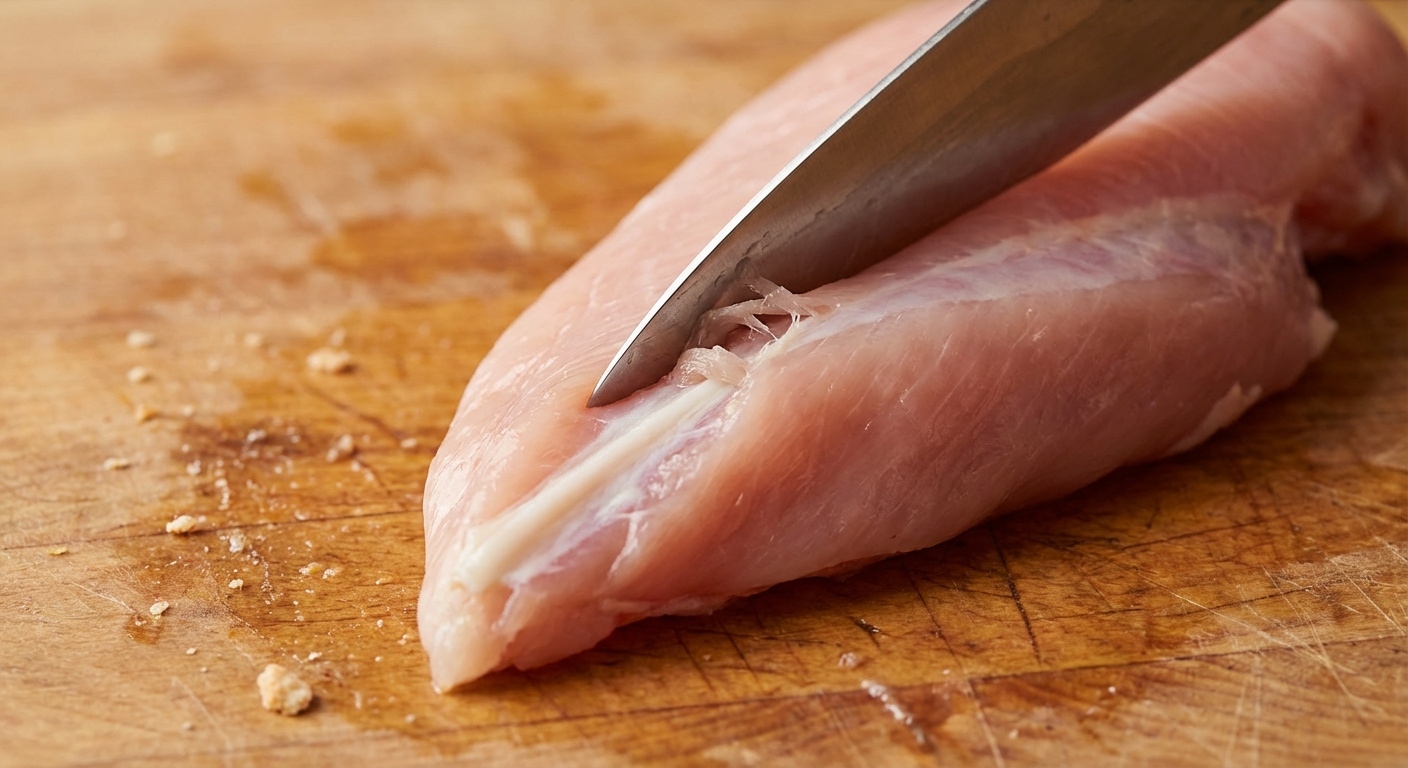
On the underside of each breast half, you will see the tenderloin — a thin strip of meat loosely attached along the length of the breast. Peel it away with your fingers. There is a white tendon running through the center of each tenderloin. To remove it, pin the tendon against the cutting board with the flat of your knife blade and pull the meat away from it. The tendon stays behind.
Step 7: Trim and Inspect
Examine each breast half. Trim any remaining cartilage, bone fragments, or excess fat. Check for the small piece of rib meat that sometimes stays attached at the bottom edge — either trim it flush or leave it for extra weight.
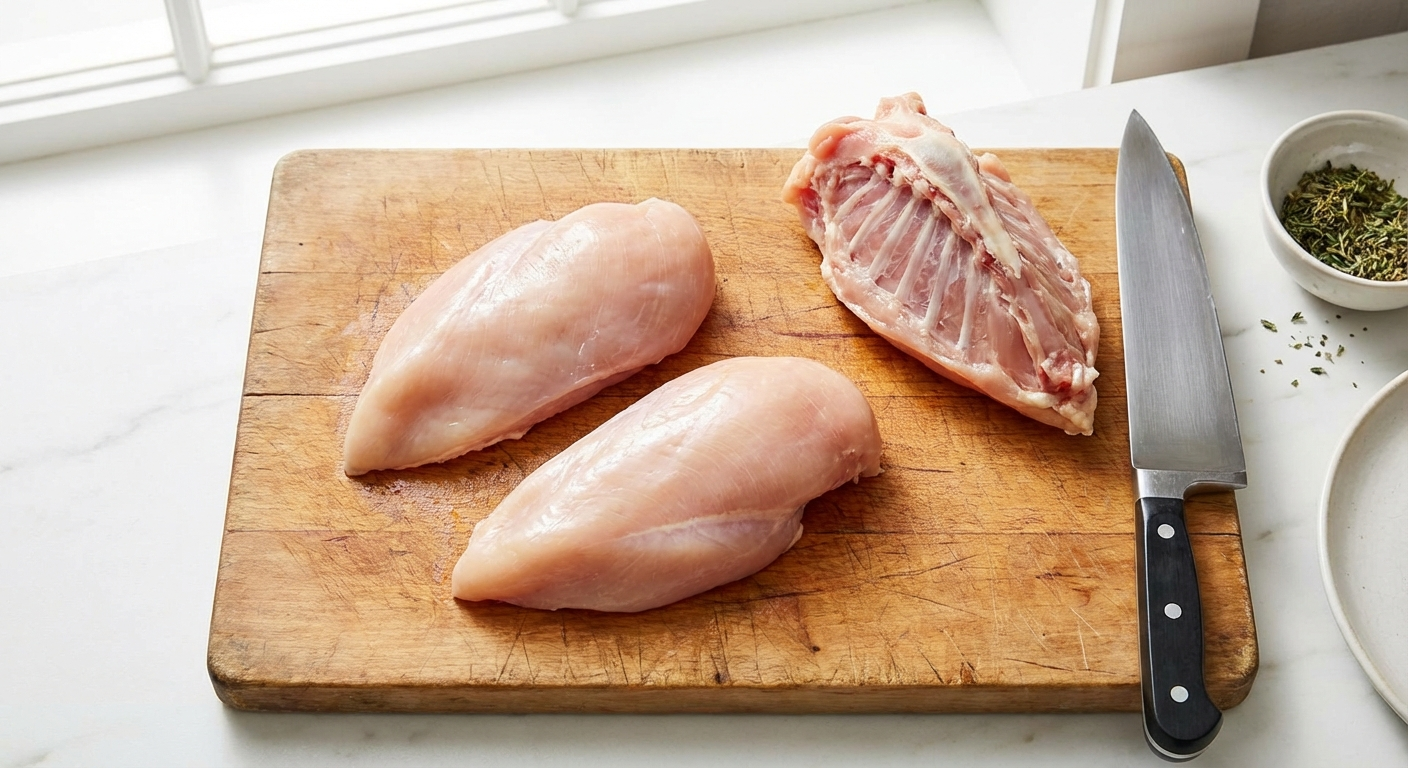
You should now have two clean boneless breast fillets, two tenderloins, a carcass with bones for stock, and optionally two pieces of skin.
Common Mistakes and How to Avoid Them
Leaving meat on the bone. The number one issue. This happens when the blade angle drifts away from the bone surface. Keep the flat of the blade pressed against bone at all times. Short, controlled strokes beat long sweeping cuts.
Cutting through the skin from the inside. If you are deboning skin-on, be careful not to puncture through the skin from the bone side. Keep your knife shallow and let the bone guide you rather than pressing through to the skin surface.
Skipping the wishbone. Trying to debone without removing the wishbone first means the breast meat stays anchored at the front. You end up tearing the meat instead of cleanly separating it, and you lose that nice tapered end of the fillet.
Using a dull knife. This cannot be overstated. A dull blade requires pressure, pressure means less control, and less control means uneven cuts or — worse — a slip that cuts you instead of the chicken. A sharp knife is a safe knife.
Working with frozen or partially frozen chicken. Partially thawed chicken is slippery and the meat texture is inconsistent. Always debone fully thawed, refrigerator-cold chicken. Not room temperature (food safety concern), not frozen (impossible to cut cleanly).
What to Do with the Bones
Never throw away chicken bones. They are the foundation of great cooking.
Quick stock: Throw the carcass into a pot with water, an onion, a carrot, a celery stalk, and a bay leaf. Simmer for 2 to 4 hours. Strain and you have fresh chicken stock that beats anything in a can.
Freeze for later: If you are not making stock today, bag the bones and freeze them. When you have accumulated bones from 3 or 4 chickens, make a large batch of stock.
Pressure cooker stock: An Instant Pot or pressure cooker makes rich stock in 45 minutes instead of 4 hours. Same ingredients, fraction of the time.
The skin can be rendered into schmaltz by cooking it slowly in a pan over low heat until the fat melts out and the skin crisps into cracklings. Schmaltz is traditional in many cuisines and adds incredible flavor to roasted vegetables, fried potatoes, or pie crusts.
Storing Deboned Chicken Breasts
Once deboned, chicken breasts should be used within 1 to 2 days if refrigerated, or frozen for up to 6 months.
Refrigerator storage: Place each breast in a single layer on a plate or tray, cover tightly with plastic wrap, and store on the coldest shelf of your refrigerator (usually the bottom). Do not stack raw breast fillets — they stick together and are hard to separate without tearing.
Freezer storage: Wrap each breast individually in plastic wrap, then place wrapped breasts in a freezer bag with the air pressed out. Individual wrapping prevents them from freezing into a single block. Label with the date.
Portion before freezing: If you plan to use the breasts for specific recipes, portion them accordingly before freezing. It is much easier to thaw exactly what you need than to thaw a whole bag and refreeze the excess (which degrades texture).
Frequently Asked Questions
Frequently Asked Questions
How long does it take to debone a chicken breast?
Once you have practiced the technique a few times, deboning a whole chicken breast (both halves) takes about 90 seconds. Your first attempt may take 3 to 5 minutes, but speed comes quickly with repetition.
Can I debone chicken breast without a boning knife?
Yes. A sharp paring knife or even a sharp chef's knife works for chicken breasts. The bones are small and the anatomy is simple. A boning knife is ideal because of its narrow, flexible blade, but it is not strictly required.
Should I debone chicken breast before or after cooking?
For most recipes, debone before cooking. However, cooking bone-in and then removing the bone gives you juicier meat because the bone insulates during cooking. For dishes like chicken salad or shredded chicken, cooking on the bone first and deboning after is the better approach.
Is bone-in chicken breast cheaper than boneless?
Significantly. Bone-in, skin-on chicken breasts typically cost 30 to 50 percent less per pound than boneless, skinless breasts. Even after accounting for the bone weight (about 20 percent), you save money by deboning yourself.
What is the white tendon in the chicken tenderloin?
The white tendon running through each tenderloin is connective tissue that attached the muscle to the breastbone. It is tough and chewy when cooked. Remove it by pinning the tendon end to the cutting board with the flat of a knife and pulling the meat away from it.
More Expert Guides
How to Trim a Brisket: The Complete Butcher's Guide
Proper brisket trimming is the difference between a backyard experiment and competition-quality results. Here is the professional technique for shaping a whole packer brisket before it ever touches the smoker.
14 min readHow to Butcher a Whole Chicken: Step-by-Step Guide
Breaking down a whole chicken yourself saves 40-50% compared to buying individual parts. Here is the professional technique for turning one bird into perfectly portioned pieces.
14 min readHome Butchering Safety Guide: Essential Protocols for Safe Meat Processing
Learn professional butchering safety protocols from a master butcher with 25+ years of experience. Essential guidance for anyone processing meat at home.