How to Spatchcock a Chicken: The Butcher's Guide to Faster, Crispier Roasting
How to Spatchcock a Chicken: The Butcher’s Guide to Faster, Crispier Roasting
Spatchcocking is the technique that changed how I cook chicken at home. After thirty years of breaking down birds professionally, I can tell you that removing the backbone and pressing a chicken flat is the single biggest improvement most people can make to their roast chicken game. You get crispier skin across every square inch, juicier breast meat, and cooking time drops from over an hour to about 40 minutes.
The word itself comes from “dispatch cock” — an old Irish and English term for preparing a bird in a hurry. And that is exactly what it delivers. No trussing, no fussing, no rotating the pan halfway through. Just a flat bird that cooks evenly because every part sits at the same distance from the heat source.
If you have ever roasted a whole chicken and ended up with dry breast meat or flabby skin on the underside, spatchcocking fixes both problems at once. This guide walks you through the technique step by step, covers the tools you need, and explains why it works from a cooking-science perspective.
What Is Spatchcocking
Spatchcocking means removing the backbone from a whole bird and pressing the carcass flat so it cooks in a single even layer. The technique is also called butterflying, though technically butterflying refers to splitting a boneless piece of meat horizontally. Spatchcocking involves bone-in poultry and requires cutting through the rib bones on either side of the spine.
The result is a chicken that lies flat with the breast facing up, legs splayed to the sides, and the entire skin surface exposed to direct heat. Every part of the bird — thick breast, thin wing, meaty thigh — cooks at a more uniform rate because the thickness difference is minimized.
Spatchcocking works on any poultry: chicken, turkey, Cornish hen, quail, duck, or game birds. The technique is identical regardless of size. A 4-pound chicken takes about 3 minutes to spatchcock. A 15-pound turkey takes about 5.
Why Spatchcocking Works Better Than Traditional Roasting
A whole chicken sitting upright in a roasting pan is an aerodynamic disaster from a heat-transfer perspective. The breast — which is the thickest, densest part — sits on top, farthest from the pan and closest to the oven’s upper heating element. The legs and thighs, which need to reach a higher temperature (175°F versus 160°F for breast), are tucked underneath where they get less direct heat.
This mismatch is why traditional roast chicken often produces overcooked breast and undercooked thigh joints. Spatchcocking eliminates the problem by changing the geometry:
- Uniform thickness. A flattened chicken is roughly 2–3 inches thick everywhere instead of varying from 1 inch at the wing to 6 inches at the breast. Even thickness means even cooking.
- Maximum skin exposure. Every square inch of skin faces the heat source. No more pale, steamed skin on the underside where the chicken sits in its own juices.
- Legs at higher temperature. The dark meat ends up at the edges of the pan, closer to the oven walls where radiant heat is strongest. They naturally reach 175°F right when the breast hits 160°F.
- Faster cooking. A 4-pound spatchcocked chicken roasts in 35–45 minutes at 450°F. A whole bird takes 60–75 minutes at the same temperature, and you would never roast a traditional whole chicken at 450°F because the outside would burn before the center cooked.
- Better browning. Higher oven temperature plus more exposed surface area equals the Maillard reaction happening faster and more completely. The skin gets deeply golden and shatteringly crisp.
Tools You Need
You need exactly one specialized tool to spatchcock a chicken: a pair of heavy kitchen shears. Everything else is standard kitchen equipment.
Kitchen Shears
Heavy-duty poultry shears or kitchen shears with a spring-loaded hinge are ideal. You are cutting through thin rib bones, which are not difficult, but cheap lightweight scissors will struggle and slip. Look for shears with:
- Serrated blades that grip bone instead of sliding off
- A spring mechanism that opens the handles automatically between cuts, reducing hand fatigue
- Dishwasher-safe construction — you are cutting raw chicken, so easy sanitation matters
You can also use a sharp chef’s knife or cleaver to cut along the backbone. Place the blade along one side of the spine and press down firmly, or use a rocking motion to crack through the rib joints. Shears are easier and more controlled, but a knife works if that is what you have.
Other Equipment
- A large cutting board with a groove to catch juices. The chicken will release liquid when you press it flat.
- A sheet pan with a wire rack for roasting. The rack elevates the chicken so air circulates underneath, crisping the skin on the bottom side too.
- Paper towels for drying the skin before seasoning. Dry skin equals crispy skin.
How to Spatchcock a Chicken: Step by Step
Start with a whole chicken between 3.5 and 5 pounds, giblets and neck removed. Pat the outside and cavity dry with paper towels.
Step 1: Position the Chicken
Place the chicken breast-side down on your cutting board. The backbone should face up, running from neck to tail. You should be looking at the back of the bird, with the leg joints visible on either side.
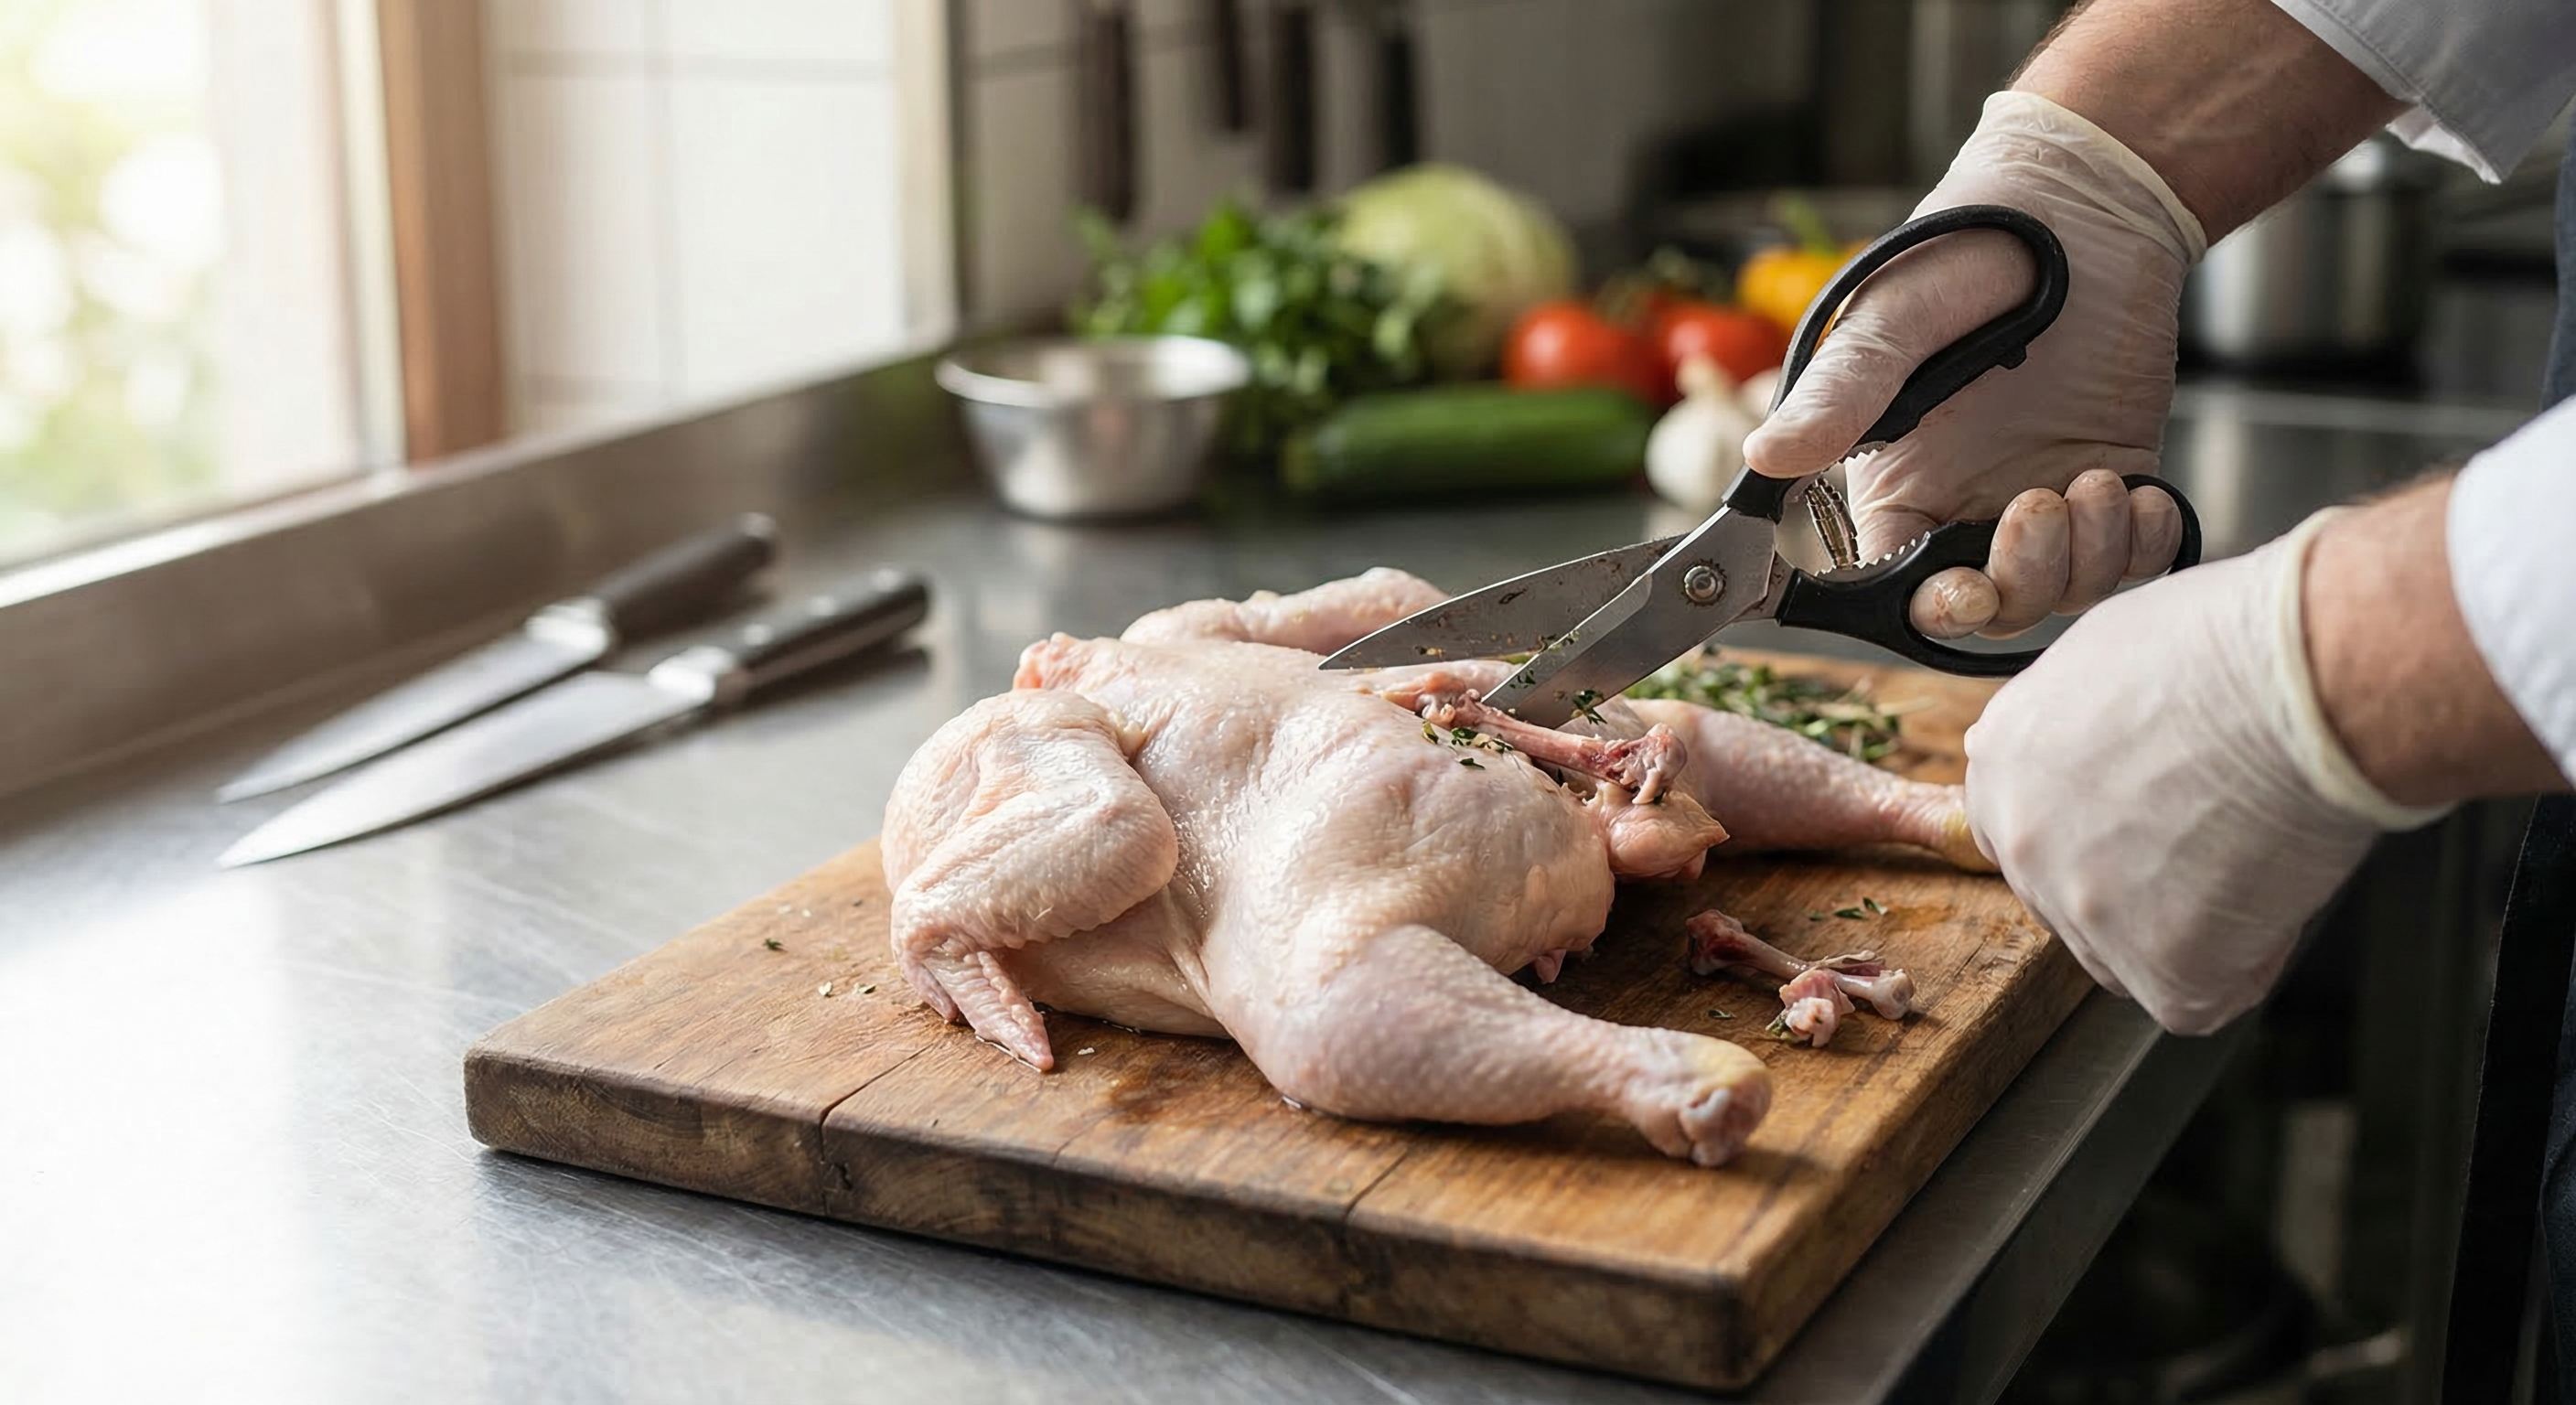
Step 2: Cut Along One Side of the Backbone
Open your shears and position them at the tail end of the chicken, just to one side of the backbone. The backbone is the narrow ridge of bone running down the center. You want to cut through the rib bones that connect to it, not through the backbone itself.
Cut from tail to neck in one continuous motion, using the full length of the shear blades. You will feel the shears crunch through thin rib bones every half inch or so. Keep the blades as close to the spine as possible — you do not want to waste meat.
Step 3: Cut Along the Other Side
Repeat on the opposite side of the backbone. Same technique: tail to neck, close to the spine, through the rib joints. The backbone will come free as a strip of bone about 1 inch wide and 6 inches long.
Save the backbone. Drop it into a freezer bag with other poultry bones. When you have collected 2–3 pounds, you have the makings of excellent chicken stock. The backbone has a lot of connective tissue and marrow that contributes body and flavor.
Step 4: Find and Score the Keel Bone
Flip the chicken over so the breast faces up. Run your finger down the center of the breast to feel the keel bone — a ridge of cartilage that runs along the breastbone. Using a paring knife, score a shallow line down the center of the keel bone. This weakens the cartilage and makes the next step easier.
Step 5: Press Flat
Place both palms on the breast, one on each side of the keel bone, and press down firmly. You will hear and feel the breastbone crack as the bird flattens. Do not be gentle — you need to break the cartilage and flatten the breast so it sits at the same level as the legs.
The chicken should now lie completely flat. The legs will splay out to the sides, the wings will tuck naturally, and the breast will form a wide, even surface. If one side is higher than the other, press again. The bird should rock slightly but sit mostly flat.
Step 6: Tuck the Wing Tips
Fold each wing tip behind the shoulder joint, like the chicken is putting its hands behind its head. This prevents the wing tips from burning during high-heat roasting and gives the bird a tidier appearance. If the wing tips will not stay tucked, cut them off and add them to your stock bag.
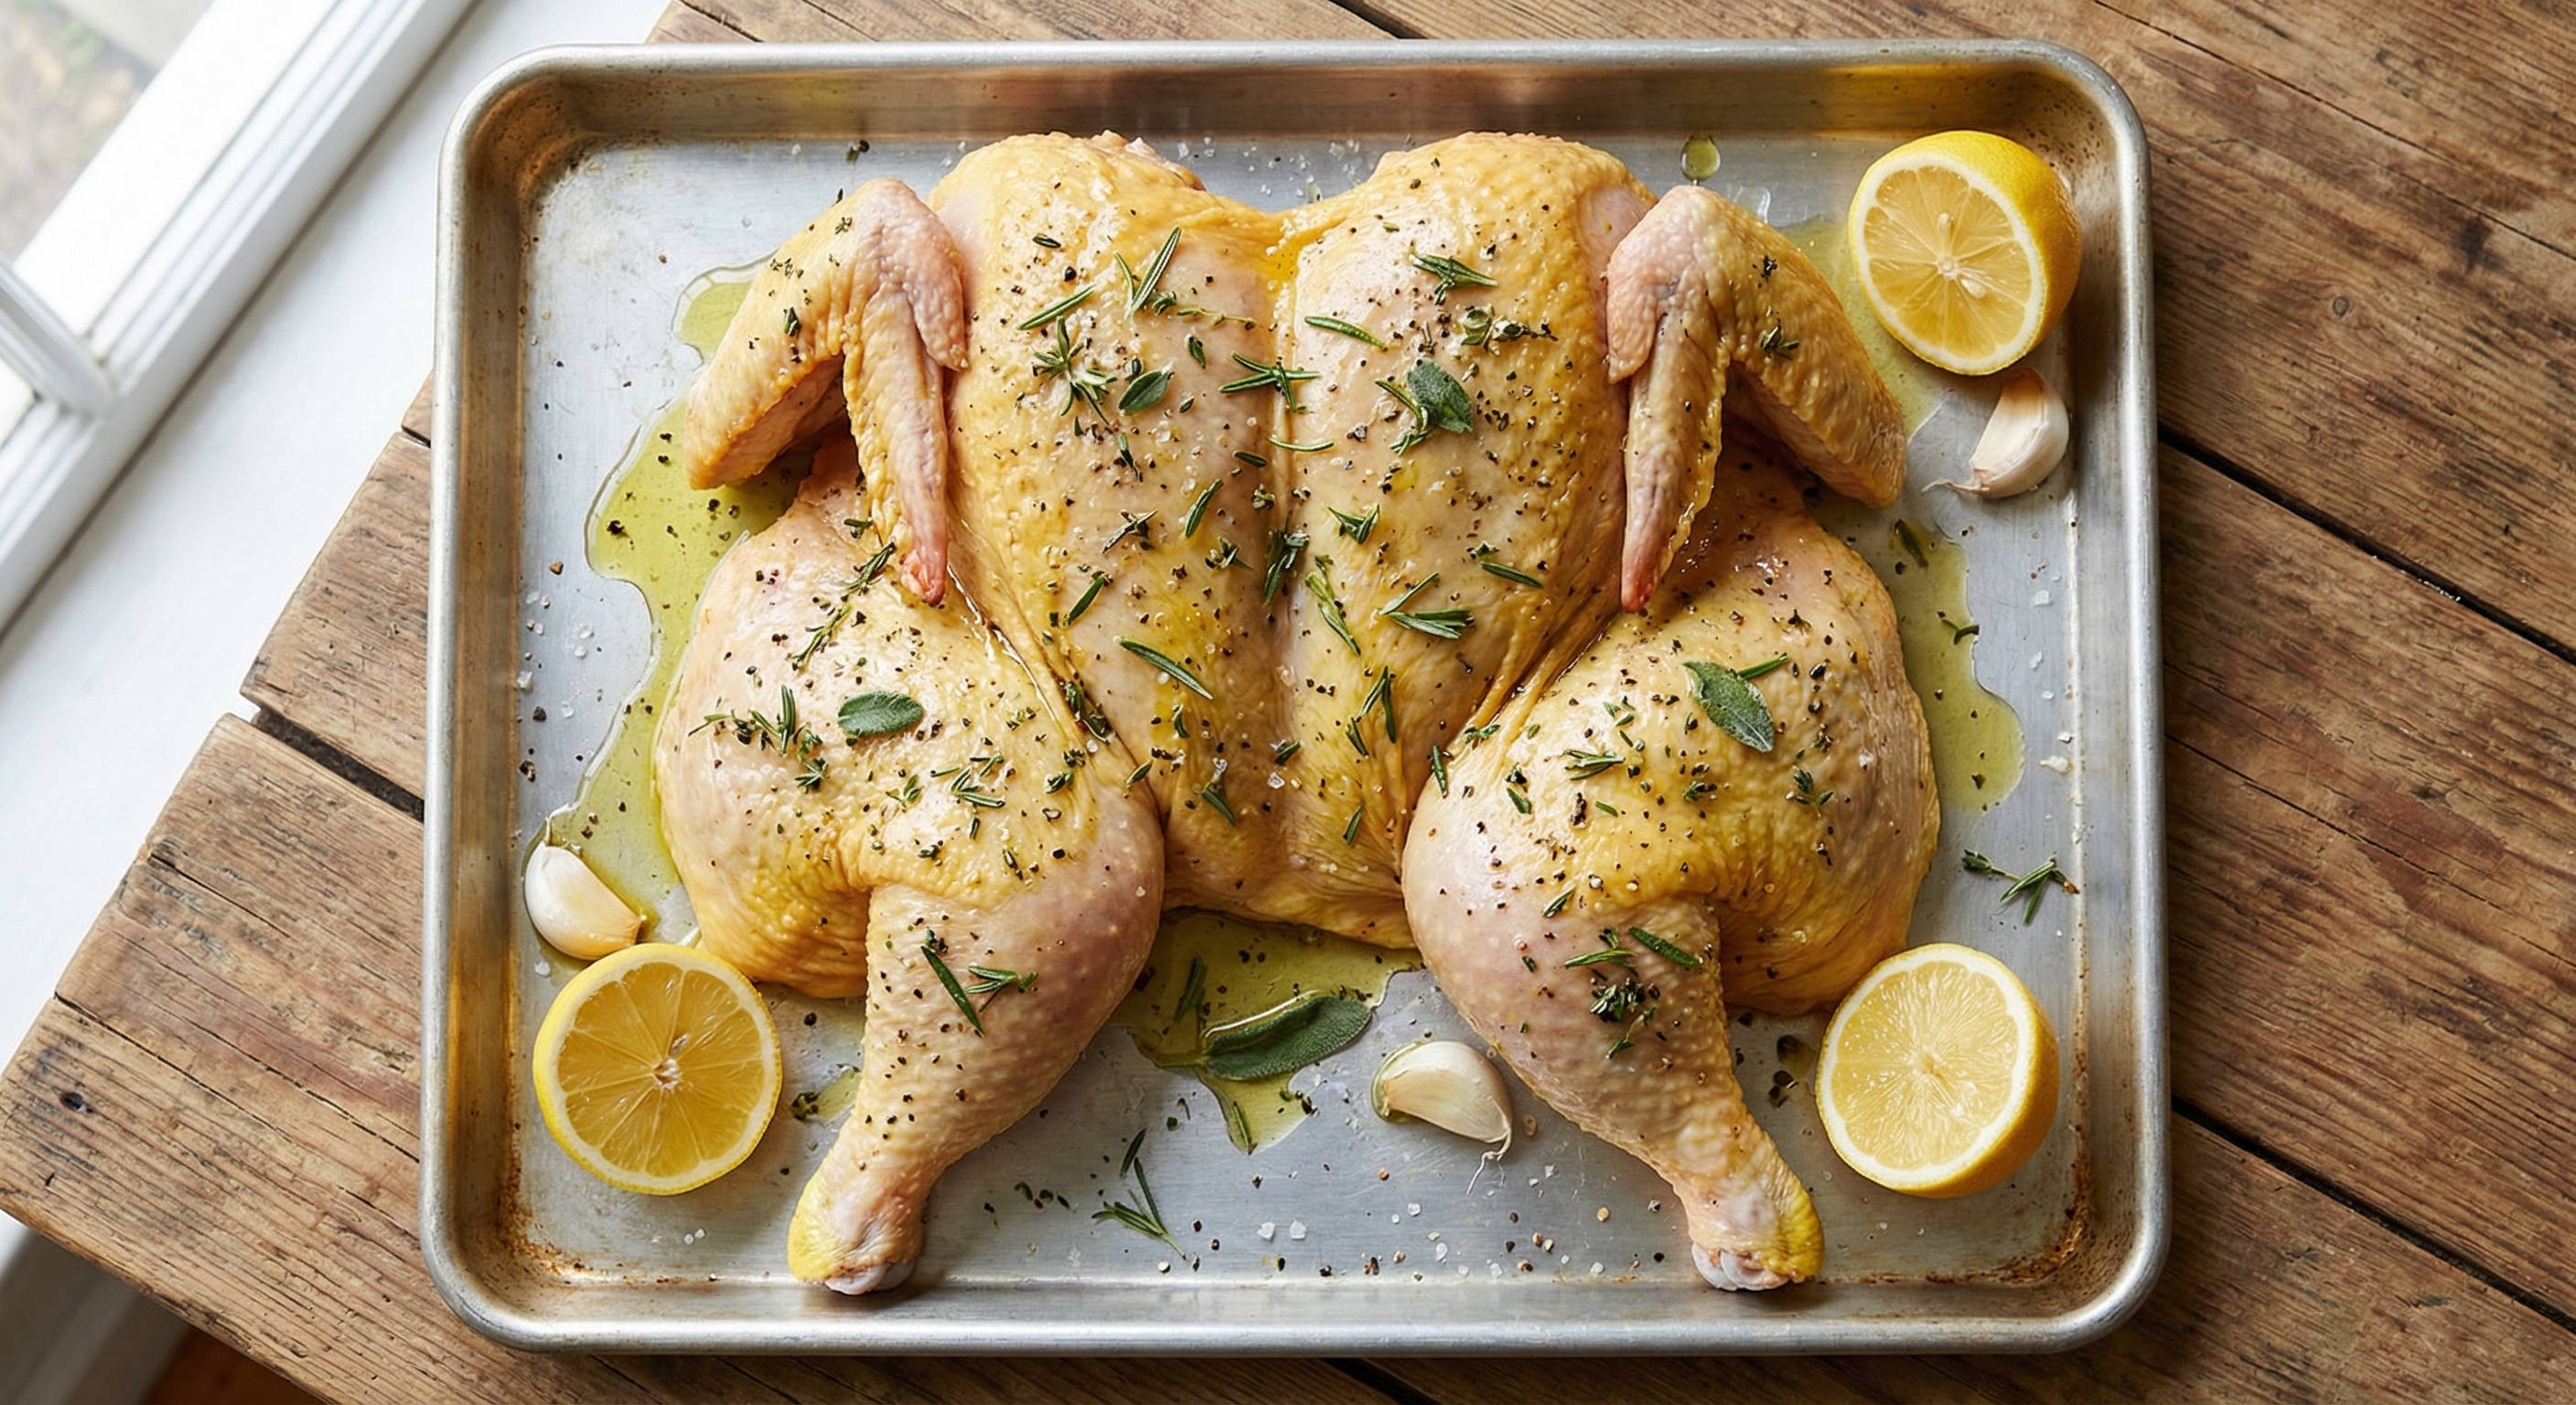
Seasoning a Spatchcocked Chicken
The beauty of a flat chicken is that every surface is accessible for seasoning. You can season more effectively and more evenly than a traditional whole bird where the cavity and underside are hard to reach.
Dry Brine Method (Best Results)
The night before cooking, season the chicken generously with kosher salt — about 1 teaspoon per pound. Place it skin-side up on a wire rack set over a sheet pan, uncovered, in the refrigerator for 12–24 hours.
This dry brine does two things simultaneously. The salt draws out surface moisture through osmosis, then the salt dissolves in that moisture and gets reabsorbed into the meat. The result is chicken that is seasoned all the way through, not just on the surface. Meanwhile, the uncovered refrigerator time dries the skin, which is the single most important factor in achieving crispy skin.
Quick Season Method
If you do not have time to dry brine, pat the chicken thoroughly dry with paper towels, then season with salt, pepper, and whatever spices you prefer. Slide your fingers under the breast skin to loosen it, and rub seasoning directly onto the meat underneath. This shortcut gets flavor closer to the breast meat without the overnight wait.
Seasoning Ideas
- Classic: Salt, pepper, garlic powder, smoked paprika, dried thyme
- Mediterranean: Lemon zest, oregano, crushed red pepper, garlic, olive oil
- BBQ: Brown sugar, chili powder, cumin, garlic powder, onion powder, cayenne
- Herb butter: Compound butter with rosemary, thyme, and garlic tucked under the skin
- Asian-inspired: Five-spice powder, sesame oil, ginger, soy sauce (brush on during last 10 minutes)
How to Cook a Spatchcocked Chicken
Spatchcocking opens up cooking methods that do not work well with a whole upright bird. Here are the three best approaches.
Oven Roasting (Most Common)
Preheat your oven to 450°F. Place the spatchcocked chicken skin-side up on a wire rack set over a sheet pan. You can scatter vegetables (potatoes, onions, carrots) on the sheet pan underneath — they will roast in the rendered chicken fat.
Roast until the breast reaches 160°F and the thickest part of the thigh reaches 175°F on an instant-read thermometer. This takes 35–45 minutes for a 4-pound bird. Rest for 10 minutes before carving.
The high temperature is key. A traditional whole chicken would burn at 450°F because the outside would overcook before the thick center was done. But a flat chicken is thin enough that 450°F works perfectly — the skin gets deeply browned and crispy while the interior cooks through in time.
Grilling
Set up your grill for two-zone cooking: all burners on high on one side, no heat on the other (or coals piled on one side). Place the chicken skin-side up on the cool side, close the lid, and cook for 25 minutes. Then flip it skin-side down over direct heat for 5–10 minutes to crisp the skin. Total time: 30–40 minutes.
A spatchcocked chicken fits on a standard grill grate, which a whole upright bird does not without a beer-can holder or rotisserie. The flat shape also means you can press it with a cast-iron skillet for even better contact with the grate — this is called chicken under a brick, or pollo al mattone in Italian cooking.
Smoking
Set your smoker to 275°F. Place the chicken skin-side up directly on the grate. Smoke until the breast reaches 160°F and the thigh reaches 175°F, about 2–2.5 hours. Use a mild wood like apple, cherry, or pecan — chicken takes on smoke quickly, and strong woods like hickory can overwhelm the delicate flavor.
The flat shape is ideal for smoking because maximum surface area is exposed to the smoke. Every part of the bird gets even smoke penetration, which does not happen with a whole upright chicken where the cavity shields the inside from smoke contact.
Common Mistakes and How to Avoid Them
I have taught this technique to hundreds of people. These are the errors I see most often:
- Cutting through the backbone instead of beside it. You want to cut along both sides of the spine, removing it entirely. Cutting through the middle leaves sharp bone fragments attached to both halves.
- Not pressing hard enough. You need to crack the keel bone. A chicken that is not fully flat will have a raised center breast that cooks slower than the edges, defeating the purpose.
- Wet skin. If you skip drying the skin with paper towels, or skip the dry brine, you will get steamed rubbery skin instead of crispy skin. Moisture is the enemy of browning.
- Too low an oven temperature. Spatchcocked chicken wants 425–450°F. If you roast at 350°F, the skin will not crisp properly and the cooking time advantage disappears.
- Not resting before carving. Ten minutes of resting lets the juices redistribute. Cut immediately and you lose moisture to the cutting board instead of keeping it in the meat.
- Throwing away the backbone. It is free stock flavor. Save it.
How to Carve a Spatchcocked Chicken
Carving a flat chicken is actually easier than carving a traditional roast because the joints are fully exposed. You can see exactly where to cut.
- Remove the legs. Pull each leg away from the body and cut through the hip joint where the thigh meets the body. The joint is easy to find on a flat bird — just follow the natural seam.
- Separate drumstick from thigh. Flex the joint to find the connection point, then cut through it. On a spatchcocked bird, this joint is often already partially exposed.
- Remove the breasts. Cut along one side of the keel bone (where you scored earlier), then follow the rib cage down to separate the breast. Repeat on the other side. You will get two large boneless breast pieces.
- Remove the wings. Cut through the shoulder joint where the wing meets the body.
A spatchcocked chicken yields the same eight pieces as any other preparation: two drumsticks, two thighs, two breast halves, and two wings. The difference is that carving takes about half the time because you are not fighting gravity or trying to see into crevices.
Spatchcocking Other Birds
The technique scales to any poultry. The only difference is size and cooking time.
- Cornish hens (1.5–2 lbs): Use kitchen shears. Roast at 450°F for 25–30 minutes. Serve one per person.
- Turkey (12–20 lbs): Use heavy-duty shears or a cleaver. The rib bones are thicker and require more force. Roast at 425°F for 80–100 minutes. A spatchcocked turkey fits on a standard half-sheet pan, which a whole turkey does not.
- Duck (4–5 lbs): Same as chicken, but score the skin in a crosshatch pattern before roasting. Duck has a thick fat layer under the skin that needs to render out. Start at 400°F for the first 20 minutes, then increase to 450°F for the final 15–20 minutes.
- Quail (5–8 oz): Tiny bones cut easily with regular kitchen scissors. Grill or broil for 8–12 minutes total.
The turkey application is particularly valuable. Breaking down a whole bird is one approach, but spatchcocking a turkey cuts roasting time from 3–4 hours to under 2 hours, frees up the oven for sides, and produces more evenly cooked meat than any other whole-turkey method. If you have ever served Thanksgiving turkey with dry breast and undercooked thighs, spatchcocking is the permanent fix.
Frequently Asked Questions
Can I spatchcock a frozen chicken?
No. The chicken must be fully thawed. Frozen bones will shatter unpredictably under the shears instead of cutting cleanly, and you cannot press a frozen bird flat. Thaw completely in the refrigerator (24 hours for a 4-pound bird) before spatchcocking.
Is spatchcocking the same as butterflying?
They are closely related but technically different. Spatchcocking removes the backbone and presses the bird flat while it remains bone-in. Butterflying typically refers to cutting a boneless piece of meat horizontally and opening it like a book. In casual cooking conversation, the terms are often used interchangeably for poultry.
Do I need to remove the keel bone?
No. You just need to crack it by pressing the breast flat. The keel bone stays in the bird during cooking and helps the breast hold its shape. It comes out easily during carving.
How do I store a spatchcocked chicken before cooking?
Place it skin-side up on a wire rack over a sheet pan, uncovered, in the refrigerator. This doubles as the dry-brine setup. A spatchcocked chicken can sit in the fridge for up to 2 days before cooking. The longer it air-dries, the crispier the skin will be.
Can I spatchcock a chicken ahead of time and freeze it?
Yes. Spatchcock the bird, wrap it tightly in plastic wrap and then foil, and freeze for up to 3 months. Thaw completely in the refrigerator before cooking. Pat the skin very dry after thawing since freezing releases extra moisture.
What temperature should I cook a spatchcocked chicken to?
Breast meat: 160°F (it will carry over to 165°F during resting). Thigh meat: 175°F. Always use an instant-read thermometer — time-based cooking is unreliable because oven temperatures vary and chicken sizes differ.
Frequently Asked Questions
Can I spatchcock a frozen chicken?
No. The chicken must be fully thawed. Frozen bones will shatter unpredictably under the shears instead of cutting cleanly, and you cannot press a frozen bird flat. Thaw completely in the refrigerator (24 hours for a 4-pound bird) before spatchcocking.
Is spatchcocking the same as butterflying?
They are closely related but technically different. Spatchcocking removes the backbone and presses the bird flat while it remains bone-in. Butterflying typically refers to cutting a boneless piece of meat horizontally and opening it like a book. In casual cooking conversation, the terms are often used interchangeably for poultry.
Do I need to remove the keel bone?
No. You just need to crack it by pressing the breast flat. The keel bone stays in the bird during cooking and helps the breast hold its shape. It comes out easily during carving.
How do I store a spatchcocked chicken before cooking?
Place it skin-side up on a wire rack over a sheet pan, uncovered, in the refrigerator. This doubles as the dry-brine setup. A spatchcocked chicken can sit in the fridge for up to 2 days before cooking.
Can I spatchcock a chicken ahead of time and freeze it?
Yes. Spatchcock the bird, wrap it tightly in plastic wrap and then foil, and freeze for up to 3 months. Thaw completely in the refrigerator before cooking.
What temperature should I cook a spatchcocked chicken to?
Breast meat: 160°F (it will carry over to 165°F during resting). Thigh meat: 175°F. Always use an instant-read thermometer.
More Expert Guides
How to Trim a Brisket: The Complete Butcher's Guide
Proper brisket trimming is the difference between a backyard experiment and competition-quality results. Here is the professional technique for shaping a whole packer brisket before it ever touches the smoker.
14 min readHow to Butcher a Whole Chicken: Step-by-Step Guide
Breaking down a whole chicken yourself saves 40-50% compared to buying individual parts. Here is the professional technique for turning one bird into perfectly portioned pieces.
14 min readHome Butchering Safety Guide: Essential Protocols for Safe Meat Processing
Learn professional butchering safety protocols from a master butcher with 25+ years of experience. Essential guidance for anyone processing meat at home.