How to Break Down a Beef Sirloin: Complete Butcher's Guide
The beef sirloin sits between the short loin and the round, spanning the hip area of the animal. It is one of the most underappreciated primals in the entire carcass — overshadowed by the tenderloin and strip loin that get all the attention from the adjacent short loin. But inside this primal are some of the most flavorful and versatile cuts in beef butchery: the tri-tip, the top sirloin cap (coulotte or picanha), top sirloin steaks, ball tip roasts, and sirloin flap meat.
Buying a whole sirloin from a wholesale supplier or butcher shop typically costs $5 to $9 per pound for USDA Choice, while individual cuts from that same primal retail for $10 to $18 per pound. On a 40 to 50 pound sirloin, that price difference can save you $200 or more. Beyond cost savings, breaking down a whole sirloin gives you access to cuts that most grocery stores never display — the coulotte cap alone is worth the effort, and the tri-tip is one of the best grilling cuts in existence.
This guide walks through every step of breaking down a whole beef sirloin primal, from initial assessment through final subprimal separation and portioning.
Anatomy of the Beef Sirloin
The sirloin is more complex than primals like the short loin or rib because it contains the hip bone and multiple muscle groups that change direction. Understanding this internal architecture before you start cutting prevents costly mistakes and ensures you extract maximum value from every muscle.
Bone Structure
- Hip bone (os coxae or aitch bone): The dominant bone in the sirloin primal. It is a large, flat, irregularly shaped bone that divides the primal into upper and lower sections. Removing it cleanly is the most challenging step in the breakdown and the key to accessing the subprimals beneath.
- Sacral vertebrae: The fused vertebrae at the back end of the spine, present at the backbone side of the primal. These connect to the hip bone and must be separated during initial breakdown.
- Femur head: The ball joint where the leg meets the hip. Depending on how the processor separated the sirloin from the round, you may see the socket where the femur head sat. This is a landmark for orientation.
Major Muscles — Top Sirloin
- Gluteus medius (top sirloin butt center): The largest and most valuable muscle in the sirloin. This thick, well-marbled muscle sits on top of the hip bone and produces the familiar top sirloin steaks sold at retail. It has moderate tenderness with excellent beefy flavor — one of the best value-to-quality ratios in the entire carcass.
- Biceps femoris cap (top sirloin cap / coulotte / picanha): A crescent-shaped muscle that sits on top of the gluteus medius, covered by a thick fat cap. This is the prized picanha of Brazilian churrascarias — intensely marbled, incredibly flavorful, and arguably the most underrated cut in American butchery. Can be grilled whole with the fat cap, sliced into steaks, or prepared churrasco-style on skewers.
- Gluteus accessorius and gluteus profundus: Smaller muscles adjacent to the gluteus medius. In many processing schemes these stay attached to the top sirloin butt. They are slightly tougher but still excellent for steaks when cut thin or used in stir-fry.
Major Muscles — Bottom Sirloin
- Tensor fasciae latae (tri-tip): A triangular muscle from the bottom sirloin, typically weighing 1.5 to 2.5 pounds. The tri-tip has become the signature cut of Central California BBQ and is now one of the most popular grilling cuts nationwide. Rich beefy flavor with moderate marbling and a distinctive grain pattern that changes direction across the muscle — requiring attention when slicing.
- Vastus lateralis (ball tip / sirloin tip): A large, round muscle from the lower portion of the sirloin. Makes excellent oven roasts and can be sliced into sirloin tip steaks. Lean but flavorful, best when not overcooked.
- Rectus abdominis (sirloin flap / bavette): A thin, heavily marbled flap of meat from the bottom of the sirloin. Similar in character to flank steak or skirt steak — deeply beefy, great for marinating and grilling hot and fast. Increasingly popular in restaurants under the name bavette.
Fat and Connective Tissue
- External fat cap: The sirloin carries a moderate fat cap, thickest over the top sirloin butt and the coulotte. Leave the fat cap on the coulotte — it is essential for proper cooking. Trim the remaining external fat to about a quarter inch for steaks.
- Intermuscular fat: Seams of fat and connective tissue run between the major muscle groups. These seams are your guides during breakdown — they mark the natural separation planes between muscles.
- Connective tissue: The hip area contains more connective tissue than most primals because it is a working, weight-bearing part of the animal. This tissue needs to be trimmed carefully from finished cuts.
Tools You Need
Breaking down a sirloin is more demanding than many primal breakdowns because of the hip bone. You need tools capable of both heavy bone work and precision muscle separation.
- Boning knife (6-inch, stiff): Your primary tool for working around the hip bone, separating muscles along seams, and removing connective tissue. A stiff blade gives better control than a flexible one when working against the irregular surfaces of the hip bone. The Victorinox Fibrox Pro 6-inch boning knife is the industry standard.
- Breaking knife or cimeter (10-12 inch): For trimming the exterior fat cap, making long cuts through large muscle groups, and portioning steaks from the finished subprimals.
- Bone saw (hand or band saw): Required for cutting through the sacral vertebrae and potentially the hip bone if you are not removing it whole. A hand bone saw works but requires effort. A band saw makes bone work significantly easier.
- Honing steel: The hip bone is hard and irregular, and your knife edges will need frequent realignment. Hone every few minutes during the bone removal phase.
- Large cutting board (24 x 36 inches minimum): A whole sirloin is a big piece of meat — often 20 or more inches long and 15 inches wide. Give yourself room to work.
- Kitchen scale: For consistent portioning of steaks and roasts from the finished subprimals.
- Sheet trays: For organizing finished cuts, trim, and bones as you work. Keeping organized prevents contamination and confusion.
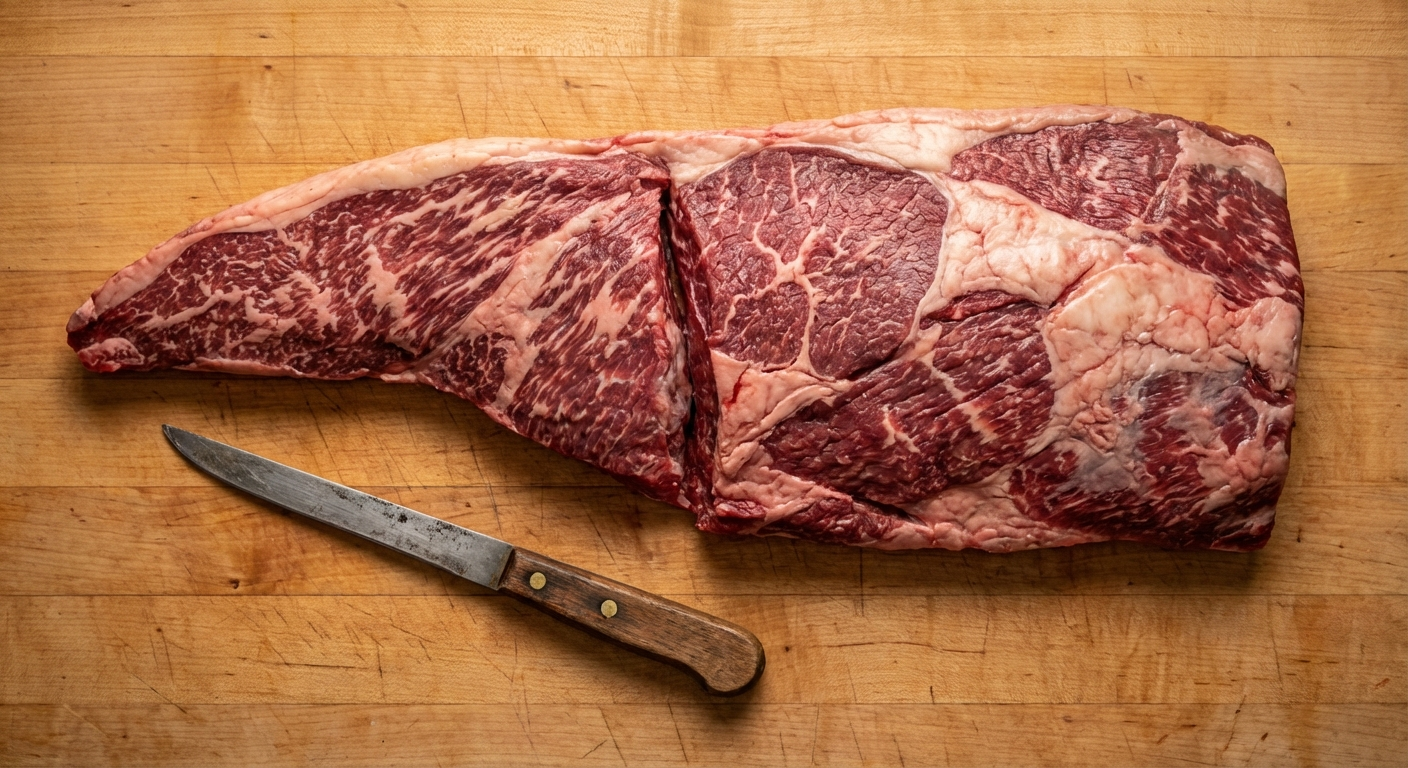
Step 1: Initial Assessment and Orientation
Before making any cuts, orient the sirloin on your cutting board and understand what you are looking at. Place the primal with the fat cap facing up and the bone side facing down. The thicker end is the loin end (where it was separated from the short loin), and the thinner, more irregular end is the round end (where it was separated from the round primal).
Identify these landmarks:
- Hip bone: Feel for the flat, hard bone beneath the meat on the underside. It extends from roughly the center toward the round end of the primal.
- Backbone attachment: At the top edge, look for the sacral vertebrae or the smooth surface where they were removed by the processor.
- Fat cap: The thickest fat coverage should be over the top of the primal, covering the coulotte and top sirloin butt.
- Tri-tip: Look at the bottom of the primal toward the round end — you should see a triangular muscle hanging below the hip bone.
Take a moment to feel the primal with your hands. Press to locate the bone edges beneath the muscle. This tactile assessment tells you where to cut and where to avoid cutting.
Step 2: Remove the Backbone (If Attached)
If the sacral vertebrae are still attached along the top edge of the primal, remove them first. This gives you a cleaner working surface for the rest of the breakdown.
- Position the primal with the backbone edge facing you.
- Using your bone saw, cut along the junction where the vertebrae meet the hip bone, following the contour of the bone.
- Once the saw cut is made, use your boning knife to cut through any remaining meat and connective tissue attaching the backbone to the primal.
- Set the backbone aside — it makes excellent stock bones.
If your processor already removed the backbone (common with boxed beef), skip this step and move directly to hip bone removal.
Step 3: Remove the Hip Bone
This is the most challenging and important step in the entire breakdown. The hip bone is large, irregularly shaped, and embedded deeply in the muscle. Removing it cleanly — without gouging the surrounding meat — is what separates experienced butchers from beginners.
- Flip the primal bone-side up so you can see the hip bone surface.
- Starting at the exposed edge of the hip bone, insert your boning knife between the bone and the meat.
- Keep the blade pressed flat against the bone surface at all times. This is the cardinal rule of boning — the bone is your guide. When in doubt, scrape bone, not meat.
- Work your way around the perimeter of the hip bone using short, controlled strokes. Follow every curve and contour of the bone. The hip bone has a deep socket (acetabulum) where the femur head sat — you will need to work your knife into this socket and around it.
- As you free more of the bone, lift it slightly with your non-knife hand to create visibility and tension. This makes it easier to see where meat is still attached.
- Continue until the entire hip bone lifts free from the surrounding muscle.
Expect this step to take 10 to 15 minutes on your first attempt. An experienced butcher can remove a hip bone in under 5 minutes. The key is patience — rushing leads to gouged meat and wasted product.
Set the hip bone aside for stock. There will be some meat left on it — this is normal and acceptable. You can scrape it off later for grinding if desired.
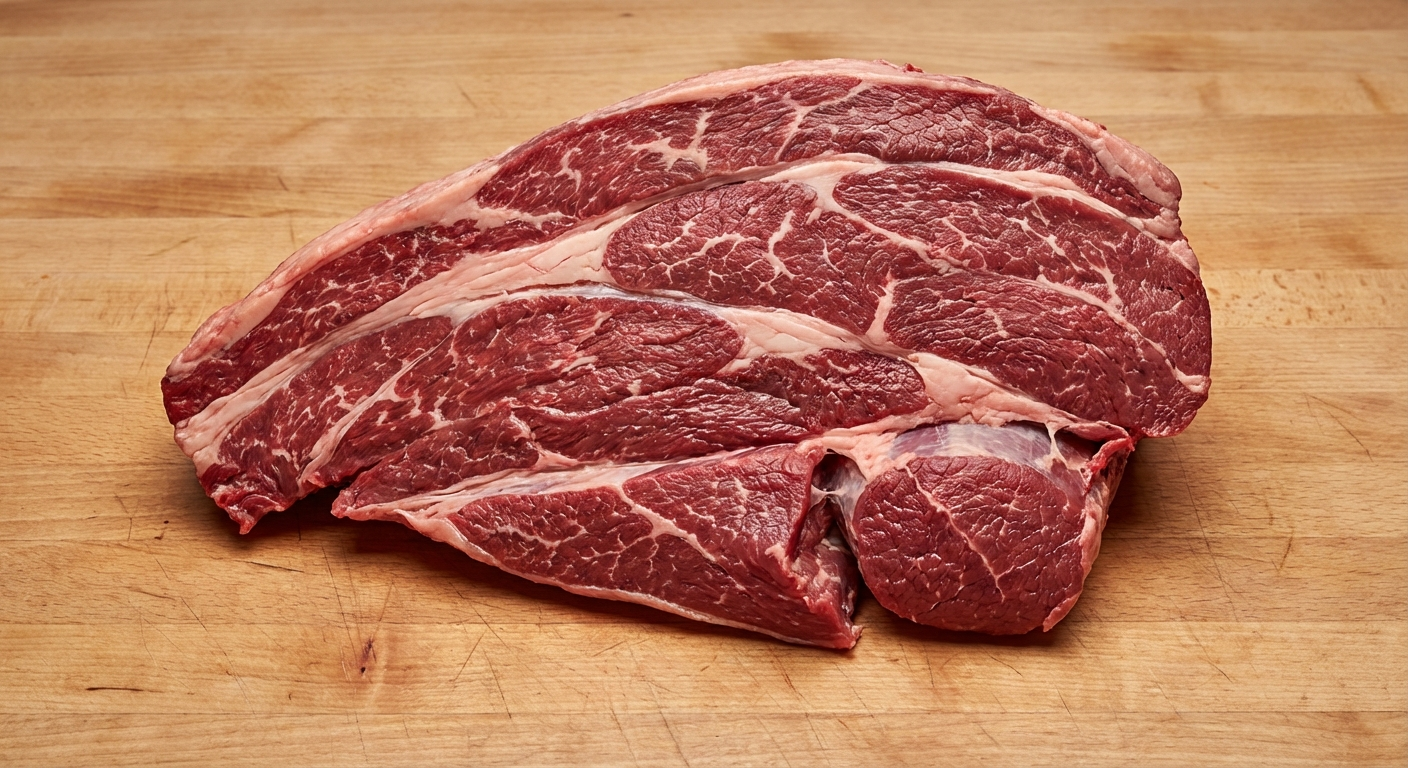
Step 4: Separate Top Sirloin from Bottom Sirloin
With the hip bone removed, you now have a boneless sirloin that naturally divides into two major sections: the top sirloin (upper portion) and the bottom sirloin (lower portion). A visible seam of fat and connective tissue marks the division between them.
- Flip the primal so the fat cap faces up again.
- Look for the natural seam that runs roughly horizontally through the primal, separating the top and bottom sections. This seam is usually visible as a line of fat and connective tissue.
- Using your boning knife, begin separating along this seam. Follow the fat and connective tissue — this is classic seam cutting technique. Let the natural separation guide your blade rather than forcing a straight line through muscle.
- Work from one end to the other, lifting and separating as you go.
You should now have two large boneless pieces: the top sirloin butt (the thicker, more valuable piece) and the bottom sirloin (containing the tri-tip, ball tip, and flap).
Step 5: Process the Top Sirloin
The top sirloin butt is the primary value center of the sirloin primal. From it, you will extract the coulotte cap and then portion the remaining butt into steaks.
Removing the Coulotte Cap (Picanha)
- With the top sirloin butt fat-side up, identify the crescent-shaped cap muscle sitting on top. It is separated from the main butt by a visible layer of fat and connective tissue.
- Starting at one end, slide your boning knife between the cap and the butt, following the natural seam of fat between them.
- Work carefully to separate the entire cap in one piece, keeping the external fat cap attached to the coulotte. The fat cap is essential — it bastes the meat during cooking and is the defining characteristic of proper picanha preparation.
- The finished coulotte should be a crescent-shaped piece weighing 2 to 4 pounds with an even fat cap on one side.
The coulotte can be left whole for roasting or grilling, or sliced into individual steaks perpendicular to the grain. For Brazilian churrasco preparation, it is cut into thick steaks, curved into a C-shape on skewers, and grilled over high heat with only coarse salt.
Portioning Top Sirloin Steaks
- With the coulotte removed, examine the remaining top sirloin butt. Trim any excessive fat or connective tissue from the surfaces, but leave a thin layer of fat for flavor.
- Identify the grain direction in the butt — you will cut steaks perpendicular to the grain.
- Using your breaking knife, portion steaks to your desired thickness. One-inch steaks (8 to 12 ounces) work well for grilling. One-and-a-half-inch steaks (12 to 16 ounces) are excellent for reverse searing.
- Weigh each steak for consistency if portioning for specific serving sizes.
Top sirloin steaks are versatile — they respond well to grilling, pan-searing, broiling, and sous vide. They have more flavor than tenderloin with significantly better value.
Step 6: Process the Bottom Sirloin
The bottom sirloin contains three distinct subprimals: the tri-tip, the ball tip, and the sirloin flap. Each has different characteristics and cooking applications.
Extracting the Tri-Tip
- The tri-tip is the triangular muscle at the bottom of the sirloin, toward the round end. It should be partially visible as a distinct, fan-shaped piece.
- Follow the natural seam between the tri-tip and the ball tip, using your boning knife to separate them. The seam is usually well-defined with visible fat and connective tissue.
- Remove the tri-tip in one piece. It should weigh 1.5 to 2.5 pounds and have a distinctive triangular shape with a fat cap on one side.
- Trim the silver skin from the non-fat side, but leave the fat cap intact — it adds flavor and moisture during cooking.
The tri-tip is one of the great grilling cuts. Season with salt and pepper (or Santa Maria seasoning for the traditional Central California preparation), grill over high heat to medium-rare, and slice against the grain. Note that the grain changes direction across the tri-tip — you may need to rotate the cut while slicing to stay perpendicular to the fibers.
Separating the Ball Tip
- With the tri-tip removed, the ball tip (vastus lateralis) is the large, round muscle remaining in the center of the bottom sirloin.
- Separate it from the surrounding muscles and connective tissue by following the natural seams.
- Trim any excessive connective tissue or silver skin from the exterior.
- The ball tip typically weighs 3 to 5 pounds and makes an excellent oven roast.
The ball tip can be roasted whole (season generously, sear on all sides, then roast at 325 degrees F until internal temperature reaches 130 degrees F for medium-rare), or sliced into steaks. Ball tip steaks are lean and best when not cooked past medium.
Recovering the Sirloin Flap (Bavette)
- The sirloin flap is the thin, heavily marbled piece of meat that runs along the bottom and outer edge of the bottom sirloin.
- It may have already partially separated during the previous steps. If not, follow the natural seams to free it from the ball tip and any remaining connective tissue.
- Trim the edges but do not over-trim — the marbling in the flap is what makes it so flavorful.
- The finished flap typically weighs 1 to 2 pounds.
The sirloin flap (bavette) is exceptional for marinating and grilling. Treat it like flank steak or skirt steak — grill hot and fast to medium-rare, rest briefly, and slice thin against the grain. It has become a favorite among chefs for its combination of intense beef flavor and reasonable price.
Step 7: Final Trimming and Organization
With all subprimals separated, give each piece a final inspection:
- Remove any remaining silver skin, blood spots, or excessive connective tissue.
- Trim fat caps to your preference — quarter-inch is standard for steaks, but leave thicker fat on the coulotte and tri-tip for cooking.
- Collect all trim pieces and categorize them: lean trim for grinding, fat trim for rendering, bones for stock.
- Weigh your finished cuts to calculate your yield percentage.
Yield Expectations
From a 45-pound bone-in whole sirloin, expect approximately:
- Top sirloin butt: 12 to 15 pounds (steaks and coulotte)
- Coulotte cap: 2 to 4 pounds
- Tri-tip: 1.5 to 2.5 pounds
- Ball tip: 3 to 5 pounds
- Sirloin flap: 1 to 2 pounds
- Bones: 8 to 10 pounds
- Fat and trim: 5 to 8 pounds
- Total usable retail cuts: 20 to 28 pounds (approximately 50 to 60 percent of starting weight)
The yield percentage is lower than some primals because of the large hip bone and significant connective tissue. However, the per-pound cost of the usable cuts remains well below retail pricing, making the whole sirloin an excellent value for home butchers.
Storage
For immediate use within 3 to 5 days, wrap cuts tightly in butcher paper and refrigerate at 34 to 38 degrees F. For longer storage, vacuum seal individual portions and freeze — properly sealed sirloin cuts maintain quality for 6 to 12 months in the freezer.
If you plan to dry age any of the sirloin subprimals, the top sirloin butt (before portioning into steaks) is your best candidate. Its size and fat coverage make it suitable for 21 to 35 day aging. The tri-tip and flap are too small for dry aging.
Cooking Recommendations by Cut
- Coulotte (picanha): Grill whole with fat cap scored, or slice into thick steaks and grill. Season with coarse salt only for traditional Brazilian preparation. Cook to medium-rare (130 degrees F internal).
- Top sirloin steaks: Grill, pan-sear, or reverse sear. Season with salt and pepper. One of the best value steaks for everyday grilling — more flavor than tenderloin at a fraction of the cost.
- Tri-tip: Grill over high heat or smoke low and slow. Santa Maria style is the classic preparation: oak wood fire, garlic salt, and pepper. Slice against the grain, rotating as the grain changes direction.
- Ball tip: Oven roast whole, or slice into steaks for grilling. Lean cut — do not overcook past medium. Benefits from trussing with twine for even shape when roasting.
- Sirloin flap (bavette): Marinate and grill hot and fast, or use for carne asada, stir-fry, or Korean BBQ applications. Slice very thin against the grain after cooking.
The sirloin primal rewards home butchers who take the time to learn its anatomy. Each subprimal has its own character and best-use application, and together they provide a diverse selection of cuts for weeks of meals. For premium sirloin and other whole subprimals ready for home butchery, explore The Meatery's selections.
Frequently Asked Questions
How much does a whole beef sirloin cost?
USDA Choice whole sirloins typically cost $5 to $9 per pound from wholesale suppliers, butcher shops, or warehouse clubs. A 45-pound bone-in sirloin runs roughly $225 to $405 total. The same cuts purchased individually at retail would cost $400 to $700, making the whole primal a significant savings.
How long does it take to break down a whole sirloin?
An experienced butcher can break down a whole sirloin in 25 to 35 minutes. A first-time home butcher should expect 45 minutes to an hour, including hip bone removal, subprimal separation, portioning, and cleanup. The hip bone removal is the most time-consuming step and gets significantly faster with practice.
What is the hardest part of breaking down a sirloin?
Removing the hip bone cleanly. The hip bone is large, irregularly shaped, and deeply embedded in the surrounding muscle. The key technique is keeping your boning knife pressed flat against the bone surface at all times, using the bone as a guide rather than cutting blindly through muscle.
What is the difference between top sirloin and bottom sirloin?
The top sirloin sits above the hip bone and contains the gluteus medius (top sirloin steaks) and the coulotte cap (picanha). It is more tender and valuable. The bottom sirloin sits below and contains the tri-tip, ball tip, and sirloin flap. Bottom sirloin cuts tend to be slightly tougher but have excellent flavor.
Can I break down a sirloin without a bone saw?
If you purchase a boneless sirloin (hip bone already removed by the processor), you need only knives. For a bone-in sirloin, you can remove the hip bone entirely with just a boning knife by cutting around it, but a bone saw is needed if any vertebrae are still attached. The boneless option is recommended for beginners.
More Expert Guides
How to Trim a Brisket: The Complete Butcher's Guide
Proper brisket trimming is the difference between a backyard experiment and competition-quality results. Here is the professional technique for shaping a whole packer brisket before it ever touches the smoker.
14 min readHow to Butcher a Whole Chicken: Step-by-Step Guide
Breaking down a whole chicken yourself saves 40-50% compared to buying individual parts. Here is the professional technique for turning one bird into perfectly portioned pieces.
14 min readHome Butchering Safety Guide: Essential Protocols for Safe Meat Processing
Learn professional butchering safety protocols from a master butcher with 25+ years of experience. Essential guidance for anyone processing meat at home.