How to Tie a Roast: Butcher's Knots and Trussing Techniques
How to Tie a Roast: Butcher's Knots and Trussing Techniques
Every professional butcher ties dozens of roasts a day without thinking about it. The technique is automatic — a few loops of twine, a slip knot cinched tight, and an irregularly shaped piece of meat becomes a uniform cylinder that cooks evenly from edge to center. It is one of the first skills taught in any butcher apprenticeship, and it is one of the most useful techniques a home cook can learn.
Tying a roast is not about aesthetics, although a well-trussed roast does look impressive. The real purpose is thermal management. An untied roast has thin edges and thick centers, flaps that hang off at odd angles, and surfaces that curl away from heat. Tying compresses the meat into a consistent shape so that every part reaches your target internal temperature at roughly the same time. The result is edge-to-edge doneness instead of an overcooked exterior surrounding a raw center.
This guide covers the fundamental butcher's knot, the three main trussing methods, and which technique works best for every common roast — from a beef tenderloin to a bone-in pork loin to a stuffed and rolled lamb shoulder.
Why Tying a Roast Matters
Three things happen when you tie a roast properly:
- Uniform shape: Compression turns irregular cuts into cylinders or ovals. A 3-inch-thick center and a 1-inch-thick edge become a consistent 2.5-inch cylinder throughout. This means the entire roast hits 130°F (medium-rare) within minutes of itself rather than having the edges at 160°F while the center is still at 115°F.
- Structural integrity: Tied roasts hold together during searing, turning, and resting. Without twine, stuffed roasts open up, deboned roasts unfold, and rolled cuts unravel — all of which expose interior surfaces to direct heat and cause uneven cooking.
- Better browning: A compact shape maximizes contact with the pan or grill grate. Loose flaps create air pockets that steam instead of sear. A tied roast browns uniformly because every surface sits flush against the cooking surface during rotation.
The difference is most dramatic with irregular cuts. A whole beef tenderloin tapers from 4 inches at the butt end to barely an inch at the tail. Without tying, the tail overcooks to well-done while the butt is still rare. Folding and tying the tail under creates consistent thickness and eliminates the problem entirely.
Equipment You Need
Tying a roast requires exactly two things: butcher's twine and a pair of scissors. That is the entire equipment list.
Butcher's Twine
Use 100 percent cotton butcher's twine, also sold as kitchen twine or cooking string. Cotton is the only acceptable material because it withstands oven temperatures up to 500°F without melting, burning, or releasing chemicals. Never use synthetic twine, jute, hemp, or any string not specifically labeled food-safe and oven-safe.
Buy a full roll — you will go through more than you expect. A single roast requires 3 to 6 feet of twine depending on size and method. The 500-foot rolls sold at restaurant supply stores cost the same as the 75-foot rolls at grocery stores. Stock your workspace properly and you will not run out mid-tie.
Scissors
Kitchen shears or any sharp scissors work fine. You need them to cut twine cleanly. Dull scissors crush and fray the twine, making it harder to thread and tie. Keep a dedicated pair at your cutting station.
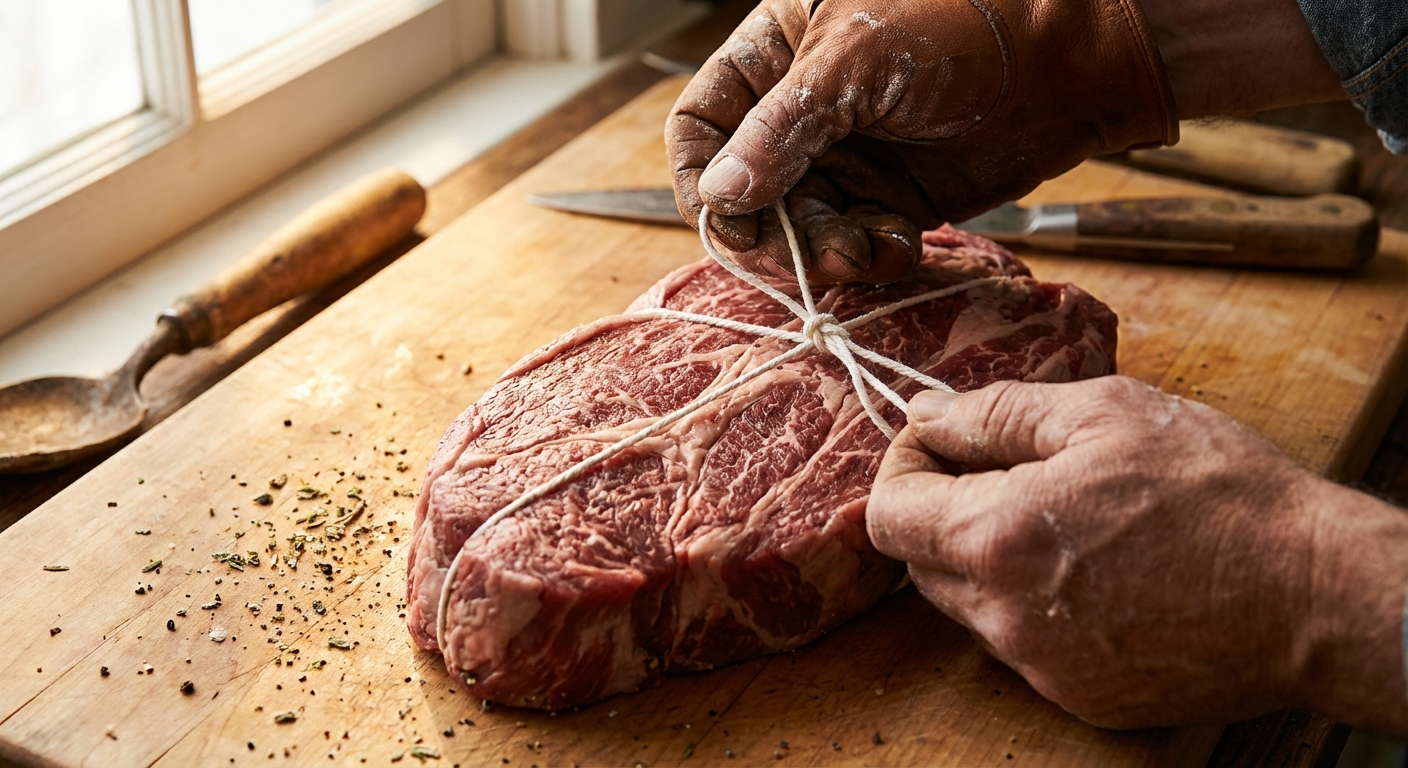
The Butcher's Knot: Foundation of Every Tie
Every trussing method starts with the butcher's knot. This is a slip knot that you can cinch tight with one hand while holding tension with the other. It locks under load, meaning the harder you pull, the tighter it grips. Once you learn this knot, you can tie any roast using any method.
Step-by-Step: Tying the Butcher's Knot
- Cut your twine. Pull about 24 inches for a single tie, or leave the roll attached if you are doing a continuous tie (more on that below).
- Slide the twine under the roast at your starting point. Position it roughly at the center, perpendicular to the length of the meat.
- Cross the ends. Bring both ends up and cross the right end over the left, just like starting to tie your shoes.
- Loop and lock. Take the end that is now on the left and wrap it around the right strand twice. This double wrap is what creates the slip mechanism — it allows the knot to slide and tighten but prevents it from loosening.
- Pull to cinch. Hold the short tail steady and pull the long end away from the roast. The knot slides down and compresses the meat. Pull firmly — the twine should indent the surface slightly without cutting into the meat.
- Lock it. Tie a simple overhand knot (half hitch) on top of the slip knot to prevent it from releasing. Trim the tails to about an inch.
Practice this knot ten times on a rolled-up towel before you move to meat. By the fifth attempt, the motion becomes fluid. By the tenth, it is automatic. Professional butchers tie this knot in under three seconds because they have done it thousands of times — muscle memory is the only shortcut.
Three Trussing Methods Every Butcher Uses
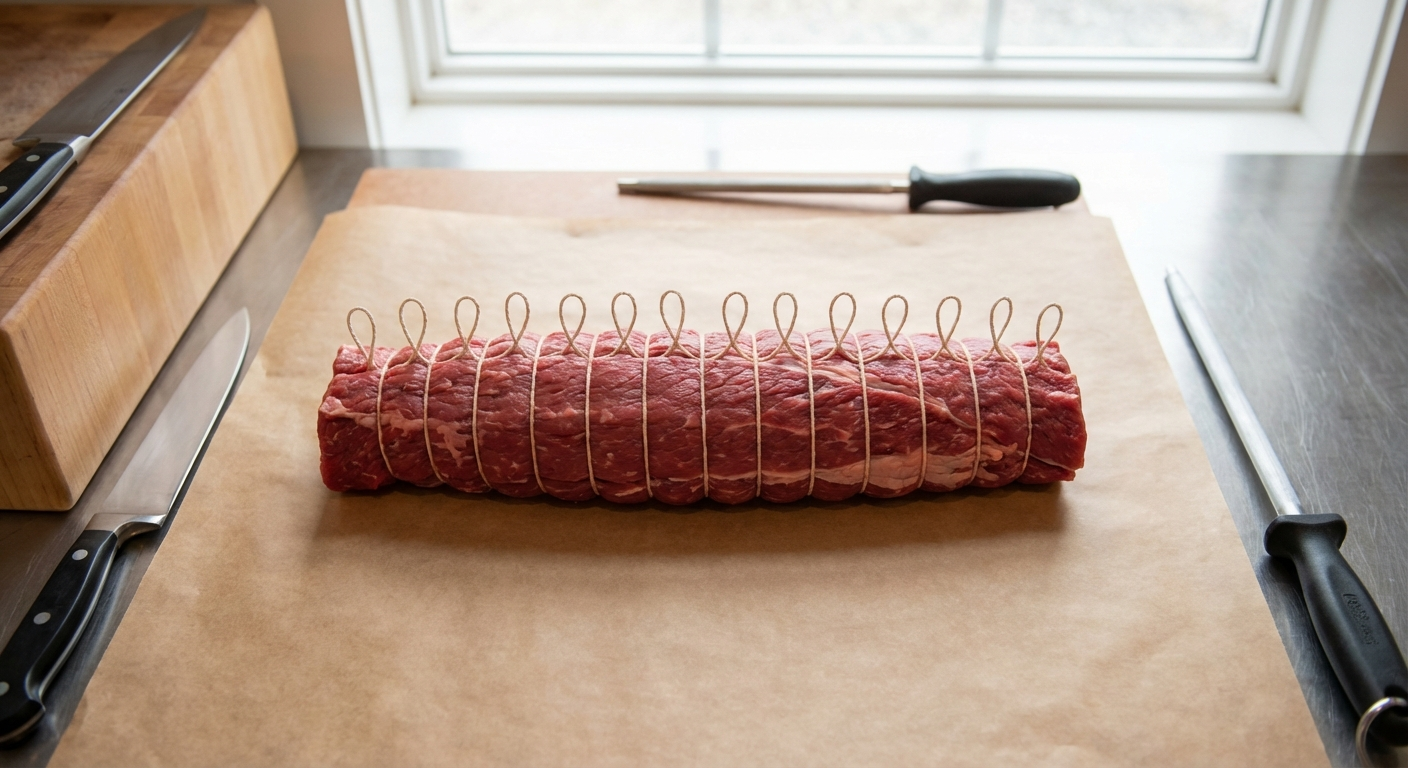
Method 1: Individual Loop Ties
This is the most common method and the one to learn first. You tie separate butcher's knots at regular intervals along the length of the roast. Each tie is independent — if one comes loose, the rest still hold.
Best for: Beef tenderloin, pork loin, boneless rib roast, any cylindrical cut
How to do it:
- Start at one end of the roast. Slide twine under, tie a butcher's knot, cinch tight, and lock with a half hitch.
- Move one to one-and-a-half inches toward the other end. Repeat.
- Continue until you reach the opposite end. A 12-inch roast typically needs 8 to 10 ties.
- Trim all tails to about one inch.
The key to individual loops is consistent spacing and consistent tension. Every tie should compress the meat to the same diameter. If one section bulges between ties, the spacing is too wide or the tension is too loose. Aim for one-inch intervals on smaller roasts (under 3 pounds) and one-and-a-half-inch intervals on larger ones.
Method 2: Continuous Spiral Tie
The continuous tie uses a single length of twine that spirals down the roast without cutting between loops. It is faster than individual ties once you get the rhythm, and it produces a very clean, professional look. The drawback is that if the twine breaks at any point, the entire tie can loosen.
Best for: Boneless roasts, rolled and stuffed cuts, any roast over 4 pounds
How to do it:
- Leave the twine on the roll. Tie your first butcher's knot at one end of the roast.
- Run the twine lengthwise along the top of the roast about one and a half inches, then loop it under and back over. Slip the twine under the lengthwise strand on top and pull to cinch. This creates a loop that locks against the previous one.
- Repeat this loop-and-cinch motion down the entire length of the roast.
- When you reach the far end, flip the roast over and run the twine straight back to the starting knot along the bottom. Tie off to the original knot.
The continuous method requires more practice than individual ties. The tension must stay consistent throughout — if you lose tension between loops, the entire spiral loosens. Keep the twine taut at all times and cinch each loop before moving to the next.
Method 3: Netting Tie (Butcher's Cage)
The netting tie adds crosswise and lengthwise runs to create a cage around the roast. It provides the most compression and structural support, making it ideal for irregularly shaped cuts or roasts that need significant reshaping.
Best for: Stuffed and rolled roasts, irregular shapes, bone-in roasts that need stabilizing
How to do it:
- Tie individual loops at one-inch intervals down the length of the roast.
- Run a separate piece of twine lengthwise, threading it under each crosswise loop on the top of the roast. Tie off at both ends.
- Flip the roast and repeat the lengthwise run on the bottom.
- The result is a grid pattern that holds the roast in a consistent shape from every direction.
You will rarely need the full netting method for simple roasts. It is primarily used for deboned and rolled cuts where the meat would otherwise unfurl, or for deboned legs of lamb that need to be compressed into a tight cylinder.
Which Cuts Need Tying and Which Method to Use
Not every roast needs tying. Bone-in cuts with a natural uniform shape — like a standing rib roast or a rack of lamb — often cook perfectly without twine because the bones provide structure. Here is a practical breakdown:
Always Tie
- Beef tenderloin (whole): Individual loops, 1-inch spacing. Fold the thin tail under itself and tie it in place to create uniform thickness. This is the most important cut to tie — an untied tenderloin is almost impossible to cook evenly.
- Boneless pork loin: Individual loops or continuous spiral. Without the bone, a pork loin flattens and fans out during cooking. Tying maintains a round cross-section.
- Stuffed and rolled anything: Continuous spiral or netting tie. The twine is the only thing preventing your stuffing from becoming a casualty. Tie at one-inch intervals minimum.
- Deboned leg of lamb: Netting tie recommended. The complex muscle structure of a deboned lamb leg wants to open in multiple directions. A cage keeps everything compressed.
Should Tie
- Boneless ribeye roast: Individual loops. Not strictly necessary if the roast is very uniform, but tying prevents the spinalis (cap) from peeling away during cooking.
- Chuck roast: One or two ties to hold together during braising. Not critical, but prevents the roast from falling apart before it has finished cooking through.
- Pork shoulder (boneless): Individual loops. Keeps the irregular shape manageable and promotes even cooking.
Usually Skip
- Standing rib roast (bone-in): The rib bones are a natural rack. No tying needed unless the butcher has cut the bones away and tied them back on (common in high-end shops for easier carving).
- Rack of lamb: Bone structure holds everything in place.
- Bone-in pork loin: The chine bone and rib bones maintain shape.
- Brisket: The flat shape is the point. Tying would compress it and interfere with bark formation during smoking.
Common Mistakes and How to Fix Them
Tying Too Tight
The twine should indent the surface of the meat slightly but not cut into it. Over-tightened ties squeeze juices out of the meat, create unsightly grooves in the finished roast, and can actually cause the meat to bulge between ties — the opposite of the uniform shape you want. Think of it like a firm handshake, not a death grip.
Tying Too Loose
Loose ties defeat the entire purpose. If you can slide a finger under the twine easily, it is too loose. The roast will cook unevenly and the twine may slide off entirely during cooking as the meat shrinks. Err on the side of slightly tight — meat contracts during cooking, so ties that feel snug when raw will feel looser once the roast has been in the oven for thirty minutes.
Uneven Spacing
Irregular spacing creates irregular compression. Some sections will be thicker than others, and you are right back to uneven cooking. Use visual markers: place the roast on a cutting board and eyeball even intervals before you start tying. With practice, consistent spacing becomes instinctive.
Using the Wrong Twine
This bears repeating because the consequences are severe. Synthetic twine melts and can release harmful chemicals into your food. Dyed or treated twine can leach color and flavors. Only use plain white or natural cotton butcher's twine rated for cooking. If the packaging does not say oven-safe or food-safe, do not use it.
When to Remove the Twine
Remove the twine after resting and before carving. The resting period is critical — if you remove twine from a roast straight out of the oven, the meat will relax and spread before the juices have redistributed. Let the roast rest for 15 to 20 minutes (small roasts) or 30 to 45 minutes (large roasts) with the twine still on.
To remove, simply snip each tie with scissors and pull the twine away. If some twine has embedded into a crust or bark, slide the tip of a knife under it to free it before pulling. Never yank embedded twine — you will tear the surface of the meat.
For stuffed roasts, be especially careful during removal. Cut each tie individually and check that the stuffing stays in place. If the roast is properly rested and the stuffing has set, the meat will hold its shape without the twine. If the stuffing is very loose, carve the roast with the twine still on and remove it from individual slices.
Frequently Asked Questions
Frequently Asked Questions
What kind of string do you use to tie a roast?
Use 100 percent cotton butcher's twine, also called kitchen twine or cooking string. It is heat-resistant to 500°F, food-safe, and will not melt or release chemicals during cooking. Never use synthetic string, jute, or hemp.
How far apart should ties be on a roast?
Space ties one inch apart for small roasts (under 3 pounds) and one and a half inches apart for larger roasts. Consistent spacing is more important than exact measurements — the goal is uniform compression throughout the entire length.
Do you remove twine before or after resting?
After resting. Leave the twine on during the full rest period (15-45 minutes depending on size) so the roast holds its shape while juices redistribute. Remove just before carving by snipping each tie with scissors.
Can you tie a roast with regular string?
No. Regular string, yarn, or synthetic twine can melt, burn, or release harmful chemicals at cooking temperatures. Only use cotton butcher's twine that is specifically labeled food-safe and oven-safe.
Is it necessary to tie a beef tenderloin?
Yes. A whole beef tenderloin tapers dramatically from butt to tail. Without tying, the thin end overcooks while the thick end stays undercooked. Folding the tail under and tying at one-inch intervals creates uniform thickness for even cooking.
More Expert Guides
How to Trim a Brisket: The Complete Butcher's Guide
Proper brisket trimming is the difference between a backyard experiment and competition-quality results. Here is the professional technique for shaping a whole packer brisket before it ever touches the smoker.
14 min readHow to Butcher a Whole Chicken: Step-by-Step Guide
Breaking down a whole chicken yourself saves 40-50% compared to buying individual parts. Here is the professional technique for turning one bird into perfectly portioned pieces.
14 min readHome Butchering Safety Guide: Essential Protocols for Safe Meat Processing
Learn professional butchering safety protocols from a master butcher with 25+ years of experience. Essential guidance for anyone processing meat at home.