How to Set Up a Home Butcher Shop: Complete Space, Equipment & Workflow Guide
How to Set Up a Home Butcher Shop
Whether you are processing a side of beef, breaking down whole animals from your farm, or simply want to cut your own steaks from sub-primals, a dedicated butcher shop space transforms meat processing from a cramped kitchen struggle into efficient, professional-quality work. You do not need a massive commercial setup — a corner of a garage, basement, or outbuilding can become a highly functional butchering workspace with the right planning.
This guide covers everything from space requirements and essential equipment to workflow design and safety protocols. By the end, you will know exactly what you need to set up a home butcher shop that handles everything from breaking primals to vacuum-sealing finished cuts.
Space Requirements and Location
The first decision is where to locate your butcher shop. The ideal space balances accessibility, temperature control, and sanitation requirements.
Minimum Space Needs
For occasional processing of sub-primals and smaller animals, you can work effectively in as little as 6 × 8 feet (48 square feet). This accommodates a butcher block table, tool storage, and a grinder station. For processing larger animals or higher volumes, aim for 10 × 12 feet (120 square feet) or more. This allows multiple work zones, hanging space, and room to move comfortably with long knives and bulky cuts.
Location Considerations
- Temperature control: Ideal meat processing happens between 34-40°F. A climate-controlled garage, basement corner, or insulated outbuilding works well. If your space lacks built-in cooling, you will need supplemental refrigeration or plan to process during cooler months.
- Water access: Hot and cold running water is essential for cleaning tools, sanitizing surfaces, and maintaining hygiene. A dedicated sink or hose connection saves countless trips to the house.
- Drainage: Processing meat produces blood, fat, and liquid trimmings. A floor drain connected to your septic or sewer system makes cleanup vastly easier than mopping into buckets.
- Power supply: You will need 120V outlets for grinders, vacuum sealers, and lights. If you plan to add a walk-in cooler or chest freezer, verify your electrical panel can handle the load.
- Proximity to main freezer: Minimize the distance between your processing area and your freezer storage. Carrying 50 lbs of wrapped cuts across your yard in summer heat is a recipe for quality loss.
Flooring and Walls
Concrete floors are ideal — durable, easy to clean, and resistant to moisture. Seal the concrete with an epoxy coating to prevent staining and make sanitizing easier. Avoid carpet, wood, or any porous surface that can harbor bacteria.
For walls, use semi-gloss or high-gloss paint on drywall, FRP (fiberglass reinforced panels), or stainless steel sheets in high-splash zones. The goal is a surface that wipes clean and resists mold in a cold, damp environment.
Essential Equipment: The Core Setup
Start with the fundamentals. You can always add specialty tools later, but these pieces form the backbone of any home butcher operation.
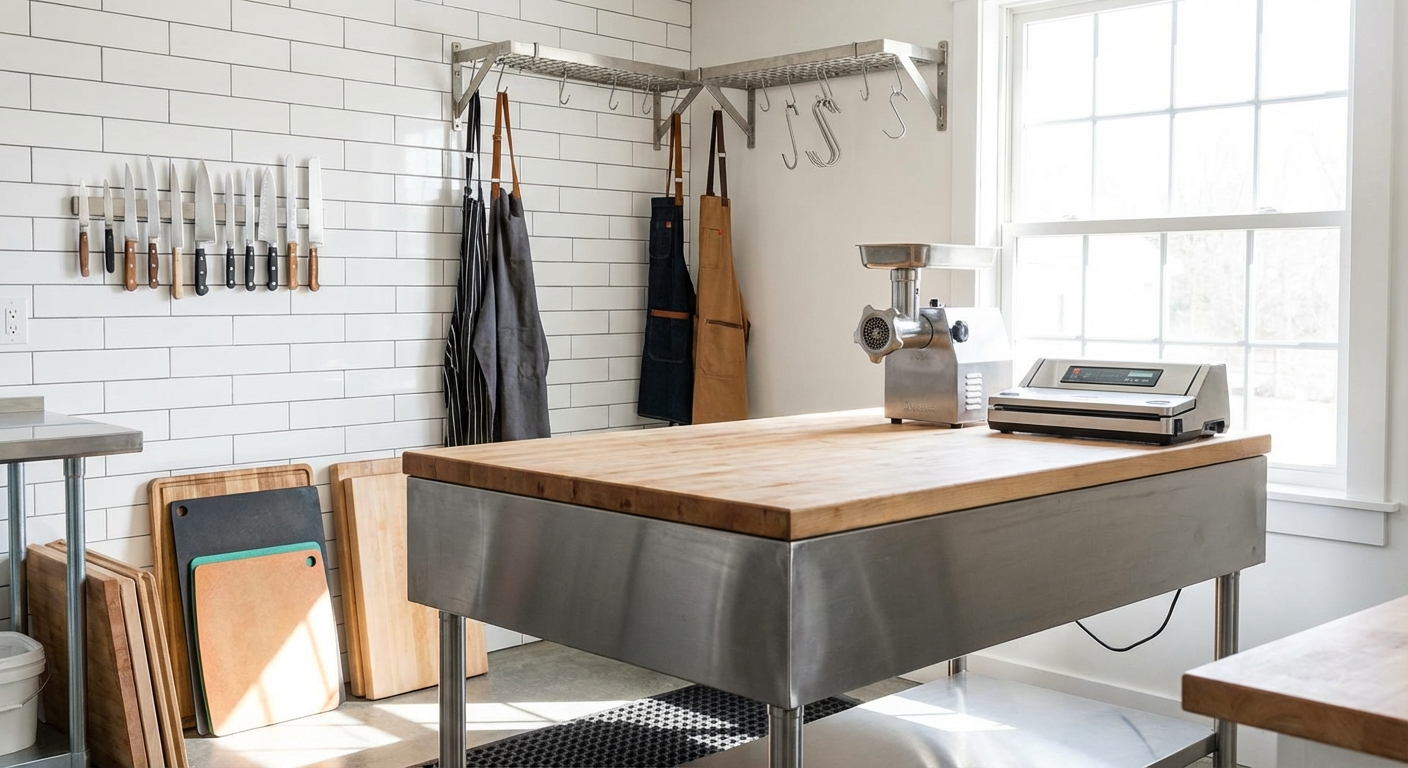
Work Surface
A solid butcher block or stainless steel table (minimum 24 × 36 inches, ideally 30 × 48 inches or larger) gives you the surface area and stability for breaking primals, portioning steaks, and trimming. Look for tables with a slight edge lip to catch liquids. Height should put the work surface at your waist — typically 34-36 inches for most people.
Butcher block (hard maple) is traditional, forgiving on knife edges, and repairable by sanding. Stainless steel is easier to sanitize and does not absorb odors. Both work well — choose based on budget and preference.
Knives and Cutting Tools
You need three knives minimum:
- Breaking knife (8-10 inch cimeter): For separating primals, slicing through thick muscles, and portioning large roasts
- Boning knife (5-6 inch, flexible or semi-flex): For removing silverskin, navigating around bones, and detail work
- Butcher's saw: For cutting through bone — ribs, chine bones, shanks. A manual hand saw (16-20 inch blade) is sufficient for most home processing
Add a honing steel (12 inch minimum) and a sharpening system (whetstone, diamond stones, or a quality pull-through sharpener). Dull knives are dangerous — plan to hone every 10-15 minutes during heavy use and sharpen weekly.
For a deeper dive into knife selection and maintenance, see our guides on butcher knife types and how to sharpen butcher knives.
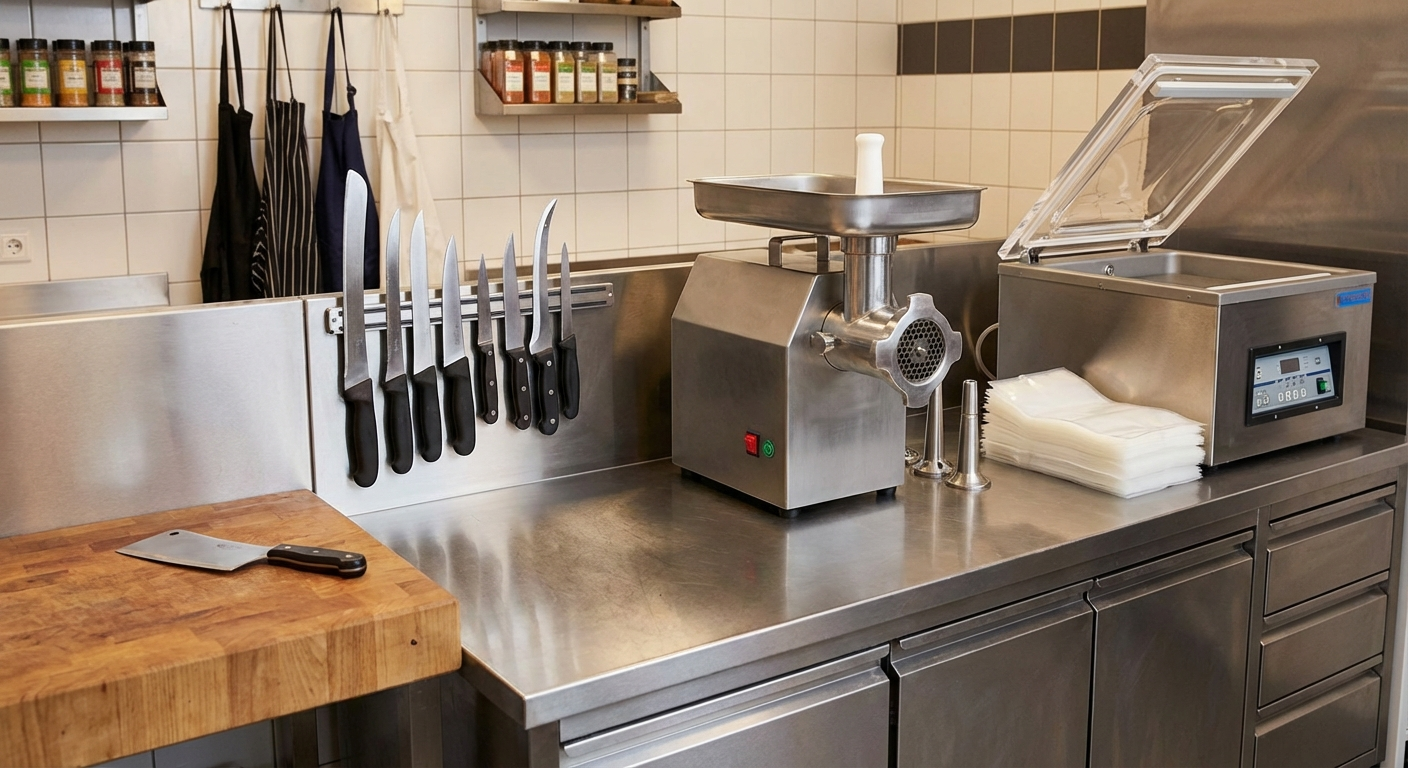
Meat Grinder
A quality meat grinder (electric, 1/2 to 1 HP motor) is essential for turning trim into ground meat and sausage. Look for models with stainless steel or tinned steel grinding parts, multiple plate sizes (coarse, medium, fine), and the ability to grind at least 5-10 lbs per minute. Brands like LEM, Weston, and STX deliver reliable performance at the home-processing scale.
Always grind cold meat (35-38°F) and partially freeze it (30 minutes in the freezer) before grinding. This produces clean texture and prevents smearing. For more details, check out how to grind meat at home.
Vacuum Sealer
Vacuum sealing extends freezer life 3-5× compared to butcher paper or plastic wrap, prevents freezer burn, and keeps your cuts organized. Look for a chamber-style sealer (like VacMaster) if you process high volumes, or a quality external-suction model (FoodSaver, Weston) for occasional use.
Budget $200-$600 for a good home unit. Buy bags in bulk rolls and cut to size — far cheaper than pre-made bags.
Hanging System
Hanging primals and quarters allows gravity to assist with breaking, keeps cuts off the work surface, and improves air circulation during resting periods. Install a ceiling-mounted rail or heavy-duty wall hooks rated for at least 200 lbs. Use S-hooks or gambrels (the spreader bars used for hanging deer) to suspend meat.
If you process whole animals regularly, a gambrel set (two hooks with a spreader bar) makes hanging and positioning far easier than single hooks.
Secondary Equipment: Expanding Capabilities
Once your core setup is running, these tools add efficiency and open new possibilities.
Meat Tenderizer / Cuber
Mechanical tenderizers with blade or needle rollers break down tough muscle fibers in cuts like top round and bottom round, transforming them into tender minute steaks and cube steaks. Hand-crank models work fine for occasional use; electric units handle higher volumes.
Sausage Stuffer
While many grinders include a sausage-stuffing attachment, a dedicated vertical stuffer (3-5 lb capacity) produces tighter, more consistent sausages with fewer air pockets. Worth the investment if you make sausage regularly. See how to make sausage at home for techniques and recipes.
Band Saw
A meat band saw (10-14 inch models from Weston, LEM, or Hobart) cuts through frozen meat, bone-in roasts, and thick steaks with ease. It is faster and cleaner than a hand saw for high-volume cutting. Overkill for occasional users, but invaluable if you process multiple animals per year.
Scale
A digital scale (10-20 lb capacity, accurate to 0.1 oz) ensures consistent portioning, accurate labeling, and precise recipe formulations for sausage and cured meats. Look for models with stainless steel platforms that tolerate moisture.
Additional Refrigeration
A dedicated refrigerator or chest freezer adjacent to your work area holds partially processed cuts, aging meat, or finished packages awaiting final freezer storage. A small upright fridge (5-7 cubic feet) is sufficient for most home operations.
Safety Equipment and Sanitation
Meat processing involves sharp tools, heavy cuts, and biological hazards. Proper safety gear and sanitation protocols are non-negotiable.
Personal Protective Equipment
- Cut-resistant gloves: Wear on your non-knife hand when boning or trimming. Look for ANSI Level 4 or 5 protection (Kevlar or Dyneema fiber).
- Waterproof apron: Rubber or heavy-duty vinyl protects your clothing and provides a barrier against contamination.
- Non-slip boots or shoes: Floors become slippery fast. Closed-toe footwear with good tread prevents slips and protects toes from dropped knives or heavy cuts.
Sanitation Supplies
- Sanitizing solution: A spray bottle of diluted bleach (1 tablespoon per gallon of water) or commercial food-safe sanitizer (quaternary ammonium or iodine-based) for wiping down surfaces between cuts.
- Hot soapy water: For initial cleaning of tools and surfaces. Use dish soap formulated for cutting grease.
- Paper towels and rags: Keep a roll of paper towels and a stack of clean rags on hand. Rags go in the wash; paper towels handle quick messes.
- Trash and trim bins: Separate bins for trash (packaging, bloodshot meat, bone fragments) and usable trim (grinding, stock bones, fat rendering). Line bins with heavy-duty trash bags for easy disposal.
For a full breakdown of sanitation protocols and food safety practices, read our home butchering safety guide.
Fire Extinguisher
Keep a kitchen-rated fire extinguisher (Class K or multi-purpose ABC) within reach. Grinder motors, electrical equipment, and propane torches (for singeing poultry) all present fire risks.
Workflow Design: Creating Efficient Zones
Even in a small space, organizing your shop into dedicated zones streamlines the process and reduces cross-contamination.
Zone 1: Receiving and Hanging
This is where whole animals or large primals arrive. Ideally located near your entrance or garage door for easy unloading. Hanging hooks or a rail allows cuts to rest and drain before processing. Keep a scale here to record incoming weights.
Zone 2: Breaking and Fabrication
Your primary work table goes here. This is where you separate primals, portion steaks, trim roasts, and perform detail knife work. Position your tool rack (knives, saw, honing steel) within arm's reach. A small trash bin for trim scraps should be immediately adjacent — you do not want to walk across the shop with a handful of fat every 30 seconds.
Zone 3: Grinding and Processing
Set up your grinder, cuber, and sausage stuffer in a separate area (even if it is just the opposite end of your table). This keeps ground meat production isolated from primal breaking, reducing contamination risks and keeping your main work surface clear.
Zone 4: Packaging and Labeling
Your vacuum sealer, scale, labels, and markers live here. This is the final station before cuts go to the freezer. Keep finished packages in a bin or cooler until you are ready to transfer them to long-term storage.
Zone 5: Cleaning and Sanitation
Designate an area (ideally with a sink) for washing knives, sanitizing cutting boards, and cleaning equipment. This zone should be physically separate from active processing to avoid contaminating tools with raw meat.
Storage Solutions
Processing meat is only half the job — you also need to store it properly.
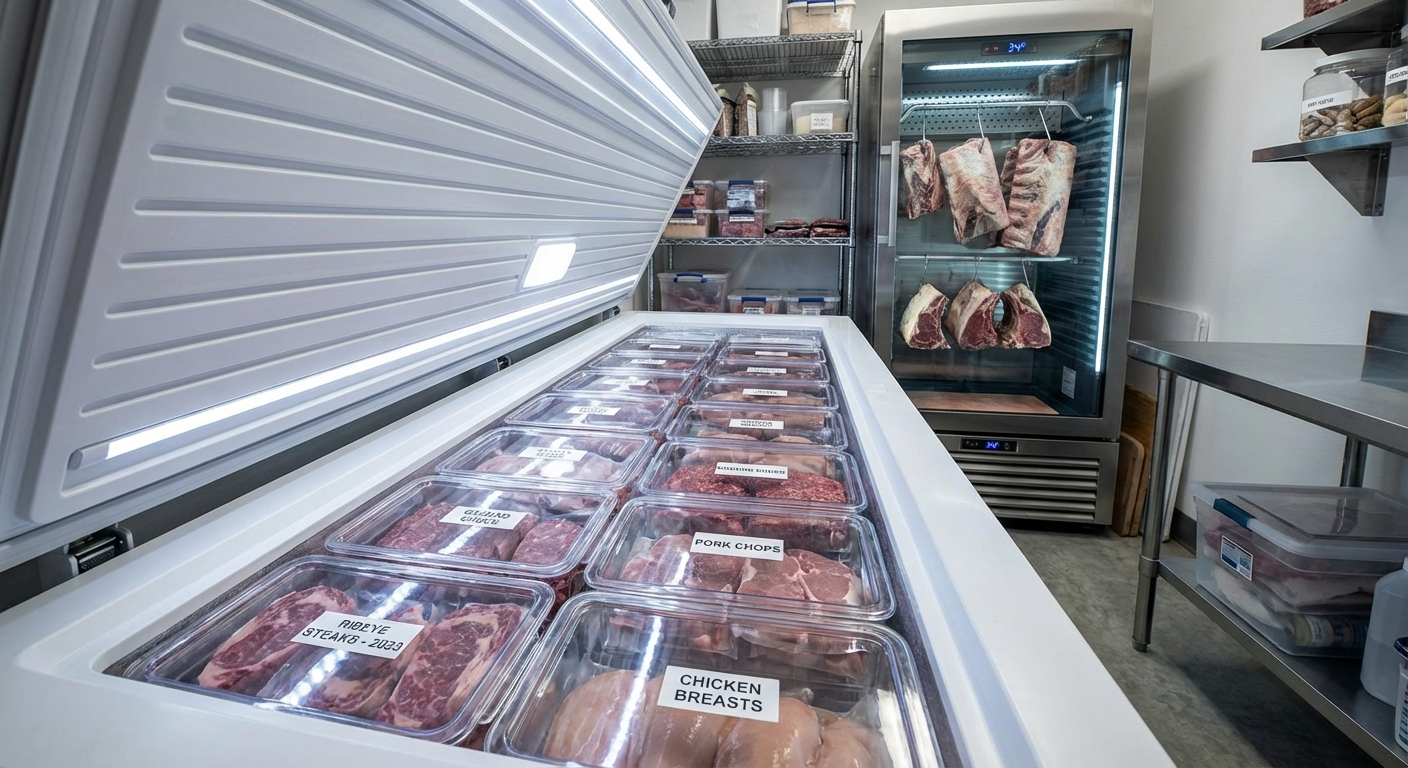
Freezer Space
A side of beef yields 200-300 lbs of retail cuts. A hog yields 100-150 lbs. A chest freezer (10-15 cubic feet minimum) is essential for serious home processors. Chest freezers are more energy-efficient and maintain more stable temperatures than uprights.
Organize by cut type (steaks, roasts, ground, bones) and date. Use plastic bins or wire baskets to prevent cuts from getting buried at the bottom.
Dry-Aging Space (Optional)
If you want to dry-age beef at home, you need a dedicated refrigerator or temperature-controlled cooler maintained at 34-38°F with 80-85% humidity. A small wine fridge or beverage cooler with a humidity tray works well. Dry-aging requires 21-45 days and produces 15-25% weight loss, so plan accordingly. For full instructions, see how to dry age beef at home.
Tool Storage
Mount a magnetic knife strip or install a wall-mounted knife rack for your primary blades. Keep them accessible, visible, and protected from damage. Store your saw, honing steel, and cut-resistant gloves on hooks or in a dedicated drawer. Grinder plates, sausage tubes, and vacuum sealer accessories go in labeled bins or drawers.
Establishing Standard Operating Procedures
Consistency is the mark of a professional operation. Develop a routine and stick to it.
Pre-Processing Checklist
- Sanitize all work surfaces and tools
- Sharpen and hone knives
- Set up trim bins and trash bags
- Ensure meat is at proper temperature (34-40°F for breaking, 30-35°F for grinding)
- Lay out necessary tools within reach
During Processing
- Hone knives every 10-15 minutes
- Wipe down work surface with sanitizer between different cuts
- Keep trim separated by intended use (grinding, stew, stock, discard)
- Label cuts immediately after portioning (cut type, weight, date)
Post-Processing Cleanup
- Wash all knives and tools with hot soapy water, rinse, sanitize, and air dry
- Disassemble and clean grinder (remove all meat particles from plates and auger)
- Wipe down all surfaces with sanitizer
- Empty trash and trim bins
- Sweep and mop floor
- Check freezer inventory and rotate stock (first in, first out)
Budget Planning: What Does It Cost?
Building a functional home butcher shop ranges from $1,500 (basic setup) to $10,000+ (fully equipped commercial-grade operation). Here is a realistic breakdown for a mid-tier setup that handles everything from breaking primals to sausage-making.
Budget-Friendly Setup ($1,500-$2,500)
- Butcher block table (30 × 48 inches): $400
- Knife set (breaking knife, boning knife, honing steel): $200
- Manual meat saw: $75
- Electric grinder (1/2 HP): $250
- External vacuum sealer + bags: $150
- Wall-mounted hooks and gambrel: $100
- Cut-resistant gloves, apron, boots: $100
- Sanitizing supplies and bins: $50
- Chest freezer (10 cu ft, used): $200
- Miscellaneous (scale, labels, trim bins): $100
Total: ~$1,625
Mid-Tier Setup ($3,000-$5,000)
Upgrade to a stainless steel table ($800), add a chamber vacuum sealer ($800), vertical sausage stuffer ($250), dedicated refrigerator ($400), electric meat saw ($600), and higher-quality knives ($400). This setup handles higher volumes and produces professional results.
High-End Setup ($7,000-$10,000+)
Commercial-grade stainless steel equipment, band saw ($1,200-$2,000), walk-in cooler or large reach-in refrigerator ($2,000-$4,000), professional knife collection ($800+), and dedicated dry-aging chamber ($1,500). This is overkill for most home processors unless you are running a small farm-to-table operation or custom processing business.
Common Mistakes to Avoid
Starting with too much equipment: Buy the essentials first, then expand as you identify what you actually need. You do not need a $2,000 band saw if you only process two deer per year.
Skimping on knives: Cheap knives do not hold an edge and make every cut harder and more dangerous. Invest in quality blades — they last decades.
Ignoring temperature control: Meat quality degrades fast above 40°F. If your space cannot stay cold, process in cooler weather or invest in refrigeration.
Poor lighting: Butchering requires precision. Overhead LED shop lights (4,000-5,000 lumens) eliminate shadows and reduce eye strain.
No workflow plan: Randomly placing equipment creates inefficiency and contamination risks. Map your workflow before you set up.
Legal and Regulatory Considerations
If you are processing meat for personal consumption from animals you own or purchase, you generally operate under "custom exempt" rules (USDA) or equivalent state regulations. This means the meat is for your household only — you cannot sell it or give it away as a commercial product.
If you plan to sell meat, you must use a USDA-inspected facility or meet your state's on-farm processing and retail exemptions (which vary widely). Check with your state department of agriculture before processing meat for sale.
Some municipalities have zoning restrictions on home meat processing. Verify local codes before setting up — particularly if you live in a residential neighborhood.
Scaling Up: From Hobby to Business
Many home butcher shops eventually evolve into small processing businesses — custom cutting for local farmers, wild game processing, or farm-to-table meat sales. If you are considering this path:
- Research your state's licensing and inspection requirements (vary dramatically by state)
- Invest in liability insurance
- Formalize your sanitation protocols and keep records
- Budget for commercial-grade equipment and potentially a separate building to meet health department codes
- Connect with local farmers and hunters — word-of-mouth is your best marketing
Final Thoughts
A well-designed home butcher shop gives you complete control over your meat supply — you choose the quality, the cuts, and the aging. You eliminate waste, save money, and develop a skill that connects you directly to your food. Whether you are breaking down a side of beef from a local farm or processing a deer you harvested, a dedicated space makes the work faster, safer, and more enjoyable.
Start simple, master the fundamentals, and expand your setup as your skills and needs grow. Within a season or two, you will wonder how you ever managed without it.
For hands-on techniques to put your new shop to use, explore our other butchering guides:
Frequently Asked Questions
How much space do I need for a home butcher shop?
A minimum of 6 × 8 feet (48 square feet) works for occasional processing of sub-primals and smaller animals. For processing larger animals or higher volumes, aim for 10 × 12 feet (120 square feet) or more to accommodate multiple work zones, hanging space, and comfortable movement.
What is the most important piece of equipment for a home butcher shop?
A solid work surface (butcher block or stainless steel table, minimum 24 × 36 inches) is the foundation. After that, invest in quality knives (breaking knife, boning knife, and saw) and a reliable meat grinder. Everything else can be added gradually as needs develop.
How much does it cost to set up a basic home butcher shop?
A functional basic setup (table, knives, saw, grinder, vacuum sealer, safety gear, and used freezer) costs approximately $1,500-$2,500. Mid-tier setups with better equipment run $3,000-$5,000. Commercial-grade operations can exceed $10,000.
Do I need special permits to butcher meat at home?
For personal consumption of animals you own or purchase, you typically operate under "custom exempt" regulations (USDA) or equivalent state rules — no special permits required. If you plan to sell meat, you must use USDA-inspected facilities or meet state-specific exemptions. Always check local zoning codes and state regulations before setting up.
What temperature should a home butcher shop be?
Ideal meat processing happens between 34-40°F. This temperature range keeps meat safe, maintains quality, and makes cutting easier (meat firms up when cold). If your space cannot stay this cold naturally, process during cooler months or add supplemental refrigeration.
Can I butcher meat in my kitchen instead of a dedicated space?
You can process small amounts (sub-primals, whole chickens) in a kitchen, but it is inefficient and unsanitary for larger volumes. Blood, fat, and bone fragments contaminate kitchen surfaces. A dedicated space keeps processing separate from food preparation and provides proper workspace, drainage, and tool storage.
How long does it take to set up a home butcher shop?
Physical setup (installing table, hanging hooks, organizing tools) takes 1-2 days. Budget additional time for equipment research, purchasing, and learning proper techniques. Most people are fully operational within 2-4 weeks from start to finish.
What knives do I need for a home butcher shop?
Start with three essential knives: a breaking knife (8-10 inch cimeter) for separating primals and portioning large cuts, a boning knife (5-6 inch, flexible or semi-flex) for detail work and removing silverskin, and a butcher's saw for cutting through bone. Add a honing steel for maintaining edges between sharpenings.
Is a meat grinder necessary for home butchering?
If you process whole animals or large primals, yes — you will accumulate significant trim that is perfect for grinding. An electric grinder (1/2 to 1 HP) turns what would be waste into high-quality ground meat. If you only buy and cut steaks from sub-primals, a grinder is optional.
How do I keep my home butcher shop clean and sanitary?
Establish a routine: sanitize all surfaces and tools before starting, wipe down work areas with sanitizing solution between different cuts, wash all tools with hot soapy water after use, and mop floors with sanitizer at the end of each session. Keep separate zones for processing and cleaning to prevent cross-contamination.
More Expert Guides
How to Wrap and Package Meat Like a Professional Butcher
Proper meat wrapping is just as important as proper cutting. A perfectly trimmed ribeye or pork chop loses quality fast if wrapped poorly. After three decades wrapping thousands of pounds of meat, I can tell you: technique matters more than materials.
10 min readHow to Choose a Meat Cleaver: Weight, Steel, and What Actually Matters
Buying your first meat cleaver shouldn't be complicated, but the market is full of confusing options. After three decades using every type of cleaver imaginable, I can tell you what actually matters—and what's just marketing. This guide will save you from expensive mistakes.
12 min readThe Butcher's Cleaver: Complete Guide to the Heavy Rectangular Knife
The butcher's cleaver—that heavy, rectangular blade—is one of the most misunderstood tools in meat cutting. After decades in the trade, I've learned it's not a crude hacking tool, but a precision instrument for controlled bone cutting. This guide covers everything from cleaver anatomy to advanced techniques.